Hot Pink Vegetable Summer Rolls

SONY DSC

This past weekend, I went to a sushi place with a friend where you fill out one of those little paper sheets… I bubbled the wrong one and I didn’t get to eat what I wanted! Which concerns me because I really wanted a cucumber roll and because I just finished a bubble-in bar exam…

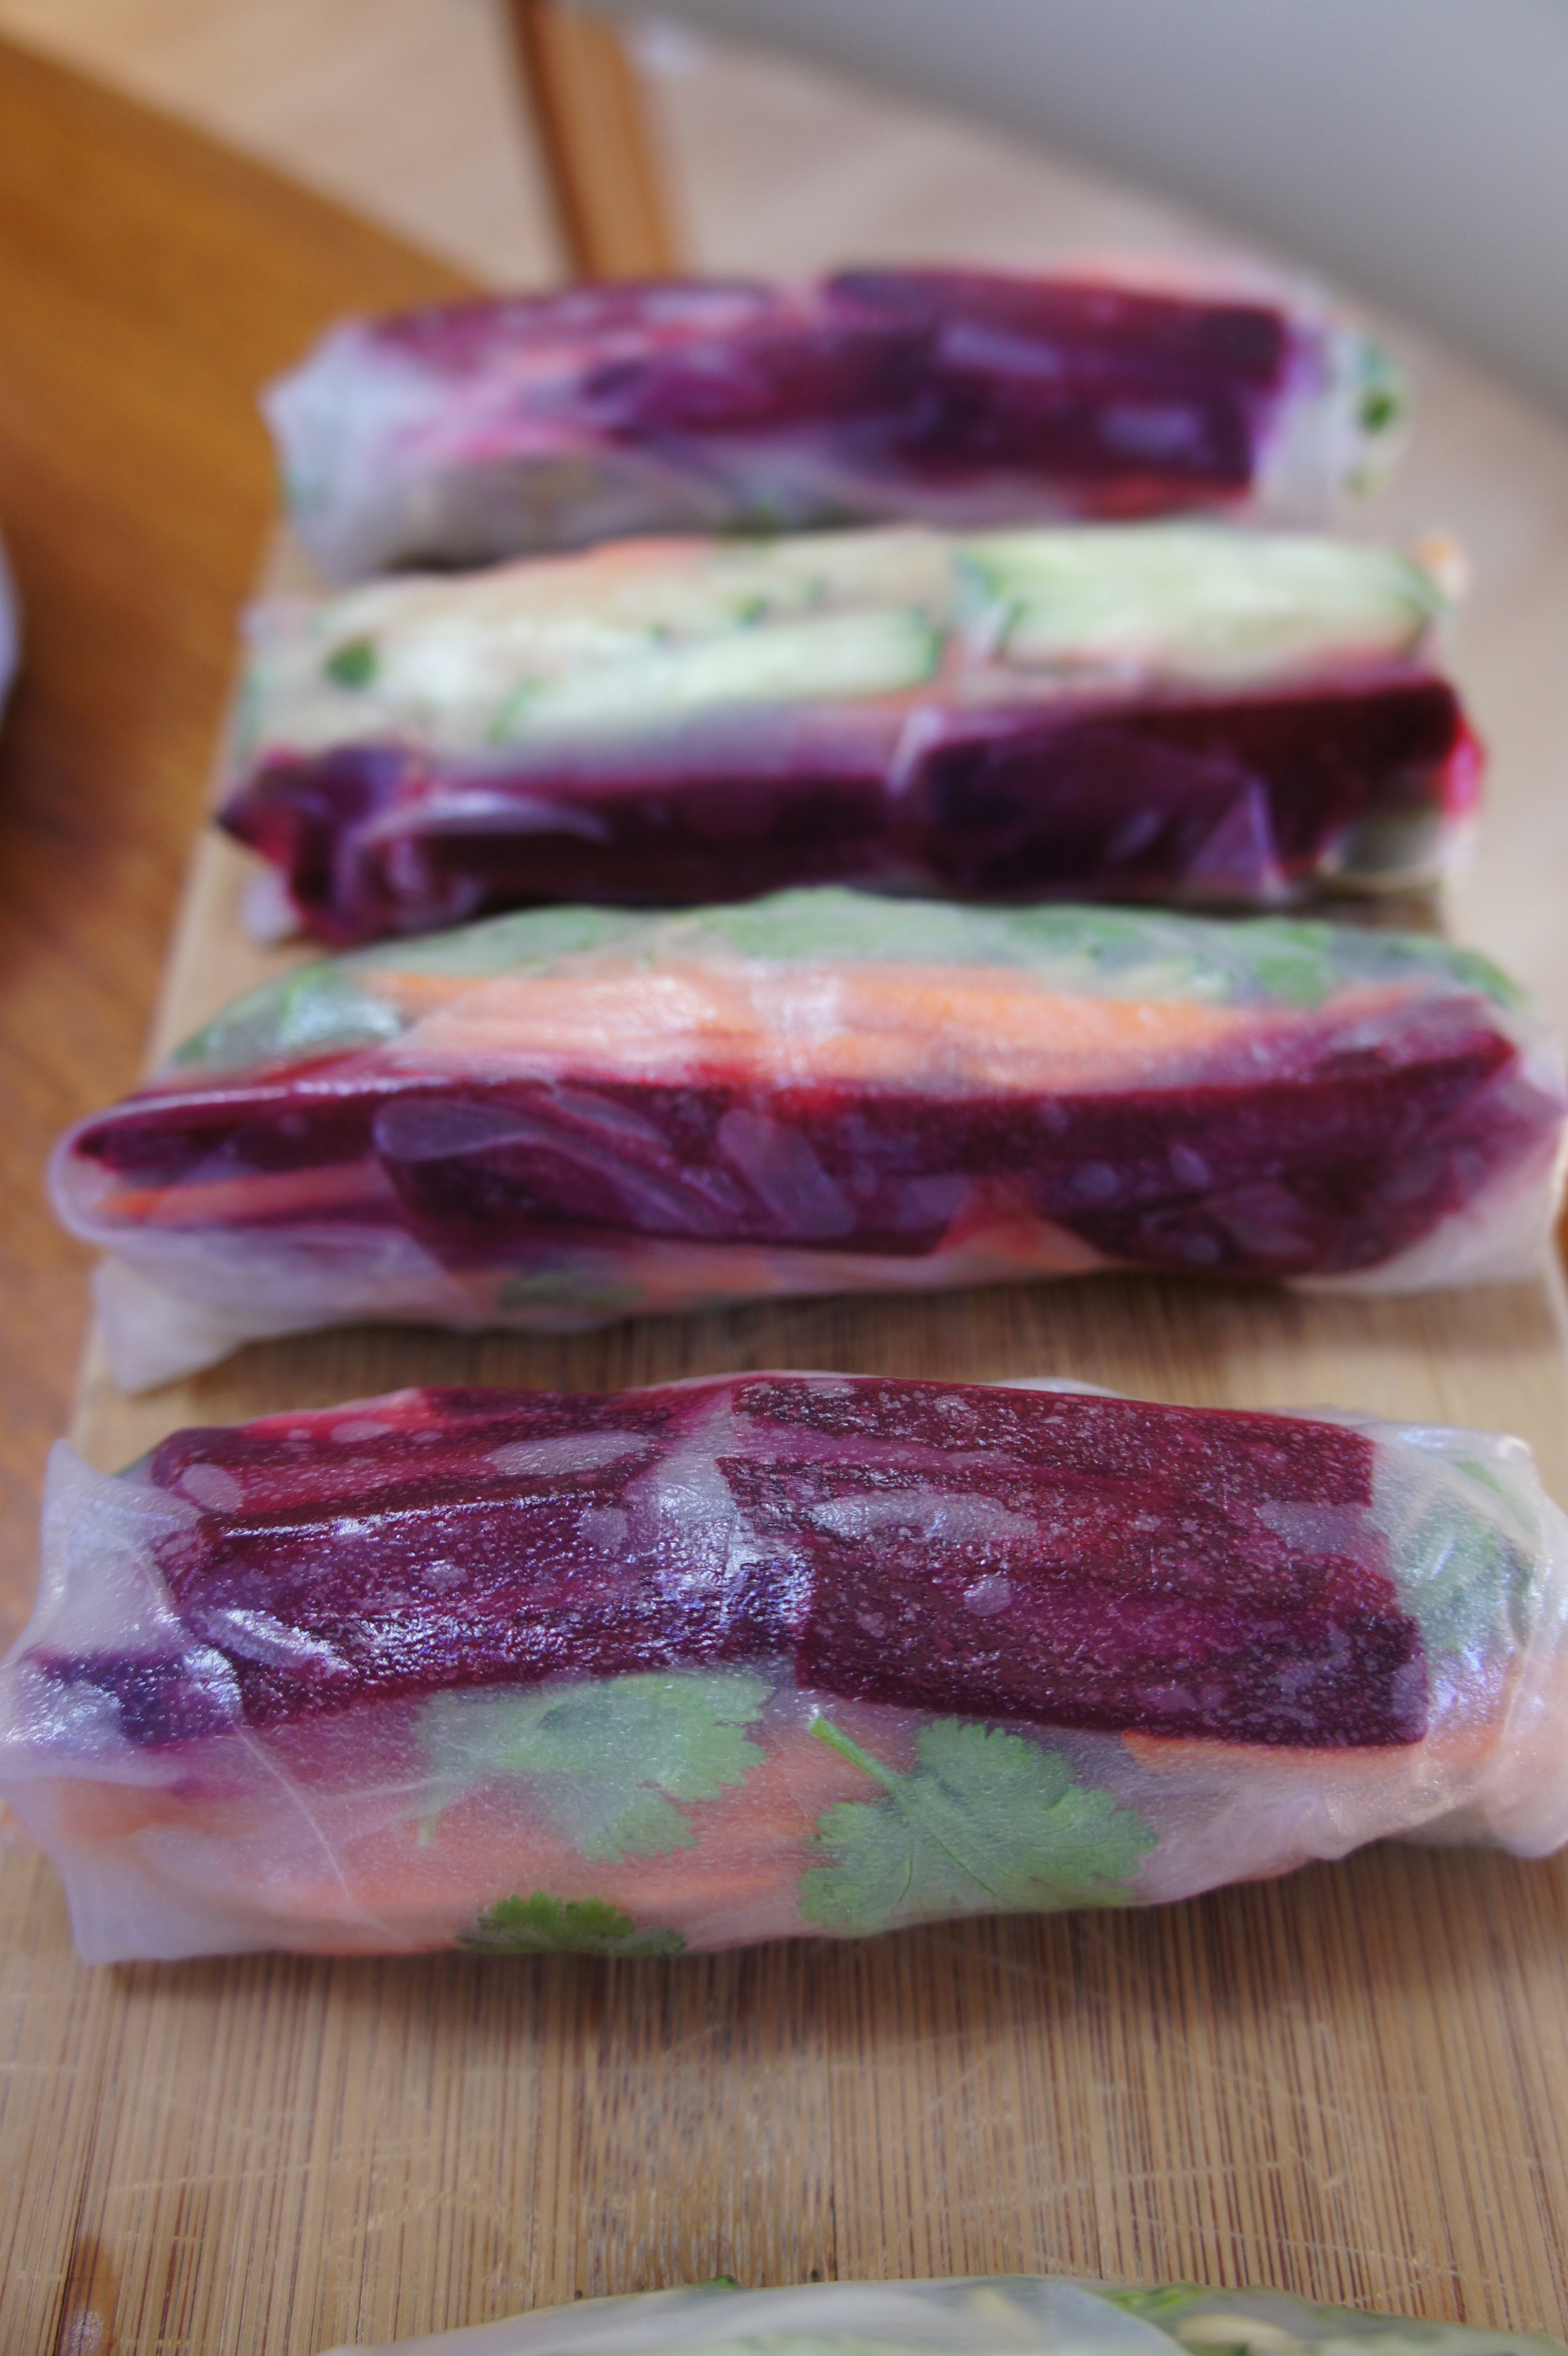
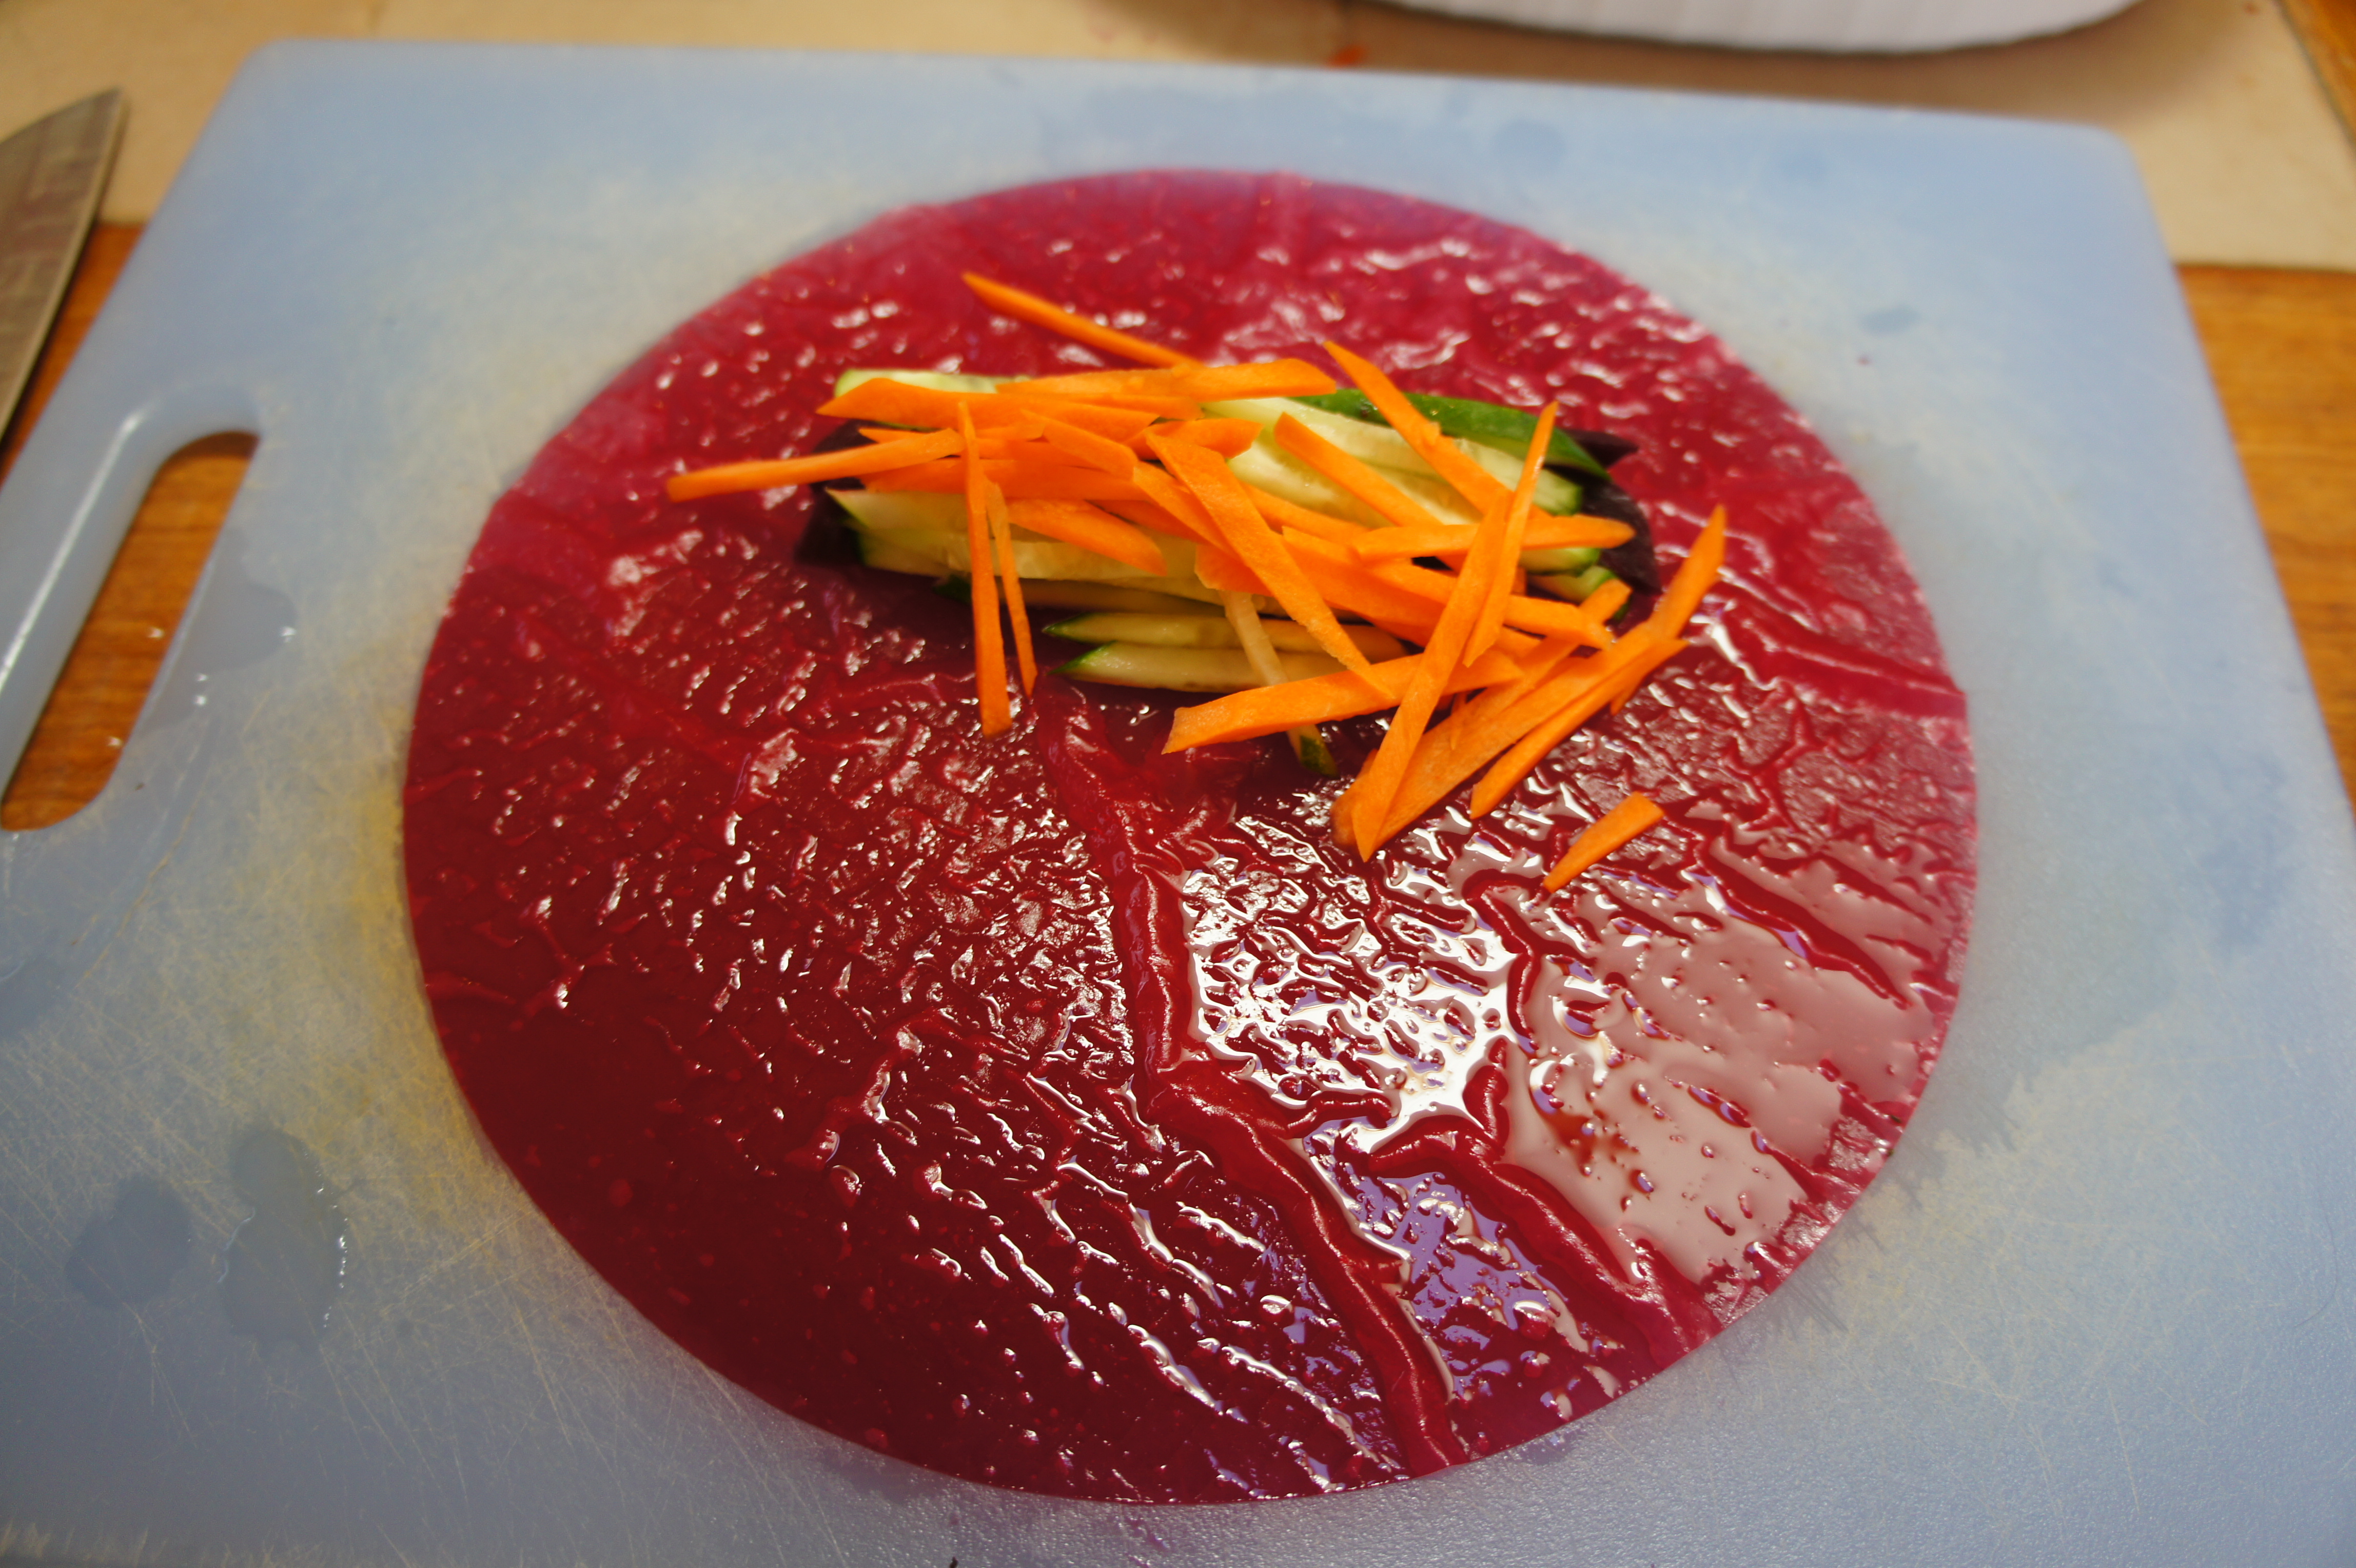
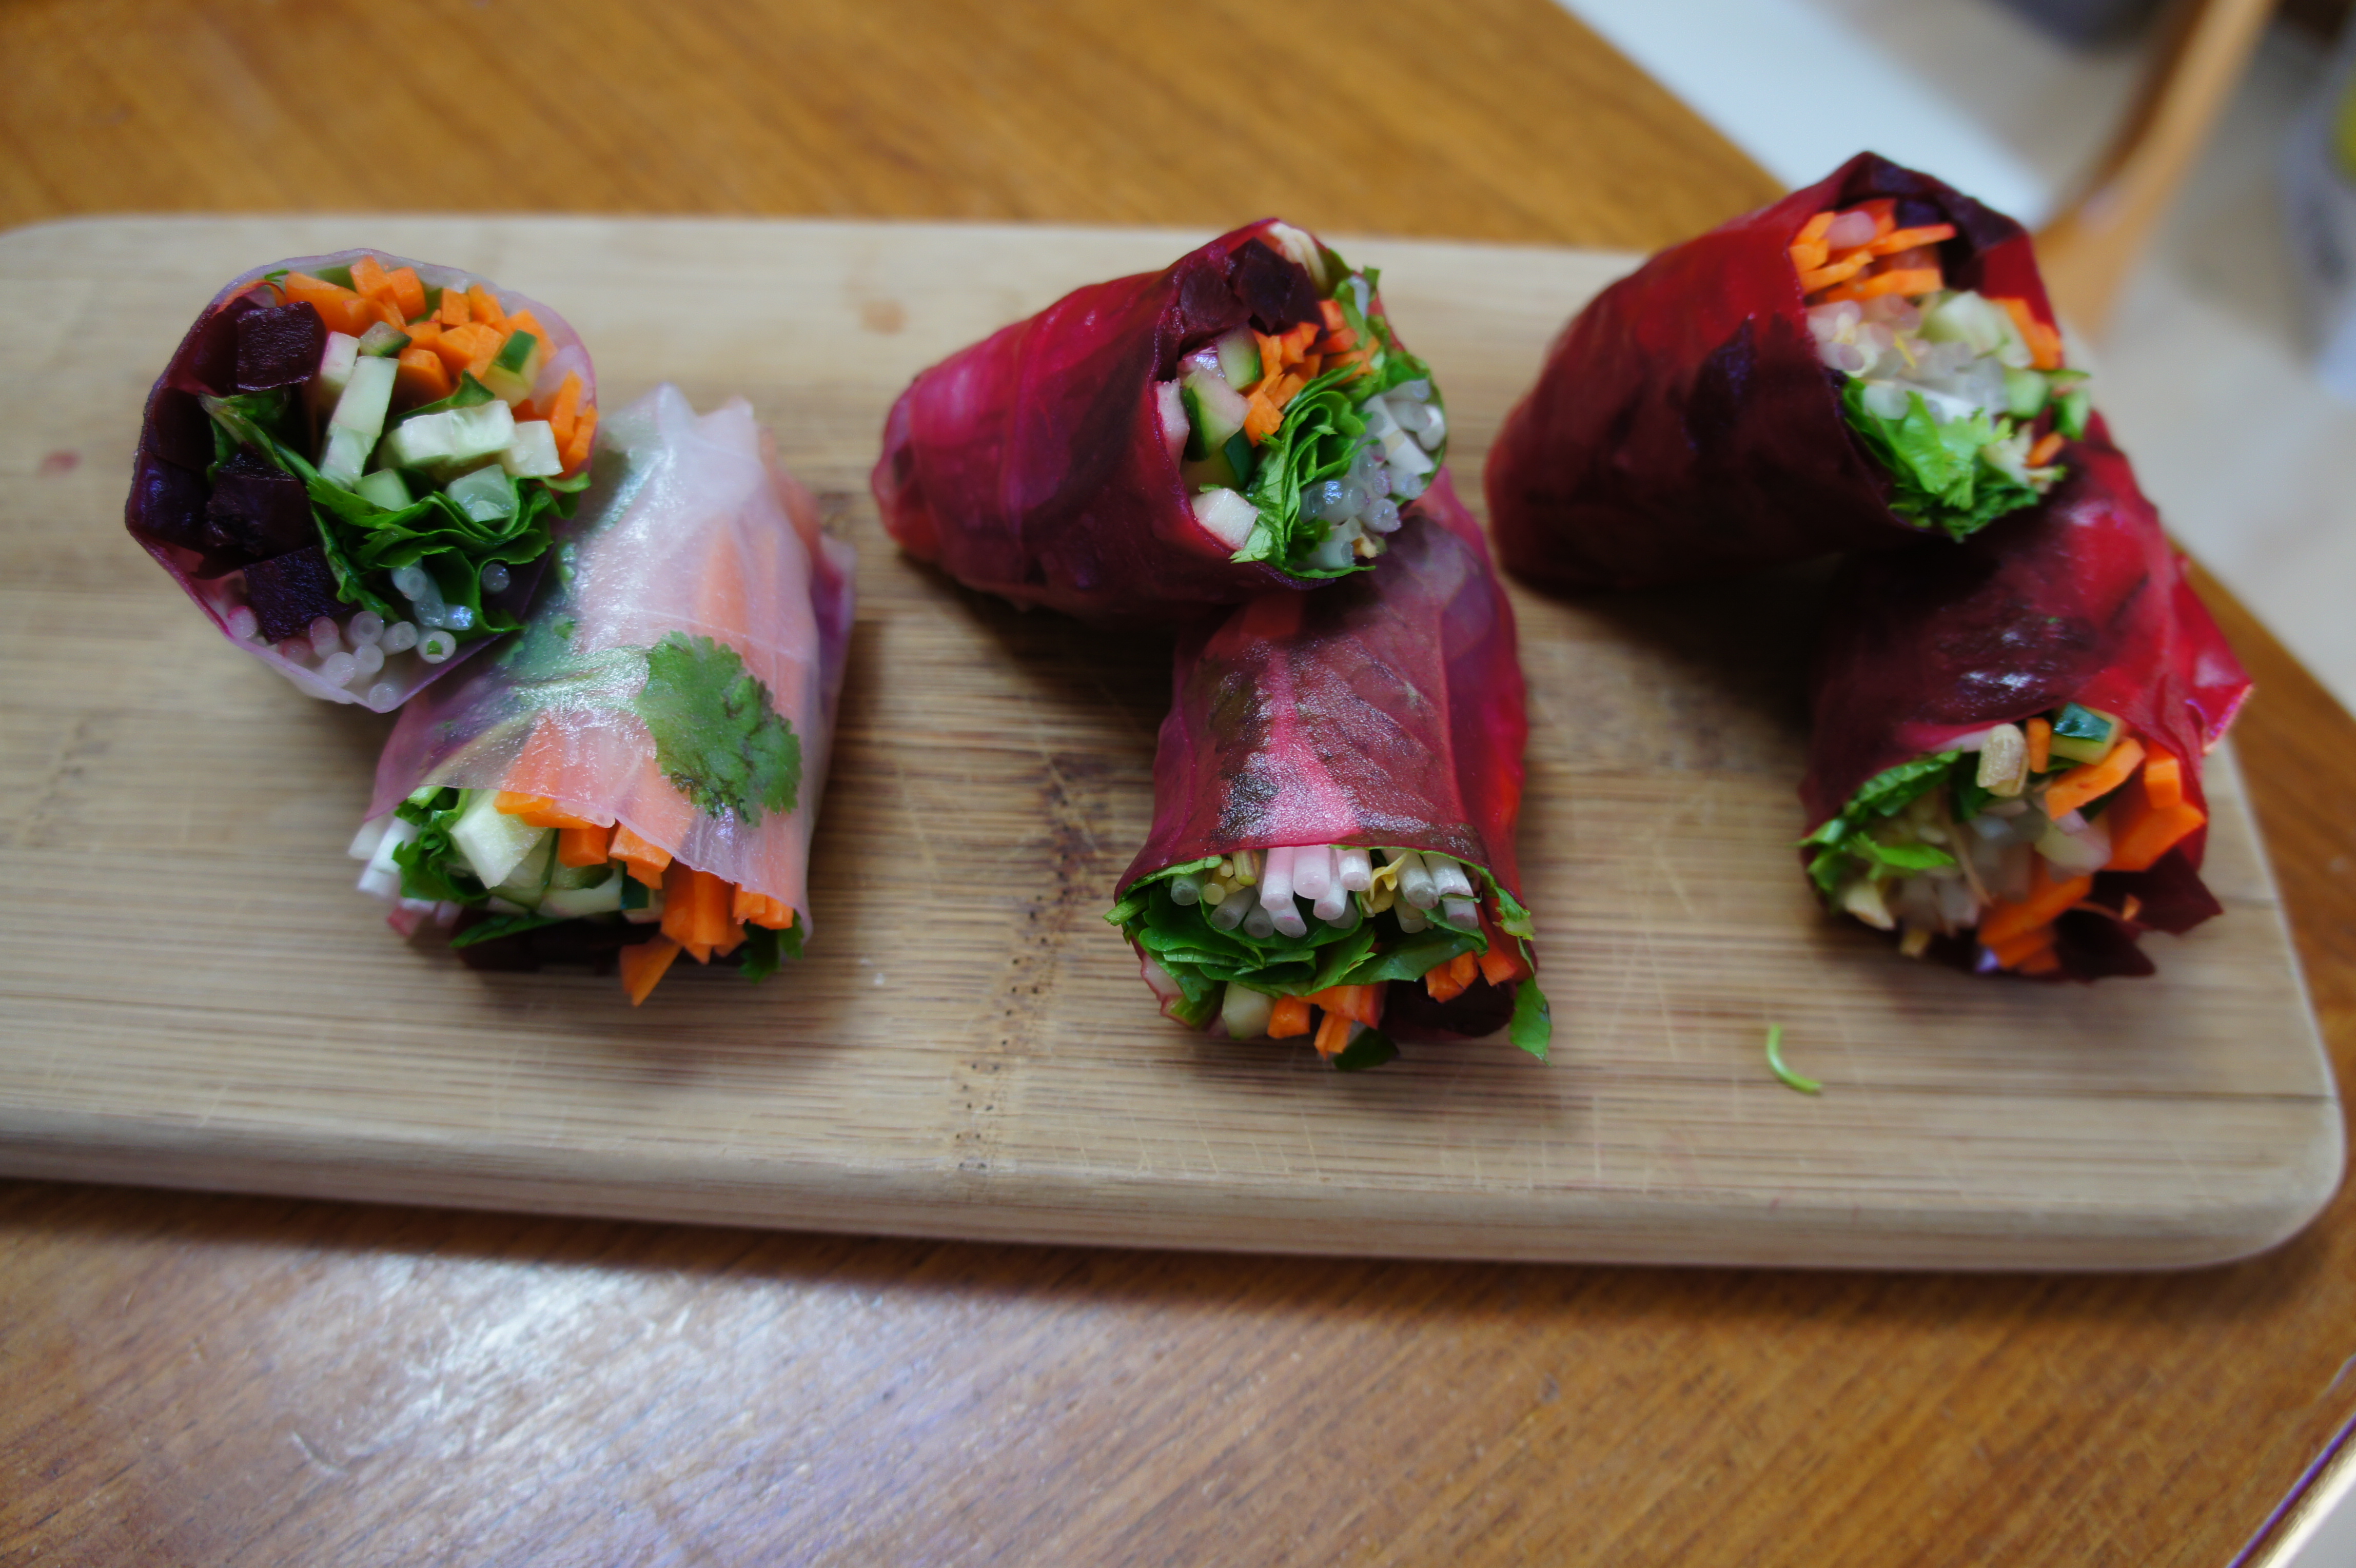
Regardless, I had vegetable rolls on the brain so I whipped these up. I had a stroke of genius when I saw the bright red poaching liquid, and steeped my rice paper in the colored water to get these beautiful hot pink wrapped summer rolls. I experimented by brushing them wrappers with the poaching liquid instead of steeping them. The difference is the intensity of the color of the wrapper. If you prefer the darker wrapper, steep the wrappers.

I imagine that making these in all sorts of different colors for a themed party would be fun, or perhaps if you have children making these brightly colored rolls together might encourage them to consume more vegetables.

Party, children, or not… these are delicious and packed with fresh vegetables to get you ramped up for the spring!

Hot Pink Vegetable Summer Rolls (Kaprise Kitchen)

  • 1 pound of beets
  • 7 carrots
  • 4 kirby cucumbers
  • 1 bunch of cilantro
  • 1 bunch of mint
  • 1/2 pound of mung bean sprouts
  • rice paper wrappers
  1. Wash, peel, and quarter the beets. In a saucepan, cover the beets with water and boil with a pinch of salt for 30 minutes, or until tender.
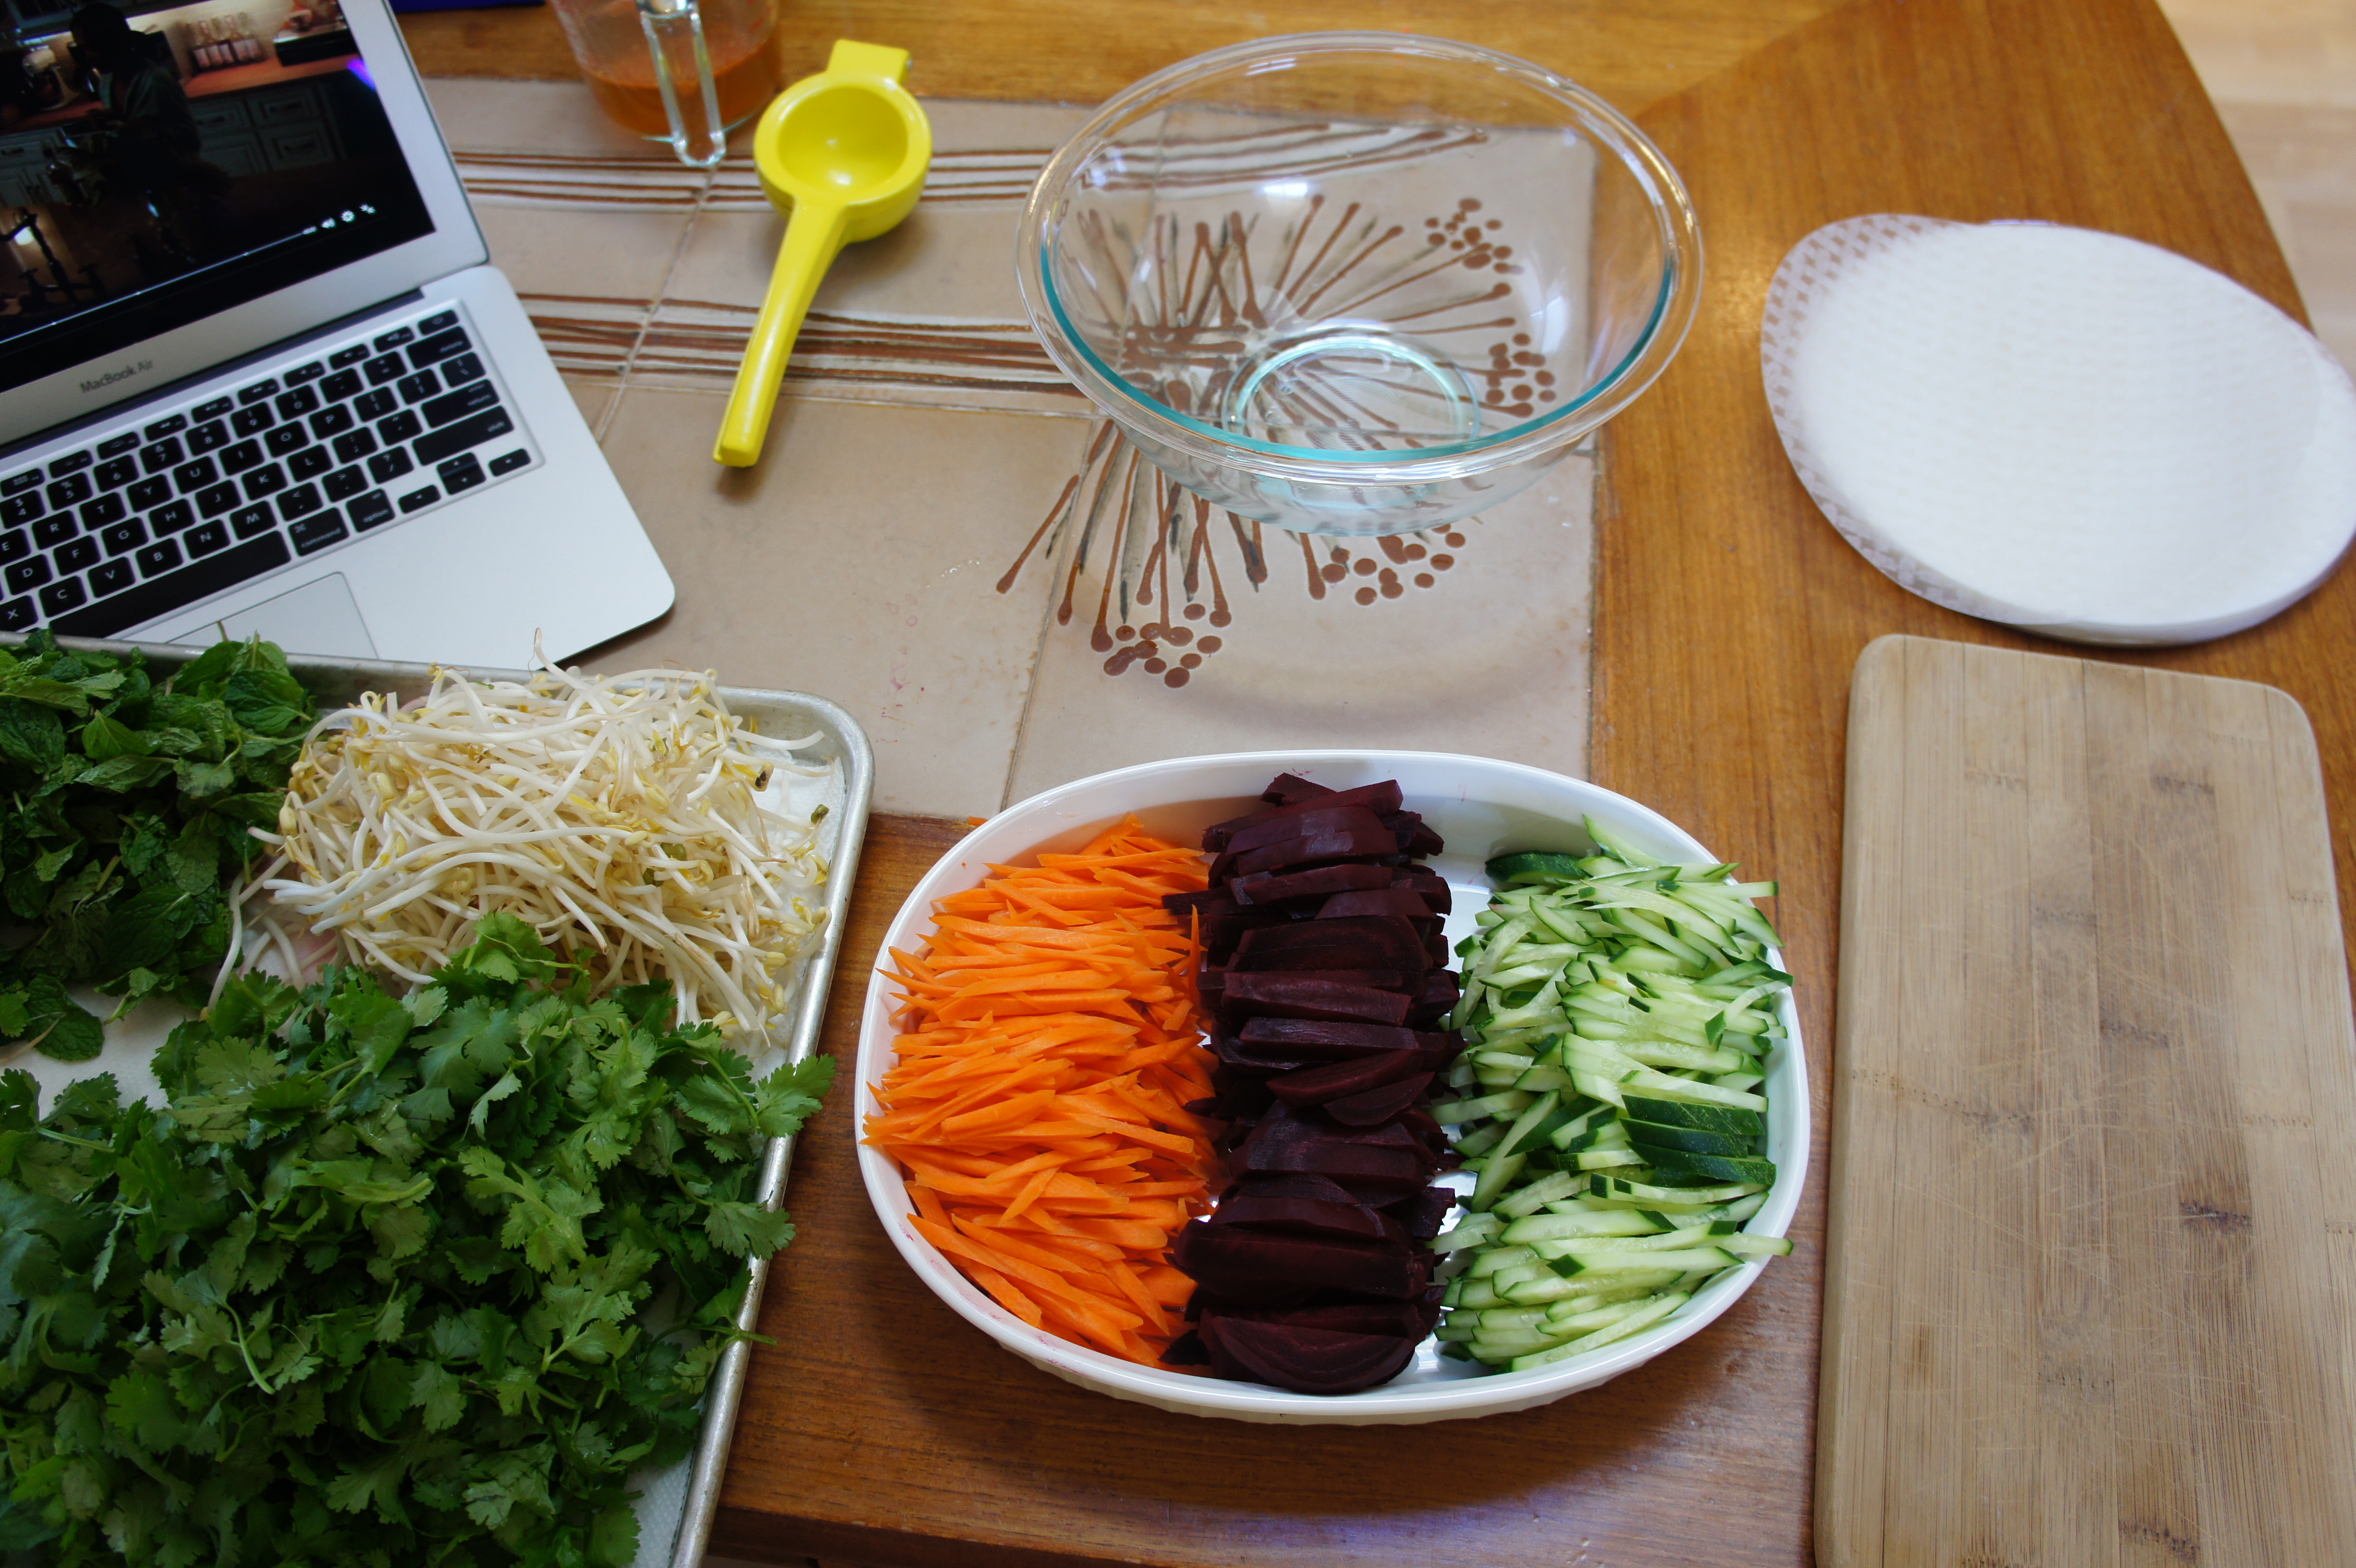
  2. While your beets boil, wash all of your vegetables and let them drain on a paper towel covered baking sheet (or clean dish towel, if you are more environmentally friendly than I).
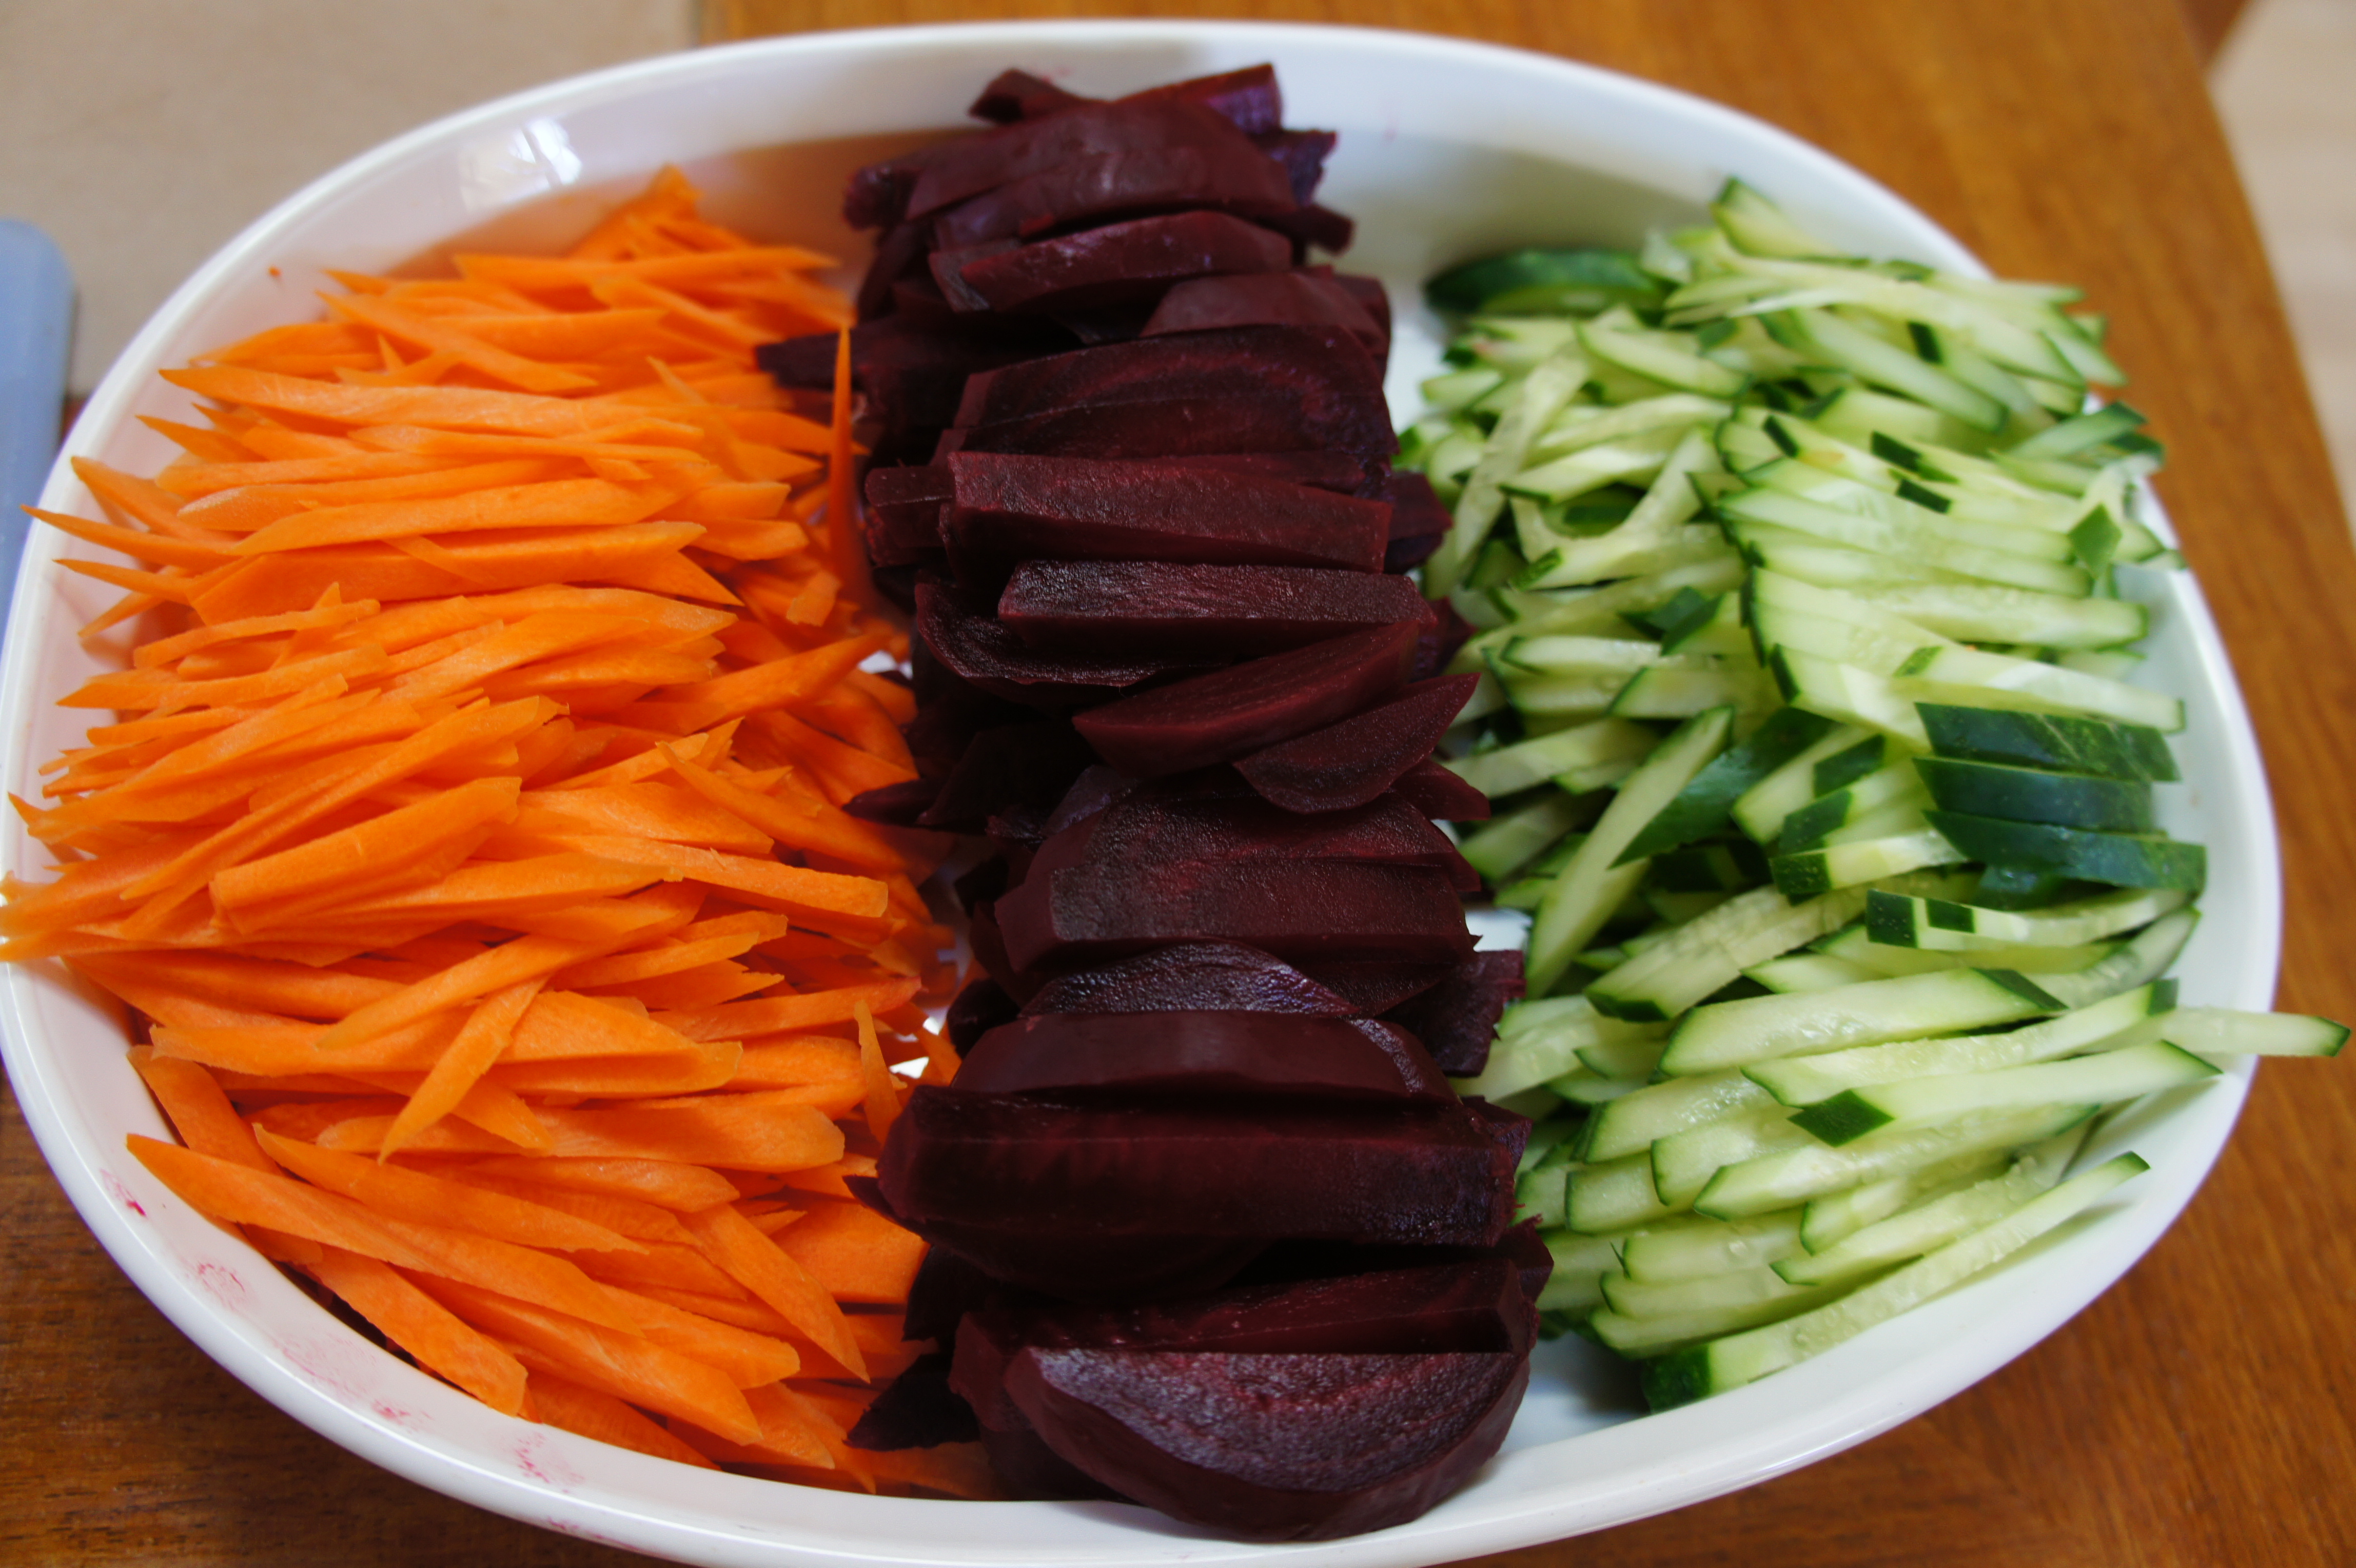
  3. Cut the cucumber and carrots into batonnets
  4. Once the beets have been boiled and cooled a bit, also cut those into batonnets, reserving the boiling liquid.
  5. In a large bowl, pour the warm beet liquid (or simply warm water for non-colored summer rolls). Make sure your water isn’t too hot or the wrappers will get too soft and rip.
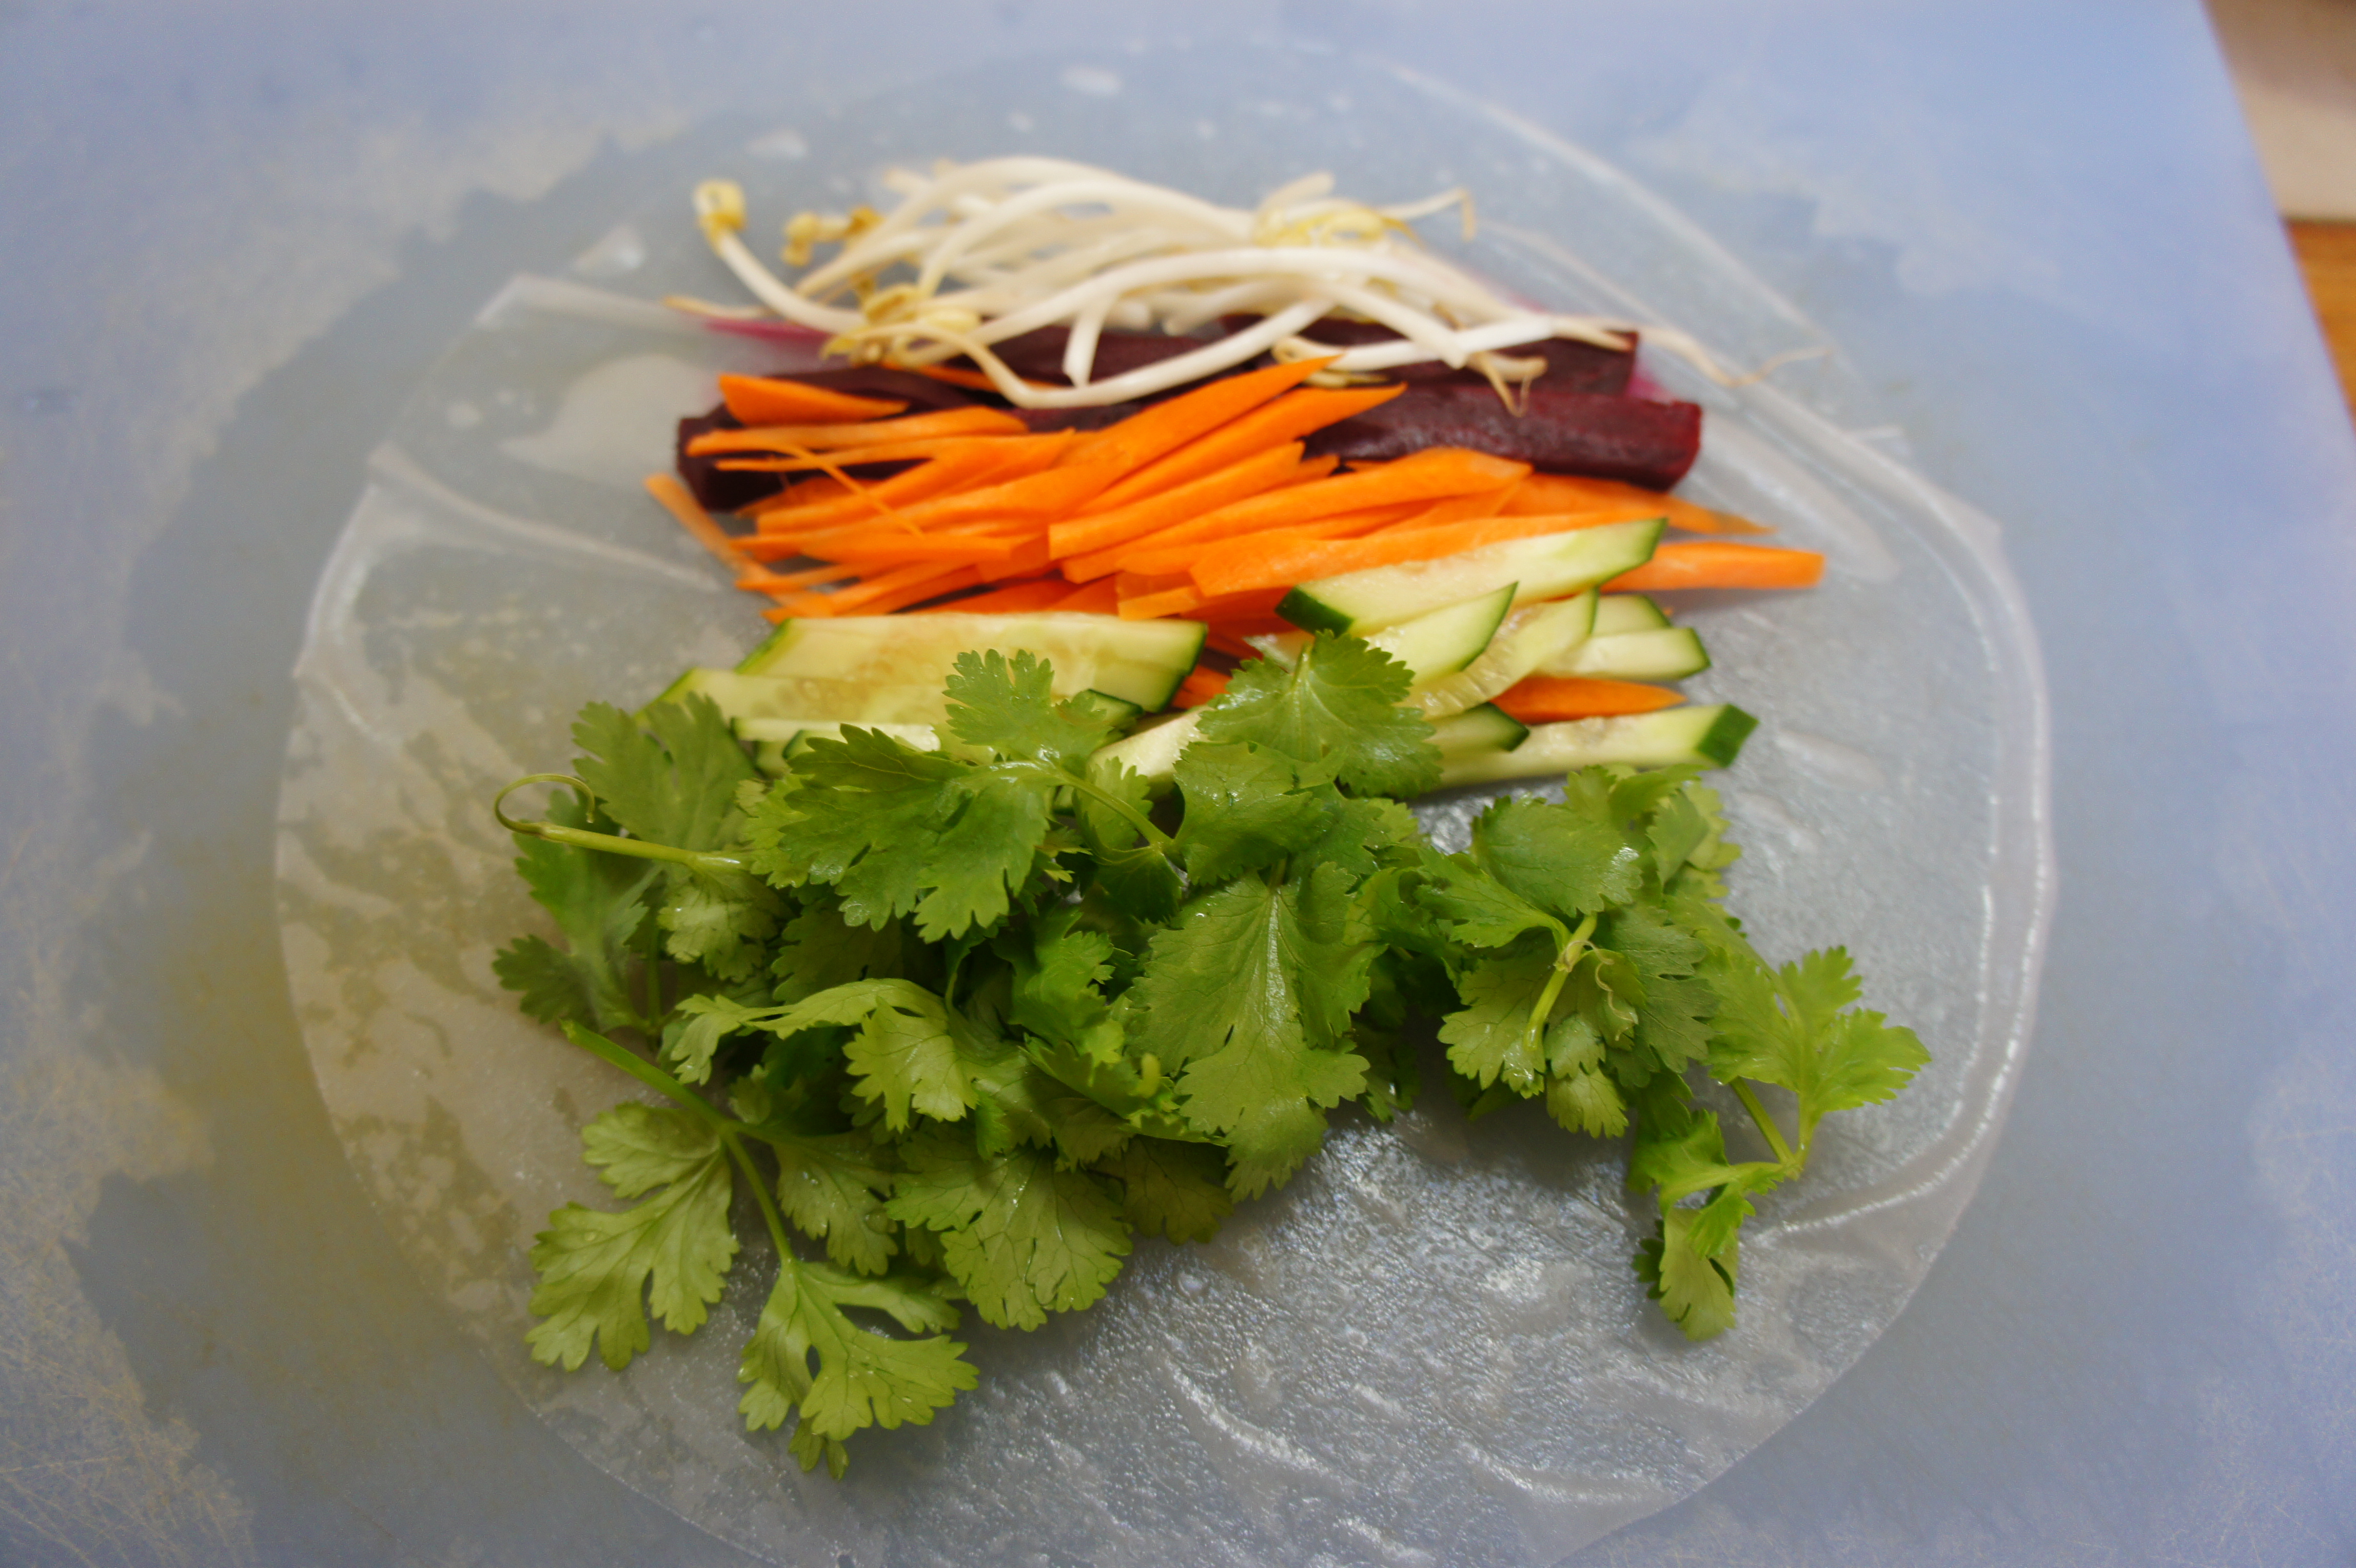
  6. Gently dip the wrappers into the water, making sure to coat both sides with the water. The wrapper should absorb some water, but still be firm. The wrapper will continue to absorb water as you work, and soften. Remember, you can always dab a little more water if your wrapper is too sticky or too firm.
  7. Place the wrapper on a cutting board (or smooth surface), add filling, roll… and enjoy!!


SONY DSC

SONY DSC

SONY DSC

SONY DSC

SONY DSC

SONY DSC

SONY DSC

SONY DSC

SONY DSC

SONY DSC


Crispy Fried Rice Cakes (Fried Dduk)

Hello friends…

So. I love dduk. Not quack quack duck, but chewy rice cake dduk. I googled the word “dduk” but there wasn’t much information. So then I tried googling “tteok” which got many more hits… see what I mean about the spelling of Korean stuff??

Anyway, there are lots of recipes on how to make Korean dishes with dduk/tteok, but I wanted to share how I like to eat mine. I made this recipe up a few years ago when I had some leftovers, and have continued to make it since. Dduk is normally only good on the day that it is made, and once in the refrigerator it becomes really hard.

Crispy Fried Dduk (Kaprise Kitchen Original)

  • Several pieces of plain dduk, cut into pieces (Make sure your pieces are dry, any moisture will cause the oil to splutter)
  • 1 tablespoon of olive oil
  • 1 1/2 teaspoon of sesame oil
  • 1 teaspoon of soy sauce
  • 1/2 teaspoon of sugar
  1. In a non-stick skillet, heat the olive oil over medium heat
  2. One the oil is heated, gently slide the dduk into the pan, be sure to leave a little space between the pieces of dduk so they don’t stick.
  3. Cook until the dduk is crispy and golden, flip to the other side and cook until crisp and golden (I fry mine for about 5 minutes on each side, but keep an eye on your so it doesn’t burn)
  4. Remove the pan from heat
  5. Drizzle the sesame oil and soy sauce over the crisped dduk as you swirl the pan, coating the pieces in the sesame and soy sauce. The combination will sizzle so move quickly.
  6. Sprinkle the sugar over the coated pieces of dduk
  7. Plate and eat!


Notes:

  • There are many varieties of Korean rice cakes… endless in fact. However, this recipe works best with the plain, white, string dduk. It is normally sold in Korean grocery stores in little styrofoam pans. I normally used left over dduk that has been refrigerated, so the dduk is hard. This helps the dduk crisp in the oil as you cook it. 
  • If you are unfamiliar with dduk, you can visit Maangachi to learn more about dduk. I believe that website uses the “tteok” spelling, but here are some links to the pages I thought were helpful: the dduk I used, how to make dduk-bokki, and how to make plain white dduk.

SONY DSC

SONY DSC

SONY DSC

SONY DSC

Have you ever tried dduk? Also, any miscellaneous questions about dduk, please let me know! I know it is still pretty novel in the States.

Easy Peasy Zucchini and Feta Squares

This is a tart of sorts… it’s a pie? I don’t know what I should call it, but I needed something to help me procrastinate my little heart out. I’m having the worst time focusing on finals this year. I’m good at waking up, but the only thing getting me out of bed is dehydration this semester. This is the first semester I have been single since starting law school, so I have been getting more work done (no pesky boys clamoring for my time), but I’ve also been distracted. I’m thinking about running and getting back into top running form. I’m thinking about where to jet off too… I just want to be on the move.

This morning, my neighbor invited me to run with her running group. I went along and it was phenomenal. I ran 10 miles with the group, paced at about 9:30/mile. It was wonderful. I was back in my apartment by 9:00am. But, the only thing I have been having problems with is splitting headaches after my long runs. I don’t know if anyone else has this problem… but about an hour after finishing a longer (more than 7 miles) run, I’m sitting with my head in my hands with a horrible headache. So instead of hitting the library as planned, I was zoinked out on my bed sleeping off my headache. Maybe it’s the water. Or maybe, like my neighbor suggested, it’s because I run without water and without any nutrition. I just go. Hmm.

This tart is super easy. Five ingredients, thirty minutes, and delicious. You can use any variation of vegetables. I imagine it’s delicious with some squash, maybe thin eggplant slices? Or even tomatoes. Or potatoes… the possibilities are endless.

Easy Peasy Zucchini and Feta Squares (the result of Kaprise Kitchen procrastination)

  • 1 zucchini, thinly sliced. If you have a mandoline (I do not) this would be supremely easy
  • 1 small onion, thinly sliced
  • 8-10 sheets of phyllo dough (I used 8 out of a package, but feel free to use whatever thickness or variation)
  • 4 oz of feta cheese, crumbled finely
  • 3 tablespoons of butter, melted
  1. Place the phyllo dough on a cookie sheet, brushing the bottom of the first sheet with butter, and brushing alternating layers lightly with butter.
  2. Spread crumbled feta cheese once inch from the sides of the phyllo dough.
  3. Arrange the zucchini and onion slices on top of the feta cheese
  4. Fold the sides of the dough up to cover a little bit of the zucchini and onion.
  5. Brush with butter
  6. Bake at 350 degrees for 20 minutes, or until golden brown

Guilty

In law school, I think a lot about guilt. We learn and analyze guilt on so many different levels, and think about proving guilt, disproving guilt, and the nature of guilt. Law school has changed the way I think of people, maybe it’s the cynic in me, but I see things in terms of lawsuits, guilt, and how solid my arguments to nail you to the proverbial wall. I judge things based on the gravity of the information I have in my possession… and I research to further analyze whether my judgment is sound. I judge. I judge a lot.

The other day, someone asked me, “What are your guilty pleasures?” And I thought… how could something that is pleasurable be guilty? Is it wrong? Are you doing something morally questionable? Why does something that make you happy a guilty thing?  Because in my mind – pleasure is good. Feeling good is good. So… what is guilty about it? A lot of people talk about food like that… chocolate is their guilty pleasure… or cupcakes. Or ribs. But to me? Food is never guilty or bad or regrettable. I believe in eating all of the wonderful things in the world and enjoying every single bite… and then if you are worried about the calories? You go run it off… I don’t believe in low calorie. I don’t believe in fat-free. I don’t believe in sugar free. I don’t believe in skipping meals. I don’t believe in dieting to lose weight. I believe in loading up on all of the good things in life. Food, exercise, and laughs.

Anyway, a few years back, my sister and I saw some stellar reviews for an arepas bar in NYC. I was working in the Financial District at the time, so my sister collected by father and me from work and we went to the arepas bar. It was delicious. Granted, my dignified father, sister, and I were squished in a little hole in the wall restaurant table nailed against the wall… but the food was delicious. And I was instantly infatuated with the idea of making my own arepas. After doing my research, I bought a bag of masarepa flour and fixings. My family and I ate arepas for months afterward… it was one of those treats we would gather around the table to eat. It was fun. We’d hollow out the pillows of arepas and load them up with cheese, beans, and meat. It was messy, and inevitably the munchkin would stick her head through our arms and try to lick the table. It was so much fun, and so delicious.

So, now that I live alone and in a little apartment, arepas are few and far between. The frying oil permeates my apartment, and I dislike sitting eating what I consider family food by myself. The arepas we ate at the arepas bar were thick, and hollowed out to make room for fillings, but I make mine thin and crisp. It eliminates the hollowing out step, and then I top the arepas with toppings like canapes. I think this would be an amazing appetizer for a dinner party, the crisp little arepas are just phenomenal with melted cheese and beans. I think any topping would be phenomenal. Maybe some pulled pork, or chicken to make them heartier.

Arepas (Kaprise Kitchen Style)

  • 1 cup of masarepa flour (this is different than masa harina!)
  • 1 cup of boiling water
  • 1/2 teaspoon of salt
  • 1/2 cup of black beans
  • 1/2 cup of salsa (or homemade pico de gallo)
  • 1/2 cup of shredded cheese (any kind! I used a pre-shredded mix from the grocery)
  • hot sauce (Tabasco, Cholula, whatever floats your boat)
  • 1/2 -1 cup of canola oil
  1. In a bowl, stir together masarepa and water until the water is absorbed. Cover the mixture for 10 minutes
  2. After the dough has rested a bit, wet your hands and form the dough into 2 tablespoon patties. Flatten them to about 1/4 inch thick. I used about 1 1/2 tablespoons per circle to make smaller and cuter arepas.
  3. Heat 1/2 cup of oil in a skillet
  4. Fry the arepas in the oil until golden, about 4 minutes per side.
  5. Allow the arepas to drain on paper towels, continue to fry the remaining arepas.
  6. Arrange the arepas on a cookie sheet
  7. Top with black beans and cheese
  8. Broil (on high) arepas until the cheese has melted
  9. Top with salsa and serve.
  10. The arepas keep well in the refrigerator (without salsa) for up to 3 days. You can simply reheat in the oven for 10-15 minutes at 400 degrees.

Crispy Falafel

This morning, I had planned on running at 7:00am and then getting to the library just as it was opening. My plans were shot when I woke up this morning to thunderclaps and my poor little munchkin huddled on the covers shuddering. The poor thing is terrified of thunder and shakes like a little leaf. So I slept in and went for my run at noon when the thunder had passed and my munchkin was no longer trembling.

I normally don’t run when it’s rainy outside or water is on the ground because I don’t want to fall. I’ve broken and sprained more than my fair share of bones and joints, and I know the waiting for everything to knit back up will drive me insane. Everyone wants me to run, because I get crazy without it! Anyway, this was my first training run since April 3 (when I ran the Cherry Blossom 10mi), and as I was hitting mile 6, the rain started again. It was glorious. I used to love running in the rain, because everything seems to wash away and the world just seems cleaner. I loved the smell of the cold rain hitting the hot pavement and the precipitation-disliking people scuttling inside. My run was like that today… no one else except me and my feet.

I felt so good, I registered for another half marathon in 21 days! Because I can use the extra race and motivation to get prepared. I’m running my first WHOLE 26.2 miles in July, and the mileage scares me just a bit. I need every minute I can get to get ready. I just want to finish it, but I also want to have a solid time too!

Anyway, since it is finals, I haven’t really been eating anything but the quickest cheese and black bean wraps. I’m craving good vegetables, so on a study break day, I’ll run over to a good grocery and load up.  I read a while back that chickpeas are good for you, so I made falafel. Because, no matter what it is… it always tastes better crispy!!

Crispy Falafel (Kaprise Kitchen Style)

  • 15 oz of chickpeas, drained (or reconstituted chickpeas, about a cup and a half) and then crushed
  • 1 onion, minced finely
  • 2 carrots, minced finely
  • 2 cloves of garlic, minced finely
  • 3 tablespoons of fresh basil, chiffonade
  •  1/2 lemon, juiced
  • 1 egg,whisked
  • 2-3 tablespoons of flour
  • 1/4 cup of oil
  1. In a large bowl, crush chickpeas with a fork. I like mine just a bit chunky, so I don’t go crazy. If you like a smoother texture, feel free to use a food processor.
  2. Stir in onion, carrots, garlic, basil and lemon juice.
  3. Stir in egg, and depending on the texture of the mixture, add 2-3 tablespoons of flour.
  4. The batter should resemble a loose cookie dough – firm enough to be shaped into patties, but loose enough to flatten in a pan.
  5. In a pan, heat the oil.
  6. Form the dough into 2 tablespoon patties. Fry gently, about 4-5 minutes per side until firm.
  7. Serve over greens with a bit of tahini.

Note: I think the next time I make this, I’ll add more vegetables. Maybe a bit of kale or spinach to pack more nutrient rich vegetables into the patties. 🙂

Peanut Sesame Noodles

I remember I loved those Chinese takeout noodles that were just sticky with peanut butter. There was something just so good about those noodles…

Since becoming a pseudo adult (I mean really, I just feel like adult sounds so… blah! and I’m not blah!), I’ve been cooking more and more. Plus, now I have healthy neurosis about germs and dirty hands, and then my weird love affair with bleaching things… but besides the point. And, I live in Baltimore. KFC and McDonald’s takes 20 minutes, and it’s already made!! So I cook for myself. A lot of people say that cooking for one is sad… is it? I would rather make my food the way I want it and not have to consider anyone else. (I had a boyfriend who used to liberally salt and pepper anything I made before even taking a single bite… and that pissed me off.)

This recipe is just enough for one serving of noodles, with just a bit of sauce to spare for dipping veggies in or to refrigerate until the next time you need some quick noodles. These noodles take me 20 minutes from when I put the water up to when I’m done eating. Super quick!

Peanut Sesame Noodles (liberally adapted from New York Times, April 2007)

  • 1 serving of noodles (I normally use buckwheat soba noodles, but angel hair, egg noodles, or whatever fits your fancy would be fine too)
  • 1 tablespoon of sesame oil
  • 1 1/2 tablespoon of soy sauce
  • 1 tablespoon of rice vinegar (I have used white vinegar and it tastes just fine)
  • 1 tablespoon of sesame paste (I used tahini)
  • 1 tablespoon of chunky peanut butter
  • 1/2 teaspoon of chopped garlic
  • 1 pinch of sugar
  • 1 pinch of ginger (if you have fresh ginger, just a quick swipe on a microplane should do it)
  • 1 teaspoon of chili paste (I have the Korea kind – go-chu-jjang. But you can omit this, or substitute red pepper flakes for the spice)
  • Sliced vegetables and a bit of salad (I use cucumber, tomato and a bit of arugula)
  1. Boil a pot of water and add the noodles. In the mean time – make the sauce
  2. In a small, microwave-proof bowl stir all of the ingredients (minus the veggies) together.
  3. Microwave for 30 seconds and stir until smooth
  4. Once the noodles are cooked – drain immediately and toss with 3 tablespoons of the sauce (or you get the amount of sauce you want on the noodles).
  5. Add veggies and eat!

(Note: These noodles do not taste good cold, so you are best making just enough for your meal. Save the sauce in the fridge for next time, just microwave for 30 seconds before tossing with the fresh noodles)

Zucchini Fritters

When I was a kid, my mother kept a garden. We grew cherry tomatoes, green beans, zucchini, and a bunch of other vegetables. And even though I was a picky kid, I would run out the door and stand amongst all of the plants and pick the vegetables off the stems to my hearts content. (I’ve always had a thing for picking vegetables and fruit… I like it!). I would eat the cherry tomatoes by the handful, smelling their wonderful green smell. I loved the green beans raw, and would often eat them all before I even got to the kitchen. The zucchini was something I couldn’t just munch on standing in the garden, but I loved it all the same. My mother would slice the zucchini into thin strips and fry them ever so lightly so that you could have these amazing and crunchy fritters. She made zucchini bread and this amazing Korean side dish (I have to ask her about that…), and all sorts of things with zucchini.

Anyway, in a fit of nostalgia, I made these zucchini fritters with a friend and devoured them for dinner. I serve them with just a bit of soy sauce and vinegar. A small caveat – these are not nearly as delicious as the ones my mother made for me as a kid… I just don’t know what she did to make them so yummy!

Zucchini Fritters (Kaprise Kitchen style… Mom – I need you to teach me how to make them like yours!)

  • 2 medium sized zucchini, julienne
  • 1 medium sized yellow onion, sliced thinly
  • 2 eggs, beaten lightly
  • 1/2 cup of sifted flour
  • 1/2 cup of corn (thawed, if you use frozen like me)
  • 1/2 teaspoon of salt
  • 1/2 teaspoon of pepper
  1. In a large bowl, mix the egg and flour until a batter forms.
  2. Toss the remaining ingredients in the batter until lightly coated.  (Or, you can just do what I did, and stir it all together)
  3. In a skillet, heat about 1/4 cup of canola oil until it shimmers (I promise, once I get one of those thermometers I’ll give you more accurate temperatures!)
  4. Drop tablespoons of batter into the oil and fry for 3-4 minutes per side, until the center of the patties are cooked through.
  5. I squish mine down just a bit so they are more like pancakes, and obviously fry them just a teensie bit longer so they are crunchy!

Mushroom Melt

I think we have established, I really like mushrooms. So it’s no surprise, that I made this delicious sandwich. (For the record, I do NOT eat tuna melts. Warm tuna, mayo, and limp veggies is just yuck. And that smell…. it rivals my distaste for the smell of airplane coffee. Gross man.)

There are no hard and fast rules for this sandwich, but I often add other vegetables too. Sometimes I grill some eggplant and zucchini. And I often use different kinds of cheese. Either way you like your sandwiches – this is a quick way to whip up dinner (or in my case, a midnight snack) that is healthier than Chinese takeout.

Mushroom Melt (Kaprise Kitchen style)

  • 1 package of button mushrooms, cleaned and sliced
  • 1 small onion, halved and sliced thinly
  • 1 small bunch of parsley
  • 1 tablespoon of good butter (I made my own, and it’s just delicious)
  • pinch of salt and pepper
  • 1/4 cup of dry white wine
  • good rolls, sliced and toasted lightly
  • 1 cup of shredded cheese, like mozzarella or provolone
  • 1 tomato, sliced thinly
  1. Toss mushrooms, salt, and pepper in a hot skillet with butter until the moisture is released and evaporated
  2. Stir in onions, and when the onions just begin to become translucent, stir in wine and parlsey
  3. Cook until moisture has evaporated and the mushrooms begin to sear just a bit. Remove from heat.
  4. Toast rolls under the broiler for just a minute, top toasted rolls with tomatoes
  5. Pile mushrooms on top of the roll/s
  6. Sprinkle cheese (or in my case, HEAP!)
  7. Broil for 5 minutes or until the cheese has just melted
  8. Enjoy!

Comfort Food: Galbi Jjim (Braised Short-ribs)

This is a recipe for Korean braised beef short-ribs… my way. My mother used to make this for me with the proper accoutrements (ginko, chestnuts, dried mushrooms, and Korean radish), but I was delirious, compliments of my cold, at the supermarket so I made do when I got home with a random assortment of food items. The recipe itself is pretty straightforward, but it is important to properly prep the short-ribs before braising them with the sauce and vegetables, otherwise your dish will been extremely greasy because of the heavy marbling in the beef.

Galbi Jjim

  • 2 pounds of bone-in beef short-ribs
  • 1 1/2 cups of filtered water
  • 1/4 cup of soy sauce
  • 2 tablespoons of sesame oil
  • 3 tablespoons of fresh chopped garlic
  • 1 small sliced onion
  • 1 teaspoon of brown sugar
  • 1 small bunch of sliced green onion
  • 2 King Oyster mushrooms, sliced
  • 2 red potatoes, cubed
  • 2 carrots, 1 inch slices
  1. Cut the short-ribs, one bone per piece.
  2. Place the short-ribs into a large pot, with the bone vertical. Fill the pot with cold water and allow the beef to soak for 1 hour. Change the water three to four times.
  3. Change the water in the pot one final time, and bring the pot of ribs and water to a rolling boil
  4. Simmer the ribs for 15 minutes
  5. During this time, whisk the water, soy sauce, sesame oil, garlic, and white onion into a bowl.
  6. Remove the ribs with tongs and place on a clean dish. (I also rinsed the ribs under cool water once more to remove a little extra fat)
  7. Pour the remaining liquid into a heat-proof bowl*(because of the high fat content, flushing the liquid down the sink will clog your drain. Instead, let the liquid cool and the fat to float to the service. Discard the fat in the trash. The remaining poaching liquid is beef stock that you can either keep for another dish, or discard. I kept it and put it in my beef stew I made the following morning)
  8. Clean out your pot, and then place the ribs back inside of the pot.
  9. Add the soy sauce mixture, and simmer over low heat for 15 minutes
  10. In the mean time, slice the potato, carrot, green onion, mushroom (and really any other vegetable that you want to add, just make sure it’s a sturdy vegetable that will hold up after simmer for an hour).
  11. Add the vegetables to the pot, and using a spoon drizzle some of the liquid over the vegetables
  12. Cover tightly and simmer over low heat for 1 hour. (DO NOT OPEN THE LID OF THE POT FOR ONE HOUR)
  13. Check the beef after 1 hour by sliding a knife into the meat. If your knife slides in the meat easily, the dish is ready. If the meat resists, then cover and simmer for another 15 to 30 minutes.
  14. Serve with steamed rice 🙂

Notes on this recipe:

  • This is not a traditional Galbi Jjim recipe… at all
  • Use a heavy pot, like a Le Creuset, with an equally heavy lid
  • Do NOT open the lid of the pot while the meat is simmering, the steam that forms inside of the pot is essential in allowing the meat to cook evenly.
  • Be sure to use LOW heat to ensure your braise doesn’t burn and that you have even cooking
  • Two pounds of short-ribs is enough for two to three people
  • Left-overs keep well for up to 3 days (That’s how long mine stayed in my fridge before I devoured it, I’m sure it’s good for up to a week, but I can’t guarantee past 3 days).

Links to Click

17 Degrees

After spending a week in Florida, with my furry jacket stuffed in my suitcase and dancing down the streets in flats and running outside in the sunshine, I’m feeling down. I want to go back and pick up another bushel of blood oranges and walk on the beach with the sand squishing in my toes while the red juice runs down my chin. I want to put that $15 bikini I fished out of a clearance bin back on and roll around on the sand.

Not to mention the start of classes. EWWW. I’m happy to be back in my cozy apartment with my fluffy little munchkin, but  this morning when the thermometer read 17 degrees… I was blue. 17 degrees is even too cold for a cold weather running junkie like me. My little dog was thrilled, it’s not wonder, because she was born wearing a cashmere sweater… but me? I was born cashmere-less.

Anyway, this general ennui has spread… I’m sitting in the library leafing through Income Tax law and looking through pictures from last week. The sun! The sand! The beautiful hotel!

Normally when I am stuck inside I resort to baking, rolling out jam tarts and baking mounds of chocolate cupcakes. This time? I have  rolled like a taco in my blankets and watching itunes movies on repeat. I didn’t even finish unpacking from Florida yet! And this morning? I realized the puff pastry I was defrosting on Friday was still on the counter in a floopy and gloopy mess. I realized this morning, as I chucked this goopy mess, that I must need a new spark. And inspiration.

So I have given myself a project. I will post every single Monday and Friday of each week (twice a week!) with recipes, pictures optional. You all can keep me on track.

This is a recipe for bbq chicken that I use frequently when I feel that the massive quantities of buttered bread should be offset by some protein. The removing the skin from the chicken is a bit tedious, but it is well worth it.

BBQ Oven Roasted Drumsticks (a Kaprise Kitchen original and favorite)

  • 6-8 chicken drumsticks, rinsed and patted dry
  • 1/2 cup of bbq sauce
  • 1 tablespoon of Worchestire sauce
  • 1/2 teaspoon of red pepper flakes
  • 1/2 teaspoon of crumbled lavender
  • 1 tablespoon of honey
  • 1 teaspoon to 2 teaspoons of whole grain mustard
  • salt/pepper to taste
  1. Preheat the oven to 425 degrees Fahrenheit
  2. Using a pair of kitchen shears, remove the skin from the chicken drumsticks. I slide the tip of the shears under the skin and cut from the meaty part of the chicken to the end of the bone. Then I cut through the little tendon and peel the skin from the meaty section down and over the end of the bone. Then I push back the clear and gelatinous membrane from the chicken before rinsing and patting dry.
  3. Cut two diagonal slices into the meaty part of the drumstick, just until a little before you hit the bone.
  4. Whisk the bbq sauce and ingredients together in a small bowl. Using a basting brush, brush the chicken with  sauce
  5. Reserve any remaining sauce for basting
  6. Lie the chicken in the baking dish with about 1 inch of space on each side.
  7. Bake chicken for 30 minutes, rotating the pan once during cooking and basting with remaining sauce
  8. Raise the temperature to 450 degrees Fahrenheit, and continue baking for another 10-15 minutes or until the chicken is browned and the juice run clear when you prick with a knife.
  9. Let the chicken rest for about 5 minutes before serving

Notes on this recipe:

  • Skinless drumsticks are available for purchase at some groceries, however they normally charge up to 2xs more per pound for skinned chicken. I prefer to do it myself (because I am a control freak) and normally buy about 5-10 pounds of drumsticks, skin the chicken and then store it in freezer bags (4 per bag) for whenever I want to have this dish.
  • I use a specific type of bbq sauce (with a yellow label), but the name escapes me right now… but that one is my favorite. Feel free to use any type of sauce you want… this chicken is just as good with a soy/ginger sauce as it is with bbq sauce.
  • During baking, try not to open the oven more than once to rotate the pan, the high temperature required for this dish is essential in having the chicken cook evenly and brown perfectly.
  • If you prefer a slightly crisper crust on your chicken, sprinkle a little salt on the tops of the chicken, it’ll help crisp up nicely.