The Rice Crispy Treat For ONE (maybe 2)

Last weekend, in the midst of a friend’s wedding festivities, I had a thought. “Rice Crispy… yes… I need one.”

SONY DSC

The problem with purchasing Rice Crispy (or Krispy, whatever) is that you inevitably get one of those gargantuan slabs of over-sweet goop with soggy rice cereal… or even worse? It’s hard as a brick. I abhor crappy treats.

So, on my way home, I perused some recipes, and again the problem? You get an entirely obscene amount of treats. I mean… really… 6 cups of cereal? One ENTIRE bag of marshmallows? 6 tablespoons of butter? And for those of us who do live alone and have VERY little self restraint, this turns into making an entire sheet of treats, followed by stuffing it into one’s open mouth. Trust me… I know. And if you DO manage not to wolf the entire sheet of treats down in one sitting, or one day – the second day you are left with these sad, dry, and hard treats that are no longer palatable.

So… the only solution? To make your treats in exactly the serving size you want. I used a not-too-dainty amount of cereal, with a dab of butter and just a few marshmallows for a perfectly reasonable sized treat. You could share if you wanted to, but I recommend against it. I pressed mine, every so gently, into a resealable container before devouring mine.

Another note – I also love a caramelized treat, but one that is still chewy – which is difficult since sugar hardens as it caramelizes into that delicious brown color. To accomplish this feat in rice crispy treats? Add the marshmallows in two batches – allowing the first to take on that delicious brown hue and then adding the poufy white marshmallows at the end to just puddle into the chewy, perfectly caramelized treat you want.

Now… go forth and make multiple single serving sized treats, to inevitably end up eating an entire pan anyway! (haha!)

SONY DSC

The Rice Crispy Treat for One (Kaprise Kitchen’s way of eating ONE treat at a time)

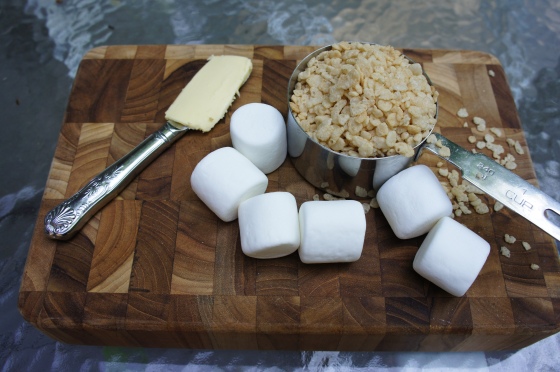
  • 1 cup of rice cereal – I used the classic Kellogg’s
  • 1 teaspoon of butter – I used salted Kerrygold here
  • 6 standard sized marshmallows – Jet Puffed for me. Use the normal sized ones – not those humongous roasting ones they have these days, or those mini-me’s.
  1. Heat butter in a small saucepan until melted, medium/low heat
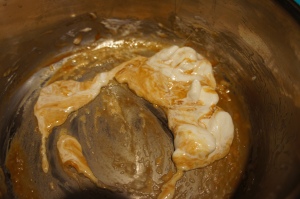
  2. Add 3 marshmallows, stir until melted and caramelized
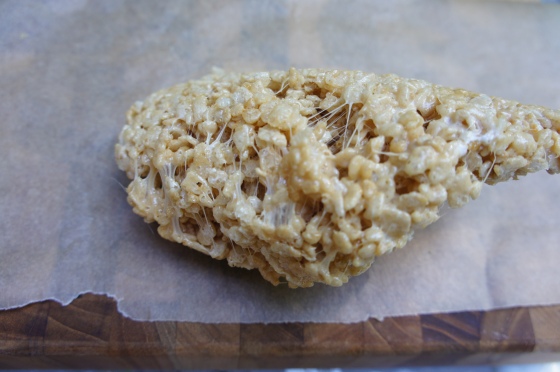
  3. Remove the saucepan from the heat, and stir in the remaining marshmallows (I tear these into smaller pieces so that they melt quickly). Your mixture should look something like this: a mix of just melted, and caramelized. SONY DSC
  4. Add cereal, stir until coated
  5. Gently press the cereal into a small container, lined with parchment paper.
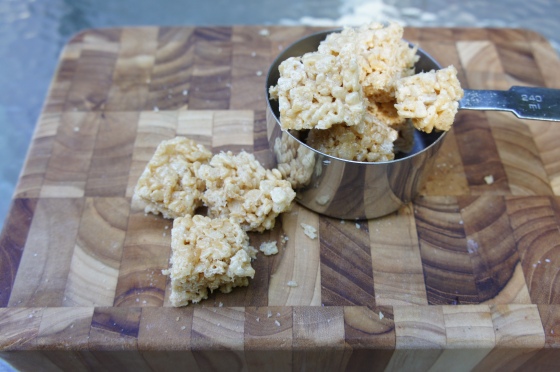
  6. Once cooled, removed the treat from the container, and slice with a sharp knife into perfect bite sized pieces like I did! Or… dig in! **Remember, heated sugar is very hot, so please be sure to let your perfect rice crispy cool enough**

SONY DSC

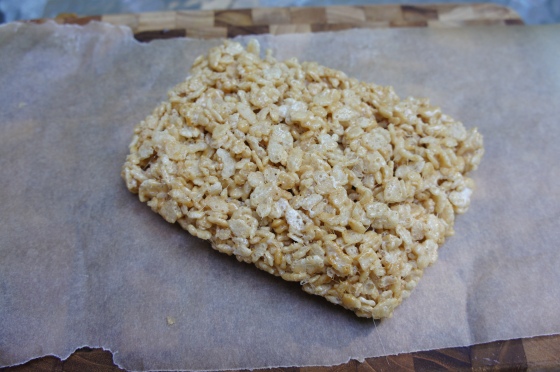
Perfectly gooey and caramelized at the same time! :)SONY DSC

Why Did I Wait So Long?!!! The Story of My NEW Love

It all started when I googled recipes for cornmeal… then I found Alanna’s website The Bojon Gourmet. And true to my mildly obsessive reading habits, I spent the next two days reading all of the recipes on her website. I highly recommend spending some time to read her recipes. Beautiful photography, beautiful food… all sorts of goodies to be found.

So… it goes back to the cornmeal. I’ve been thinking about cornmeal, so when I found Alanna’s recipe for custardy cornmeal cake, I knew it was just right. The only problem? I didn’t have an 8 inch cast iron skillet… so of course I braved rush hour traffic to go hunt one down.

So when I got to Target and there was just ONE small cast iron skillet left without a barcode… I just bought it. The nice man there helped me, and after inspecting the bottom of the pan and seeing “8SK” stamped on the bottom, he decided it was in fact an 8 inch skilled at it would just be $10.99. So I popped it into my car, grabbed some grassfed buttermilk and cream and headed home.

SONY DSC

So. I mixed my batter, suspicious that it was such a little quantity of batter, but I proceeded anyway. I spread the batter thinly, and baked away.

When my cake baked up thin, contrary to Alanna’s beautiful pictures, I was indignant! I did everything right! I even followed the recipe!! I even bought the right pan!!!!!

SONY DSC

SONY DSC

But, I was immediately pacified when I ate a slice of my delicious creation. It was creamy, delicious and just perfect as a near-midnight snack.

SONY DSC

Then, after scrutinizing the recipe AGAIN, I noticed that the pan Alanna used looked much smaller than mine. So I whipped out my ruler and discovered I had in fact bought a 10 inch skillet. Oh dear…. that explains everything!!

The morale? Thin or thick, that beautiful cornbread studded with berries is an excellent dish.

So today, I meant to remake the cornbread with a double batch so I could have a thick and creamy slice of cake… but then I was thinking about asparagus and cheese.

SONY DSC

I did a little research on Alanna’s blog again, and baked up the crustless quiche in the SAME beautiful, cast iron skillet I bought.

SONY DSC

Let me tell you… Not only am I completely enamored with Alanna and her beautiful recipes, but I am absolutely head over heels with my new skillet.

Why ever did I wait so long to purchase this lovely skillet? Amazing. I love it. I can’t say enough good things.

So, my dear lovelies, this wasn’t a recipe post, but more of a review of The Bojon and Lodge skillets. Both? Excellent! Highly recommend.

I hope you all have a lovely weekend!

And for your patience reading my ramblings about my NEW love (10in Lodge skillet), here are some pictures! ❤


IMG_4032 IMG_4067 IMG_4074 IMG_4075 IMG_4078 IMG_4104 IMG_4116 IMG_4120 IMG_4128 IMG_4159 IMG_4202 IMG_4206 IMG_4209 IMG_4233 IMG_4260 IMG_4296 IMG_4385 IMG_4396 IMG_4400

Listen When I Sing This Song (+ the BEST Baked Ziti)

Today… Today I was ravenous… After my run, I demolished an entire tray of sliced carrots and hummus. Then I ate a cheeseburger. Then I spent three hours thinking about how I was SO hungry. Clearly, my body was telling me to eat something! But then I got super, uber fixated on cheesy pasta. So. I made it.

The first time I had baked ziti was at my friend Deirdre’s house. Her mom asked me to come over to play, and I was SO excited. I shouldn’t have been so excited, the minute I arrived Deirdre and I were planted firmly at the kitchen table and told to work on Algebra together while Deirdre’s mother whipped up dinner. Despite being forced to do homework on my “play” date, I was thrilled because Deirdre’s mother made us this thing called “baked ziti.” I distinctly remember wolfing down more than my fair share. It was hot, cheesey, and absolutely amazing. I loved it.

I made baked ziti for years, and it has always been one of my favorites. I made it for my 16th birthday celebration, but I can’t remember having made it since (… seriously?!).  Anyway, I read a couple recipes on my phone before running through the grocery and grabbing the ingredients. From start to finish it took me about an hour and 15 minutes, but it was an active 1 hour and 15 minutes. Either way, baked ziti is always worth the elbow grease!

Kaprise Kitchen’s So-Hungry-I-Can’t-Focus-On-Anything-But-Food Ziti (inspired by several different recipes online, and Deirdre’s mom)

  • 28 oz can of whole tomatoes (you may choose to use more tomatoes if you like to keep extra sauce for rainy days. I did!!!)
  • 1 bunch of basil
  • 1 bunch of parsley
  • 1 bay leaf
  • 2 tablespoons of chopped garlic
  • 1 yellow onion, minced
  • 2 tablespoons of olive oil
  • salt/pepper
  • 1 pound of uncooked pasta
  • 15 oz of full fat ricotta cheese
  • 12 to 16 oz of full fat mozzarella, shredded (also. seriously. NEVER buy that preshredded stuff. It’s bad. VERY bad)
  1. If your oven takes 10000000 years to preheat, now is the time to fire up that babd boy. 375 degrees F.
  2. In a large pot, bring a large quantity (enough for 1 pound of pasta) to boil. Salt lightly.
  3. In another large pot, heat olive oil over medium heat
  4. Mince the onion (really more of a petit dice) and add to the olive oil.
  5. While your onion is softening, peel and smash about 3-4 cloves of garlic. Chop finely and add to onions. Continue to cook gently, be sure not to let the garlic or onion brown. You just want them to be nice and translucent.
  6. Add tomatoes to the garlic/onion. Break apart the whole tomatoes with a fork. Continue on medium/high heat
  7. While your tomato mixture is heating up, your water should boil. Add your pasta and cook for 2 minutes less than al dente. Set a timer so you don’t forget!
  8. As your tomatoes heat, finely chop your fresh basil and parsley. I added a very generous 1/4 cup of chopped herbs, but feel free to adjust based on your preferences.
  9. Add the herbs to the tomatoes, cover and bring the tomato sauce to a boil. I don’t like to cook the heck out of the sauce, so just as it gets to a boil, I turn the heat off.
  10. Now… your pasta timer should have beeped, so drain your pasta in a colander. Shake the excess water from the pasta and return to the pot.
  11. In the pot, add the ricotta cheese and 1/2 of the shredded mozzarella (I added some more chopped herbs too) and 1/2 of the tomato sauce. Stir until the noodles are evenly coated.
  12. Spread your pasta into a large casserole dish (or two separate ones like I did). Dot the top of the pasta with the remaining tomato sauce. Sprinkle with the remaining mozzarella.
  13. Pop into the over for 20 minutes, or until the cheese has bubbled a bit.
  14. ENJOY!

Leftovers keep well for up to 4 days in a tightly sealed container. When reheating, add a little extra tomato sauce to the pan/plate/whatever to help the pasta perk up a bit.

I would have taken pictures, but I was so busy burning my tongue and wolfing this down that I didn’t. Also. Baked ziti photographs pretty terribly, so I doubt you’re missing much.

What did you eat for dinner?


Day 6 and Pumpkin Scones

Hello hello!

I ran 3 miles today. I kept a little bit of a faster pace and got a good work out in. I was actually pretty tired after this run, which is atypical. I sat on the dock in the lake where I ran and chatted with my new found friend while I stretched before heading home.

I didn’t feel like making anything so I picked up a salad and headed to the library. I don’t know what was up with that salad, but I felt terrible afterwards. I drank nearly a gallon of water trying to get rid of that dry, weird taste in my mouth before I gave up and came home. I ate some carrots and downed an electrolyte drink before taking nap… apparently that did the trick because I feel better. Anyway, lesson learned. No more store bought salads.

I also just noticed that I gave myself a good sunburn on my shoulders from sitting out on the dock… so sunblock for tomorrow for sure. Though, I’m told it will be raining so we’ll see how my run shakes out tomorrow.

In the mean time, I want to share a new scone recipe that I tried out. I know… I know… I have so many of these types of recipes on my blog, but since I do spend a rather large portion of my day sitting in the library, I like to have good food that is portable. I’ll do a separate blog post on what I take to the library, but that’ll have to be another day.

So… these are almond flour scones (again) but sweetened with a bit of maple syrup and fluffy from the delicious pumpkin puree. I used this recipe from The Spinach Spot. I just found her blog today, and it’s totally awesome!

I tweaked (as always) and swapped the baking soda for baking powder, added a palm full of hazelnut flour, and skipped on the frosting. They turned out fluffy, moist, and absolutely delicious. I do have quite a sweet tooth, so next time I’ll add a little more maple syrup… maybe chocolate chips or some dried fruit…..

So… what did you all do today? Any weird food experiences like mine? What do you like to avoid??


SONY DSC

SONY DSC

(Sorry for the crap photos, I have terrible lighting in my kitchen and I didn’t try…. O.o)


Smoked Gouda Almond Flour Scones with Tarragon and Thyme (Paleo/Primal)

Hello hello my friends! Today was Day 1 of the 30 Day Fitness Challenge. I’ll post about that shortly in a separate post.

But, before we get into the running, I wanted to share this quick little recipe. It’s a riff off of the Nom Nom Paleo Scones which I made a while back with a couple tweaks. Those scones are sweet, but these are savory and stuffed with smokey gouda cheese.

Smoked Gouda Almond Flour Scones with Tarragon and Thyme (Paleo)

  • 3 cups of blanched almond flour
  • 1 1/2 teaspoons of baking powder
  • 2 tablespoons of fresh tarragon, chopped
  • 2 tablespoons of fresh thyme, chopped
  • 1 teaspoon of cracked black pepper
  • 1/4 cup – 1/2 cup of smoked gouda, chopped into small cubes (add more cheese as you see fit)
  • 1 teaspoon of black truffle oil, or truffled cheese
  • 4 tablespoons of butter
  • 2 tablespoons of apple cider vinegar
  • 2 tablespoons of honey
  • 2 eggs, whisked
  1. In a large bowl, combine the almond flour, baking powder, chopped herbs and cracked pepper
  2. Grate the butter into the almond flour mixture, until the butter is evenly distributed in the mixture
  3. Stir in the cheese
  4. In a small bowl, whisk the eggs, honey and vinegar
  5. Stir the wet mixture into the almond flour until just combined
  6. Divide and shape into scones
  7. Place on a parchment lined baking sheet. You should have about 6 to 8 good sized scones
  8. Bake at 335F for 25 minutes, or until golden brown
  9. Store left overs in the refrigerator, and bake for a few minutes to reheat and re-crisp when desired.

Enjoy!!!

Summer Ribs and Avocados

This morning, I woke up, ran through my chores at the speed of light before bolting out the door. I have been getting a little stir crazy, so I went to the mall and tried on a number of fun little outfits. I love shopping, and today I had a blast trying on some really fun little summer outfits. I decided after trying on a candy-colored striped dress that it was time for guacamole and some summer barbecue. Nothing says “summer” like a pile of perfectly caramelized ribs and a whole  bunch of zesty guacamole and chips.

So I went to the store… they were having a sale on avocados. 10 for $10!!! So I gathered 10… that is I think I gathered 10! Because when I got home I realized I miscounted and had 11… I think I “stole” and avocado!

Anyway… Today I tried a different method of cooking my ribs. I alternate between the dry rub I wrote about HERE and wet barbecue sauce where I cut up the racks into segments. Anyway… the point is today, the ribs came out absolutely tender and succulent with just the right amount of crisped fat and bubbly barbecue sauce so I thought I would share! The method is easy peasy, but remember to crack a window or run a fan because the heat from the oven definitely makes the kitchen quite warm!

Easy Peasy Oven Baked Pork Ribs 

  • Baby Back Pork Ribs
  • 2 tablespoons of salt
  • 1 tablespoon of cracked black pepper
  • 1 teaspoon of paprika
  • 1 teaspoon of chili powder
  • Barbecue sauce (any variety!)
  1. Preheat the oven to 400F
  2. Rinse and pat the ribs dry
  3. Mix together the salt, pepper, paprika, and chili together.
  4. Sprinkle on both sides of the ribs
  5. Lay ribs on rimmed baking sheets, meat side down.
  6. Cover the entire sheet tightly with foil
  7. Bake ribs in foil wrapped baking sheets for 1 hour and 30 minutes, or until ribs are tender
  8. Drain fat
  9. Return ribs, meat side up, to pans
  10. Brush with barbecue sauce and bake at 375F for 30 minutes, until bubbly and delicious
  11. Serve!

I didn’t take pictures, because I’m a bum these days… but there is a picture of the finished ribs on my instagram… so check that out HERE

Teeny Milk Biscuits

Years and years ago I remember reading about this place in the South that made legendary biscuits. I remember reading in the article that the key to the biscuits was a specific type of flour… White Lily. Anyway, I recently dug up the recipe online, and in a strike of luck I just happened to have milk in my refrigerator when the mood struck me to make these biscuits.

IMG_1793

I have been trying to cut down on the wheat in my life, but I do have a soft spot for fluffy biscuits. I especially like my biscuits slathered in good butter and tart jam. Since the presence of milk is rare in my refrigerator, it was even more auspicious that I happened to have a tablespoon of peach apricot jam and extra Kerrygold butter to smother my little biscuits with.

Teeny Milk Biscuits (adapted from the Carriage House Recipe)

  • 2 cups of White Lily flour (I’m sure you can use all purpose here, but you may need a bit more milk)
  • 4 teaspoons of baking powder
  • 1/4 teaspoon of salt
  • 2 tablespoons of sugar
  • 5 tablespoons of good quality butter, popped in the freezer for 15 minutes
  • 3/4 cups of milk (more as needed)
  1. Combine flour, baking powder, salt, and sugar in a mixing bowl
  2. Dip your chunk of butter into the flour mixture and grate it into the flour mixture, dipping as you go to prevent sticking to the grater
  3. With a whisk, stir the mixture together and pop the whisk up and down until the grated butter and flour resembles coarse crumbles.
  4. Add 1/4 cup of milk at a time, until the dough is combined into a soft dough. Add a tablespoon or two more to achieve the proper consistency. Your dough should be cohesive, but soft and sticky
  5. On a well-floured surface roll out the dough. Fold into third and roll out until 1/4 to 1/2 inch thickness is achieved.
  6. Cut with a small round biscuit cutter. I used a 1 1/2 inch diameter one for perfectly petite biscuits.
  7. Place on a parchment covered sheet and brush the tops with another tablespoon or so of milk.
  8. Bake at 400F for 15 -20 minutes until perfectly golden brown
  9. Serve immediately with butter and jam.
  10. These keep well in a sealed container for up to 1 week, be sure to let them regain their crisp with a quick visit back in the oven for 10 minutes at 400F.

I imagine these biscuits would also be perfectly delicious in a more savory application – scale back the sugar and throw in a little cheese and spice for a savory biscuit! Let me know how yours turn out!!

SONY DSC

The Giant Rhubarb In the Room

I went to the farmer’s market… and as I’m apt to do, I went a little crazy with the buying. I just like farmer’s markets and when I see all of the people and the produce I just want to buy it all.

I found an adorable gentleman who sold me two soft-shell crabs… I cleaned them (eeek!) and ate them with great gusto. I was pleased that I had cleaned them myself… but a little freaked out that they continue to move even as I was hacking into their vital organs and cutting their faces off. It makes me cringe still. ::cringe::

Well, last week I walked past anything that required cooking/baking because I was in study mode. I’m still in study mode, but I decided that this week I was going to just spend a couple hours cooking and enjoying myself before going back to :::i-want-to-kill-someone::: study mode. When I saw these arm length (or if you’re short, like me, 1/2 body length) rhubarb, I had to have them. They were so delightfully pink, I immediately grabbed them.

I did like Connie at ouichefcook and tossed the sliced rhubarb in sugar before letting it drain in the refrigerator for 8 hours. Then, I decided I wanted coffee cake crumbs in a buttermilk based cake. So I fused Lottie + Doof’s favorite cake with some coffee cake crumbs… with a layer of rhubarb in between the cake. So maybe I over-did it a little bit. I ended up with is a 9×13” cake that’s about 2 inches thick. I told you. I’m not good at subtle. Or a little. I like BIG. Bigger = better. DUH…  I might have been a Texan in a former life.

The crumbs are just perfectly crunchy and the cake is pillowy. And the layer of rhubarb is just acidic and tart enough to balance the crunchy crumbs. And since I absentmindedly left out the vanilla extract, the cake tastes just like rhubarb. I know some people won’t like it because it’s a bit tart, but this giant corner slice I pried out of the pan before it cooled is just delicious.

Anyway. Here is what I did

Giant Rhubarb Coffee Cake (Kaprise Kitchen interpretation from a little of this and a little of that)

  • 3 cups of flour, sifted
  • 1 1/2 teaspoon of baking powder
  • 1 teaspoon of baking soda
  • 12 tablespoons of butter, softened
  • 1 1/2 cup of sugar
  • 3 large eggs
  • 1 1/2 cup of shaken buttermilk

Rhubarb:

  • about 1 pound of rhubarb
  • 1/4 cup of granulated sugar

Crumbs:

  • 1/4 cup of brown sugar
  • 1/4 cup of granulated sugar
  • 1 teaspoon of cinnamon
  • 1/2 teaspoon of ground ginger
  • 8 tablespoons of melted butter
  • 1 1/2 cup of flour
  1. About 8 hours before you plan on baking, or the night before (or in the wee morning hours): wash and slice the rhubarb. Toss with 1/4 cup of sugar. Place in a colander over a mixing bowl. Cover and refrigerate.
  2. After 8 or so hours have elapsed,  shake the excess moisture from the rhubarb and discard the liquid that has drained. Set the rhubarb aside.
  3. On to the batter!!
  4. In a large bowl, whisk together the butter and sugar together, adding one egg at a time until creamy and smooth
  5. Whisk in the buttermilk.
  6. Stir in the flour, baking powder, and soda (I normally stir 1/2 of the flour with the baking powder and soda into the mixture, and then stir the remaining flour in. Mostly because I don’t have another mixing bowl to combine dry ingredients, and because this works just fine)
  7. The batter should be a little thicker than normal cake batter.
  8. Line a 9X13” baking pan with buttered parchment paper. Butter the sides of the pan as well.
  9. Spread about 2/3 of the batter in the bottom of the pan.
  10. Add the rhubarb in an even layer over the batter
  11. If you prefer a less tart cake, sprinkle 1/4 cup of brown sugar over the rhubarb layer to counteract the acidity of the fruit. I left this out because I like the bite.
  12. Dollop the remaining batter over the rhubarb. Because the batter is pretty stiff, I drop blobs of the batter over the rhubarb and then lightly tap the pan on the counter to even it out a bit.
  13. In a bowl, combine the crumb ingredients. I make crumbs by squishing the ingredients into a ball and then breaking the ball apart over the cake.
  14. Bake at 350 degrees Fahrenheit for about 60 minutes. Mine took about 65 minutes, but I was also peeking in the oven to check on my baked potatoes (because there is nothing like multitasking your oven!)
  15. A tester should come out nearly clean from the center of the cake. Remember that the rhubarb is moist so the cake around the rhubarb will be moist – so be cautious of overbaking since your tester won’t be perfectly clean coming out of the cake. However… make sure the cake is sufficiently baked, otherwise the cake will be dense and gummy. (I know. Not an exact science, but I normally press a finger at the center of the cake, and if it springs back, it’s normally done).

Cheese Straws and Circles

When I was a kid, my summers were filled with books and lots of time running in the sun dappled yard. My mother would us strap us into our trusty red Volvo, and drive us to the library with the windows down. We’d sneakily stick our hands out the window to feel the wind push our hands back. My sisters and I would quiet the minute we go to the library, solemnly picking out our books and propping ourselves on the stacks to read the interesting ones right away. And after the air-conditioning had sufficiently seeped into our bones, we would pile back into the car with our stacks of books. We would spend the rest of the afternoons with our piles of books in the yard reading. I remember sitting on blankets on the deck reading books until the sun set. The soft breeze rippling through the grass and the shade on the deck lulling me into the books.

Well, other than wishing that these huge tomes of law books were nearly so fun to read and that I was still in my backyard plastered to my books like I was as a kid… I remember reading a story that talked about cheese straws. It sounded so glamorous and delicious. The main character was in London, and her friends were visiting and she scraped together these cheese straws with “just a bit of butter, cheese, flour, and water.” I wanted to feel as glamorous in my chic apartment munching on cheese straws… so I obviously tried my hand at it. My mother’s the forgiving sort that let us experiment with all of the kitchen supplies, and would patiently watch while we insisted we knew what we were doing. After mushing together an extraordinarily expensive chunk of cheese with some flour, water, and butter… I baked my little straws. They were actually just awful. I was just a kid, but the cheese straws I imagine in my head were light and crunchy and melted on your tongue. The ones that I had made were heavy blocks of floury cheese.

Needless to say, I never looked at another recipe for cheese straws again. I just wasn’t interested in baking blocks of disappointment. But, then two years ago when I started law school, I was actually living alone in my chic little apartment with my equally chic little puppy. I felt that it was time to try my hand at cheese straws again. I followed the recipe on smittenkitchen, which was delicious, but the dough was just a bit too substantial for me. I wanted little straws that were meltingly lovely and that were equally pretty. So, I tweaked. Just a bit. And discovered that a combination of cheddar and the best Parmesan (that my teensy grocery carries) made all of the difference. A generous sprinkle of crushed red pepper made them just spicy enough, and of course, all food must be pretty… so I used the teensiest fluted cutter I have.

Cheese Circles (Adapted from smittenkitchen, who references Lee Bros. Southern Cooking)

  • 1 1/2 cup of cheddar cheese, grated finely
  • 1/2 cup of Parmesan cheese, grated finely
  • 4 tablespoons of good butter, at room temperature
  • 3/4 cup of flour
  • 1/2 teaspoon of flaky sea salt
  • 3/4 teaspoon of crushed red pepper flakes, I whizzed mine through a food processor to get smaller flakes
  • 1 to 2 tablespoons of heavy cream
  1. In a large bowl, mix together the cheeses, butter,  flour, salt, and pepper. Work the mixture together until the dough is crumbly and well incorporated.
  2. Slowly drip the cream into the bowl, stirring until the dough comes together into a cohesive ball.
  3. On a lightly floured table (or counter) roll the dough out to about 1/4 inch. Cut with a 1/2 inch cookie cutter. Or whatever size you desire.
  4. Bake at 350 degrees Farhenheit for 10-15 minutes. The circles should be golden and have poufed up a bit.
  5. Note: In one of my runs, I sprinkled a little Parm over the tops of the circles and that was delicious also… but I prefer mine without.

Easy Peasy Zucchini and Feta Squares

This is a tart of sorts… it’s a pie? I don’t know what I should call it, but I needed something to help me procrastinate my little heart out. I’m having the worst time focusing on finals this year. I’m good at waking up, but the only thing getting me out of bed is dehydration this semester. This is the first semester I have been single since starting law school, so I have been getting more work done (no pesky boys clamoring for my time), but I’ve also been distracted. I’m thinking about running and getting back into top running form. I’m thinking about where to jet off too… I just want to be on the move.

This morning, my neighbor invited me to run with her running group. I went along and it was phenomenal. I ran 10 miles with the group, paced at about 9:30/mile. It was wonderful. I was back in my apartment by 9:00am. But, the only thing I have been having problems with is splitting headaches after my long runs. I don’t know if anyone else has this problem… but about an hour after finishing a longer (more than 7 miles) run, I’m sitting with my head in my hands with a horrible headache. So instead of hitting the library as planned, I was zoinked out on my bed sleeping off my headache. Maybe it’s the water. Or maybe, like my neighbor suggested, it’s because I run without water and without any nutrition. I just go. Hmm.

This tart is super easy. Five ingredients, thirty minutes, and delicious. You can use any variation of vegetables. I imagine it’s delicious with some squash, maybe thin eggplant slices? Or even tomatoes. Or potatoes… the possibilities are endless.

Easy Peasy Zucchini and Feta Squares (the result of Kaprise Kitchen procrastination)

  • 1 zucchini, thinly sliced. If you have a mandoline (I do not) this would be supremely easy
  • 1 small onion, thinly sliced
  • 8-10 sheets of phyllo dough (I used 8 out of a package, but feel free to use whatever thickness or variation)
  • 4 oz of feta cheese, crumbled finely
  • 3 tablespoons of butter, melted
  1. Place the phyllo dough on a cookie sheet, brushing the bottom of the first sheet with butter, and brushing alternating layers lightly with butter.
  2. Spread crumbled feta cheese once inch from the sides of the phyllo dough.
  3. Arrange the zucchini and onion slices on top of the feta cheese
  4. Fold the sides of the dough up to cover a little bit of the zucchini and onion.
  5. Brush with butter
  6. Bake at 350 degrees for 20 minutes, or until golden brown