How to Pack a Paleo/Primal Friendly Care Package

How many of you have loved ones that are far away? How many of you have loved ones in the military and/or overseas? How many of you believe that FOOD is the best way to express your love? Yes, yes, and yes? Me too.

Since most of my loved ones practice paleo/primal eating habits, my care packages are tailored for their needs. If you’ve read my blog before, you know that I am not, so it makes it a little bit of a challenge since I am not as nearly in tune with paleo/primal dietary restrictions. Plus, there are some things that are just SO good and worth breaking the rules just a little bit.

The most important thing that I do is READ the entire label and check the expiration date. Things that don’t expire until 2030 are OUT and things that expire within the next 6 months are out also. Often times these overseas care packages take over a month to find their destination, so I want to be sure the food lasts long enough.

After I read the entire package, I run through this little list. I try to purchase things that are a perfect fit, but it’s tough. I will purchase things that have the majority of these factors, but if the product only has ONE factor, I’m more hesitant to include it. Okay. Here’s my list:

  1. Made, manufactured, and sourced in the USA. I also try to support smaller companies over conglomerates
  2. Sustainably sourced
  3. Non-GMO
  4. Organic
  5. No added sugar (If the product MUST have sugar, I look for coconut sugar sweetened, agave, or something less toxic that corn syrup)
  6. Only intelligible ingredients (if I don’t recognize the 24 character word, I put it back)
  7. Gluten Free (I’m most on watch for wheat products)
  8. Healthful oils and fats
  9. Fiber content (I’m told that a little fiber is super helpful since many of the armed forces are stuck eating dense baked goods that don’t pass too well… and on that note, I think my list is done)

Occasionally some corn products slip into the boxes, but wheat almost never makes the list. For some reason, I find corn more forgivable than wheat (which may not be your preference).  I vary my boxes each time I send them, so this is only ONE of the many boxes I send. I’ll try to post the others as I send them to give you more ideas. As always, I used a USPS Large Square Flat-Rate Box. The box ships to any US address or FPO for $13.95 and for up to 20 pounds.

Alright? Ready? (Also. Please excuse the dark, middle of the night kitchen photos. I was trying to pack this all up and write a card before 11:00pm, but I guess that’s not happening!)

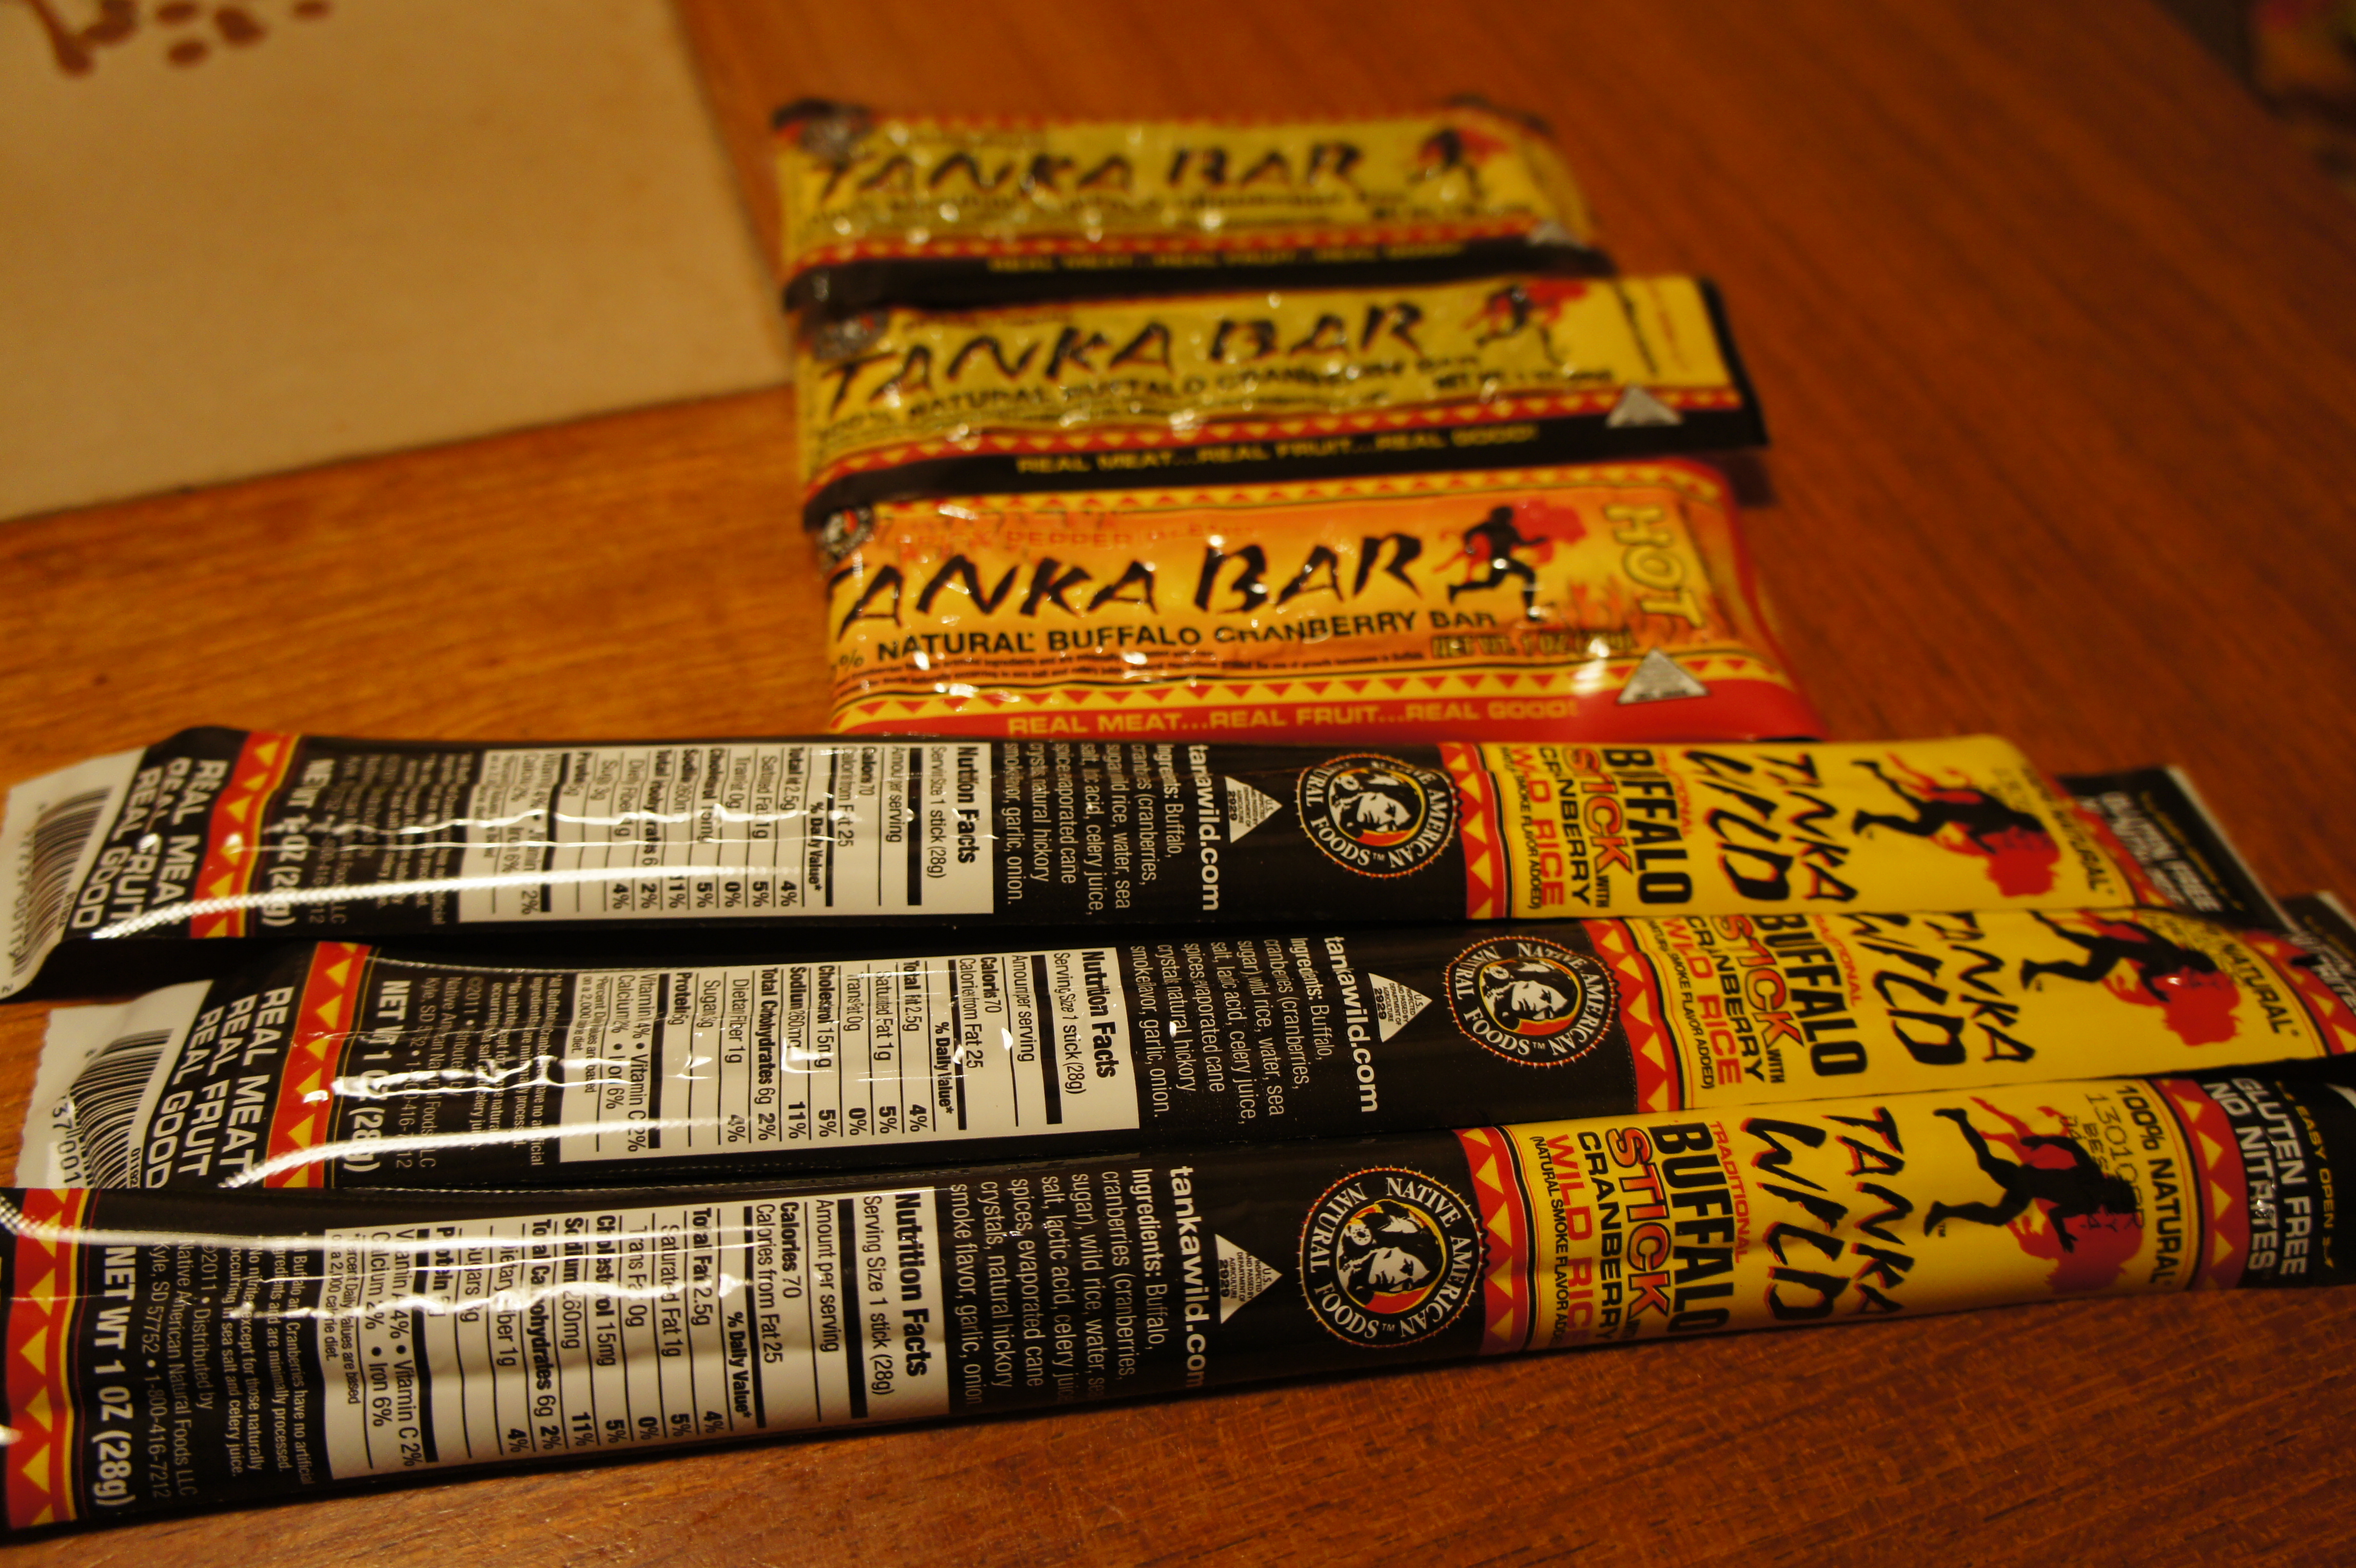
  1. Tanka Bars – These are Buffalo meat and cranberry bars. They’re good, filling, and come in a variety of different flavors. I packed a “HOT” one for fun. They come in the long whip or a bar. (For the skinny ones, $2/each. Bars, $2.89/each)SONY DSC
  2. TrueBar in Cranberry Almond and Hazelnut Chocolate – I haven’t tried these yet, but the ingredients were clean and it’s made in the USA. ($1.69/each)SONY DSC
  3. Coconut Secret – Mint Coconut Bar – This is amazing. It’s minty and coconutty all at the same time. It’s really yummy and a good dessert. (Dammit… now I want one) ($2.89/each)SONY DSC
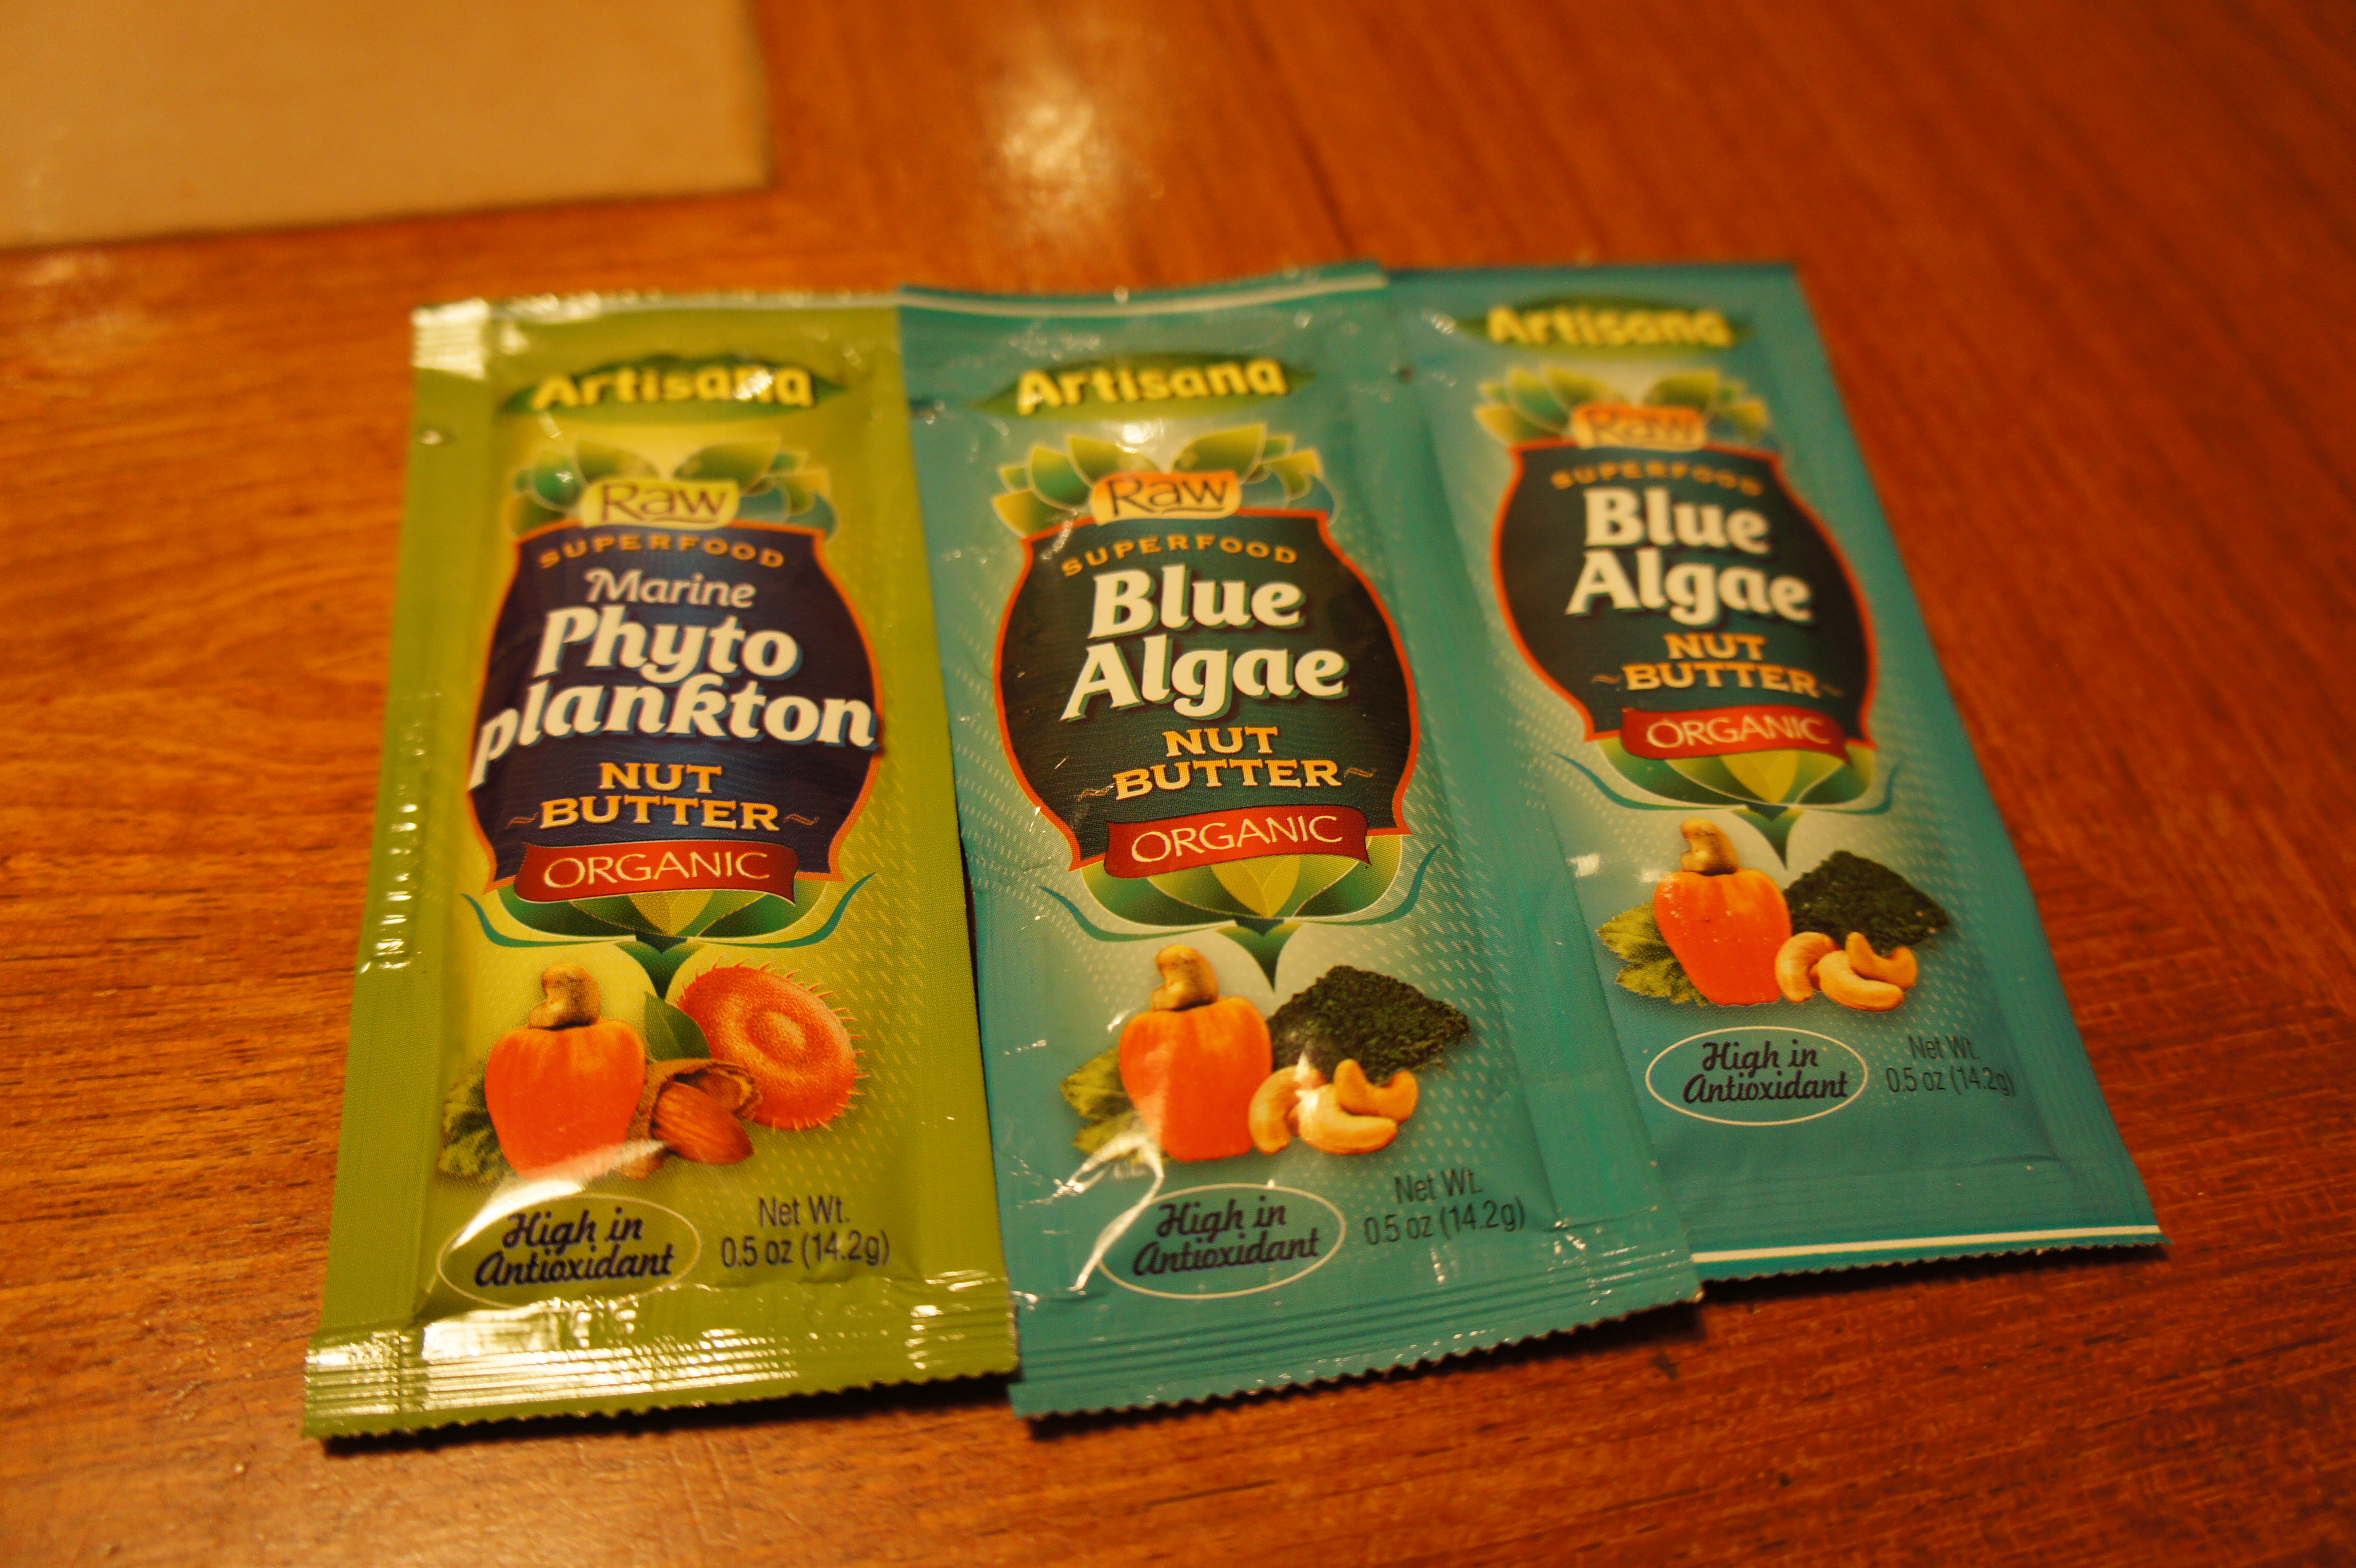
  4. Artisana Nut Butters in Blue Algae and Phyto Plankton – I’m told that these are amazing despite their very strange physical appearance. I haven’t tried them, but I trust the reviewer. ($2.00-$3.00/each – I think the Phyto Plankton was 75 cents more)SONY DSC
  5. Inca Corn and Inca Chips – I know… I know… corn. However, the plantain chips are paleo! Both of these are crunchy, salty, and delicious. They are on the cleaner sider. The corn is non-GMO and the plantains are gluten free. ($1.49/each on sale)    SONY DSC
  6. Bear and Wolf Pink Salmon – I purchased this at Costco so I’m not sure the pricing. This salmon is pretty good for canned, and the cans are one serving size, which I think is good.   SONY DSC
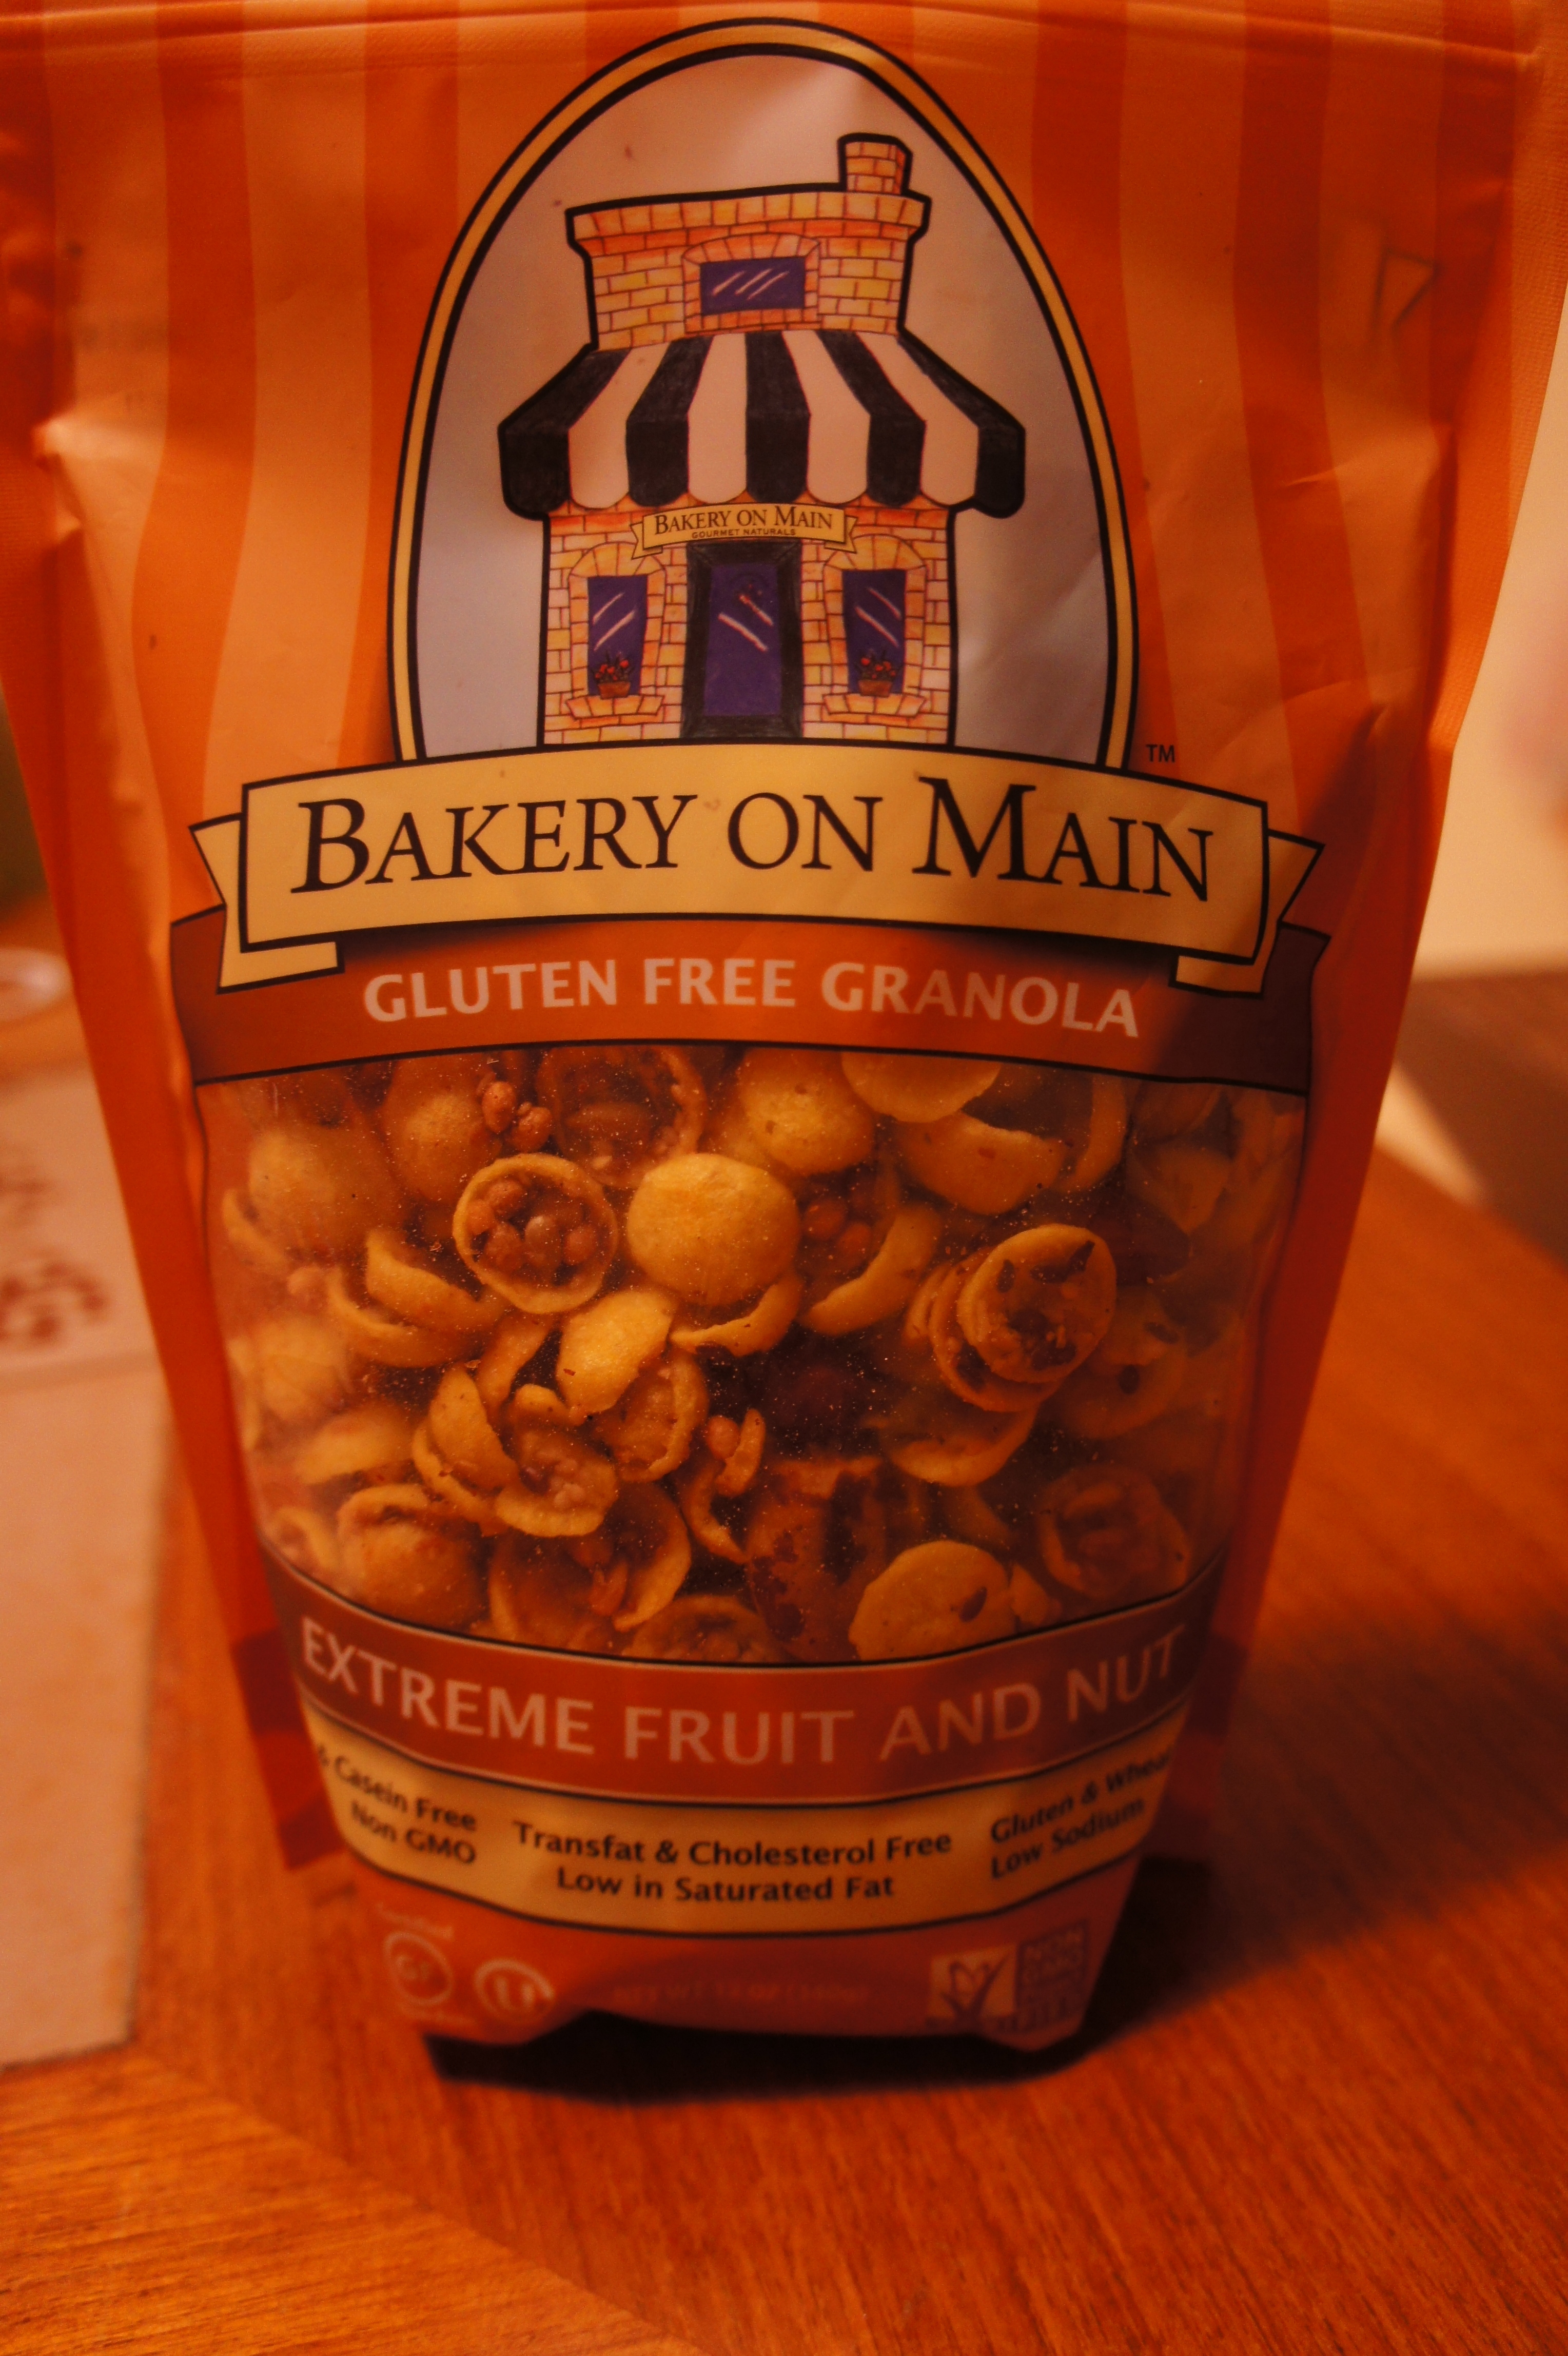
  7. Bakery on Main Gluten Free Granola in Extreme Fruit and Nut – Also derived from corn products (since there is no oatmeal or wheat). I haven’t tried this before, but it looks promising. It is filled with delicious looking dried fruit and plenty of nuts. ($5.99/each) SONY DSC
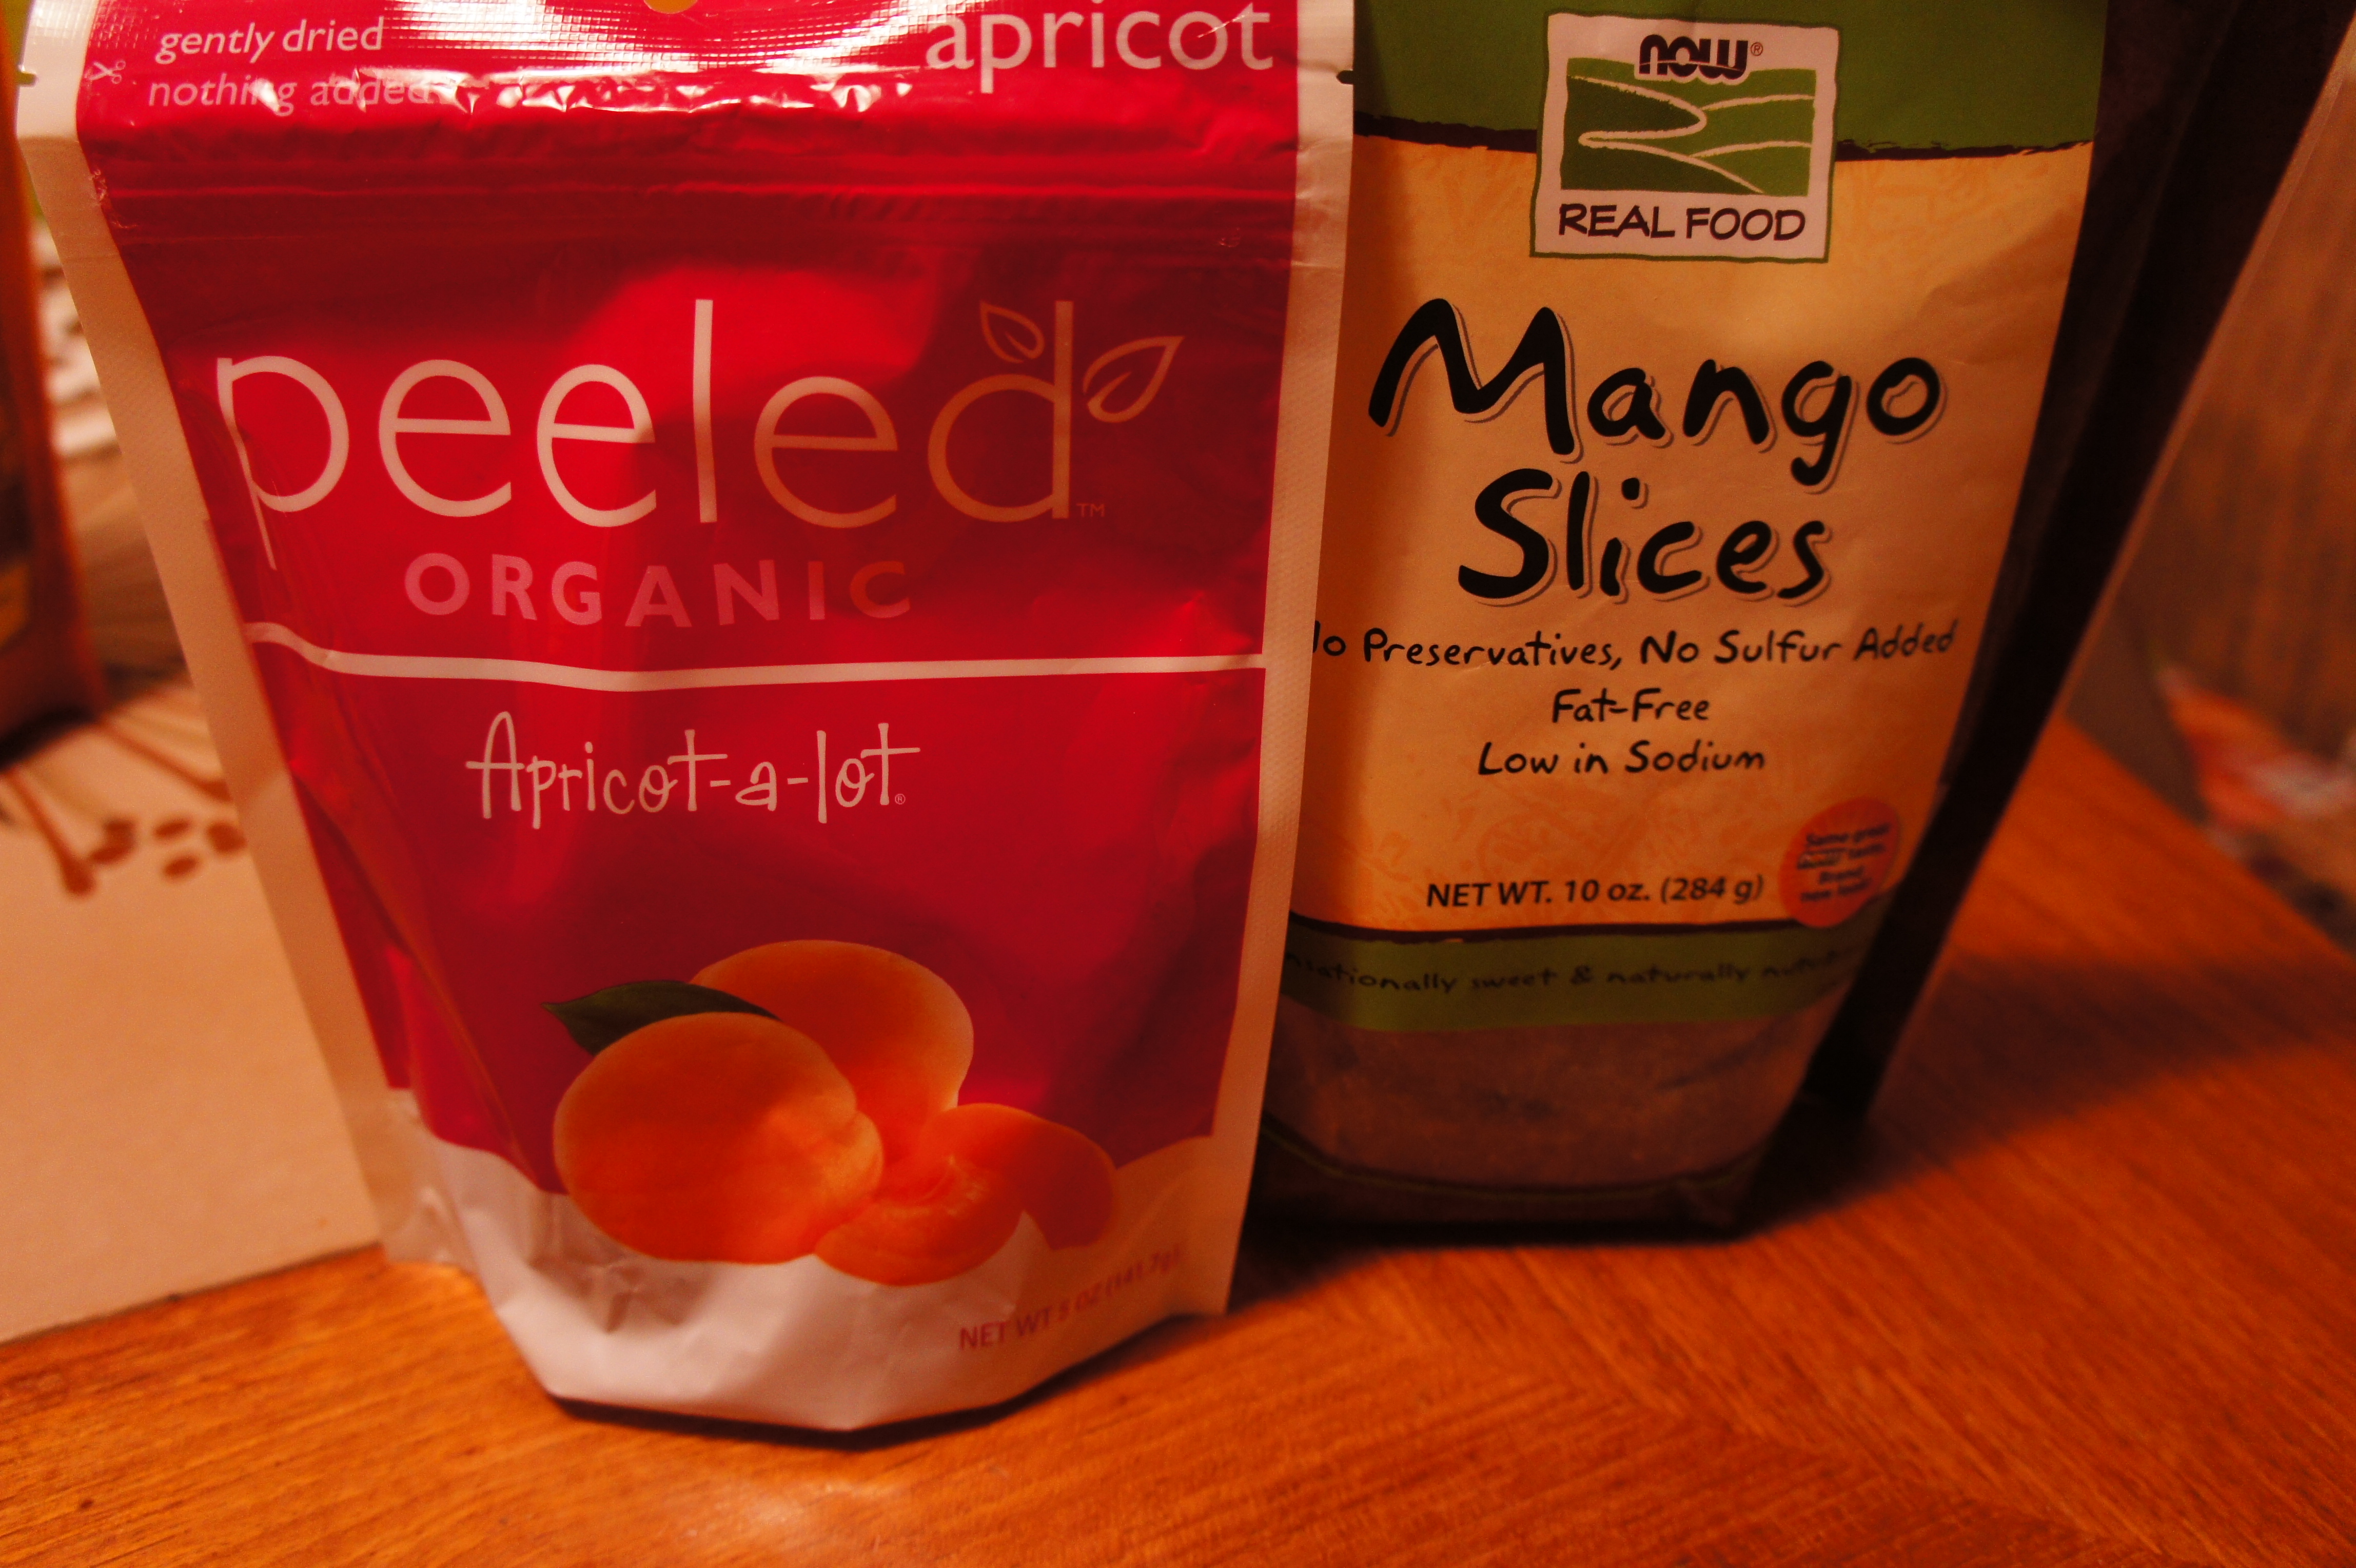
  8. Peeled Dried Apricots and NOW Dried Mango – Just dried fruit. No sulfates or other nastiness, but again, I haven’t tried these two varieties so hopefully they are yummy! (Apricots, $3.99/each. Mangos, $5.49/each)  SONY DSC
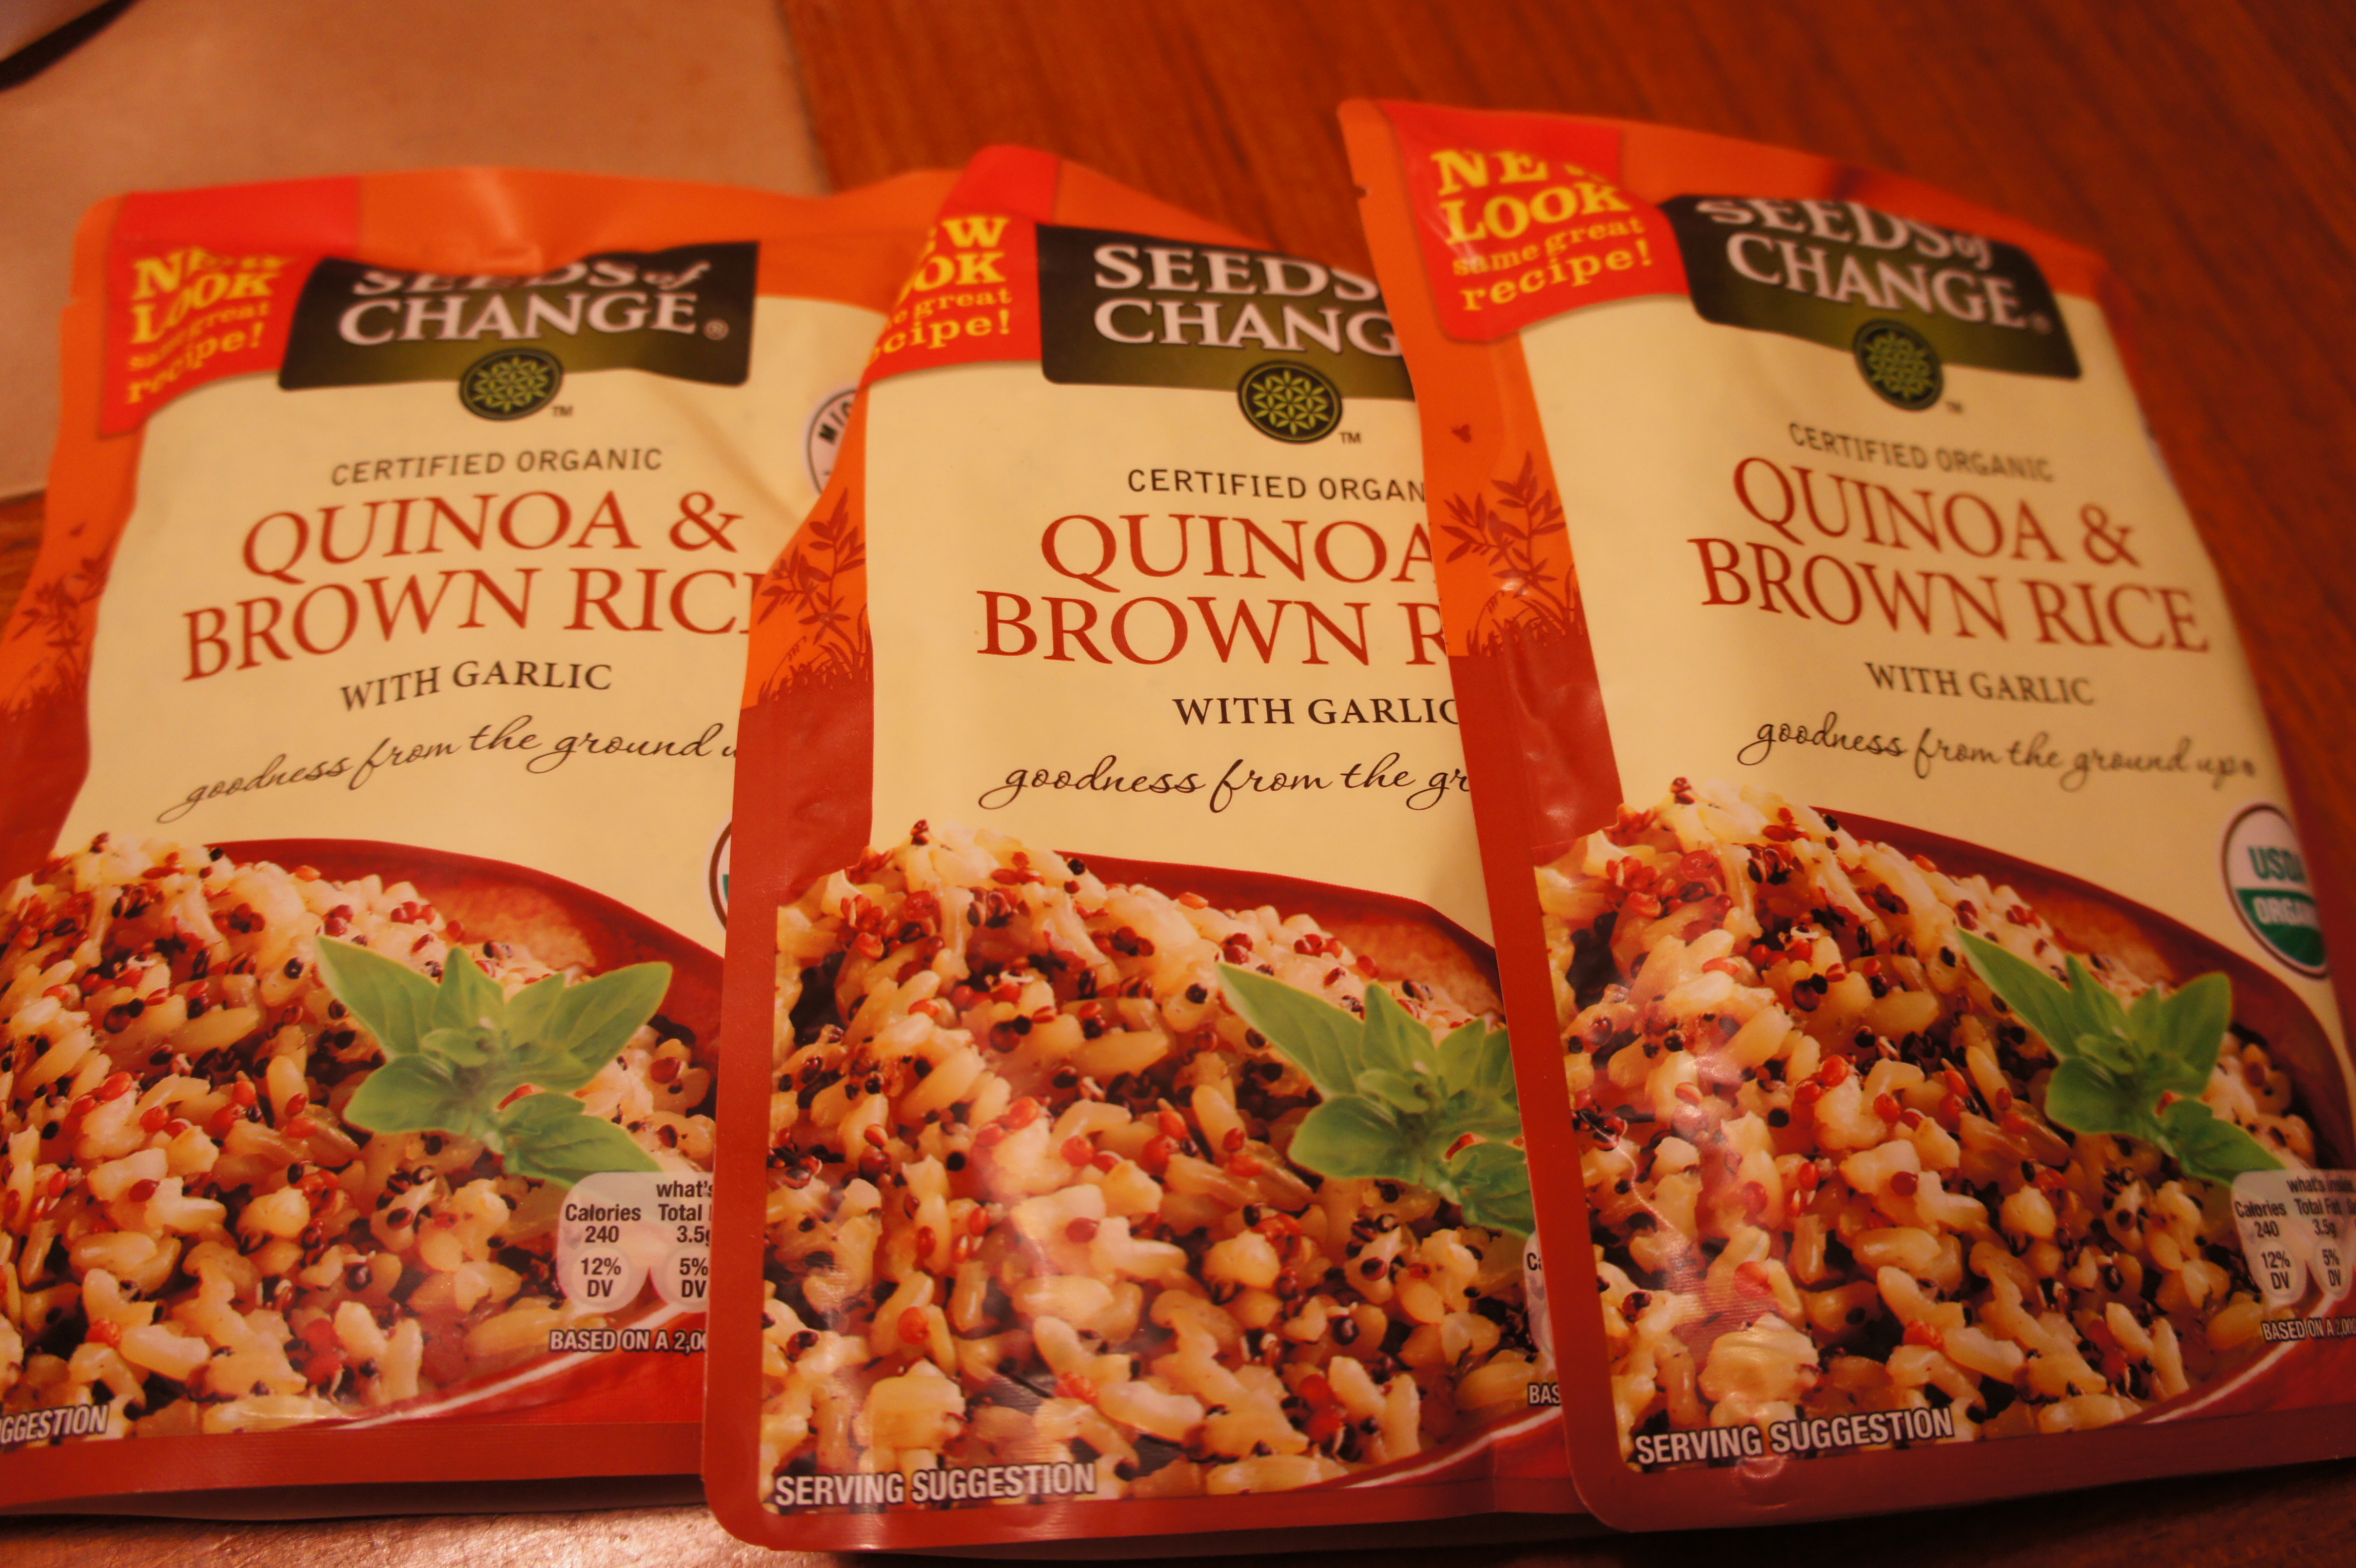
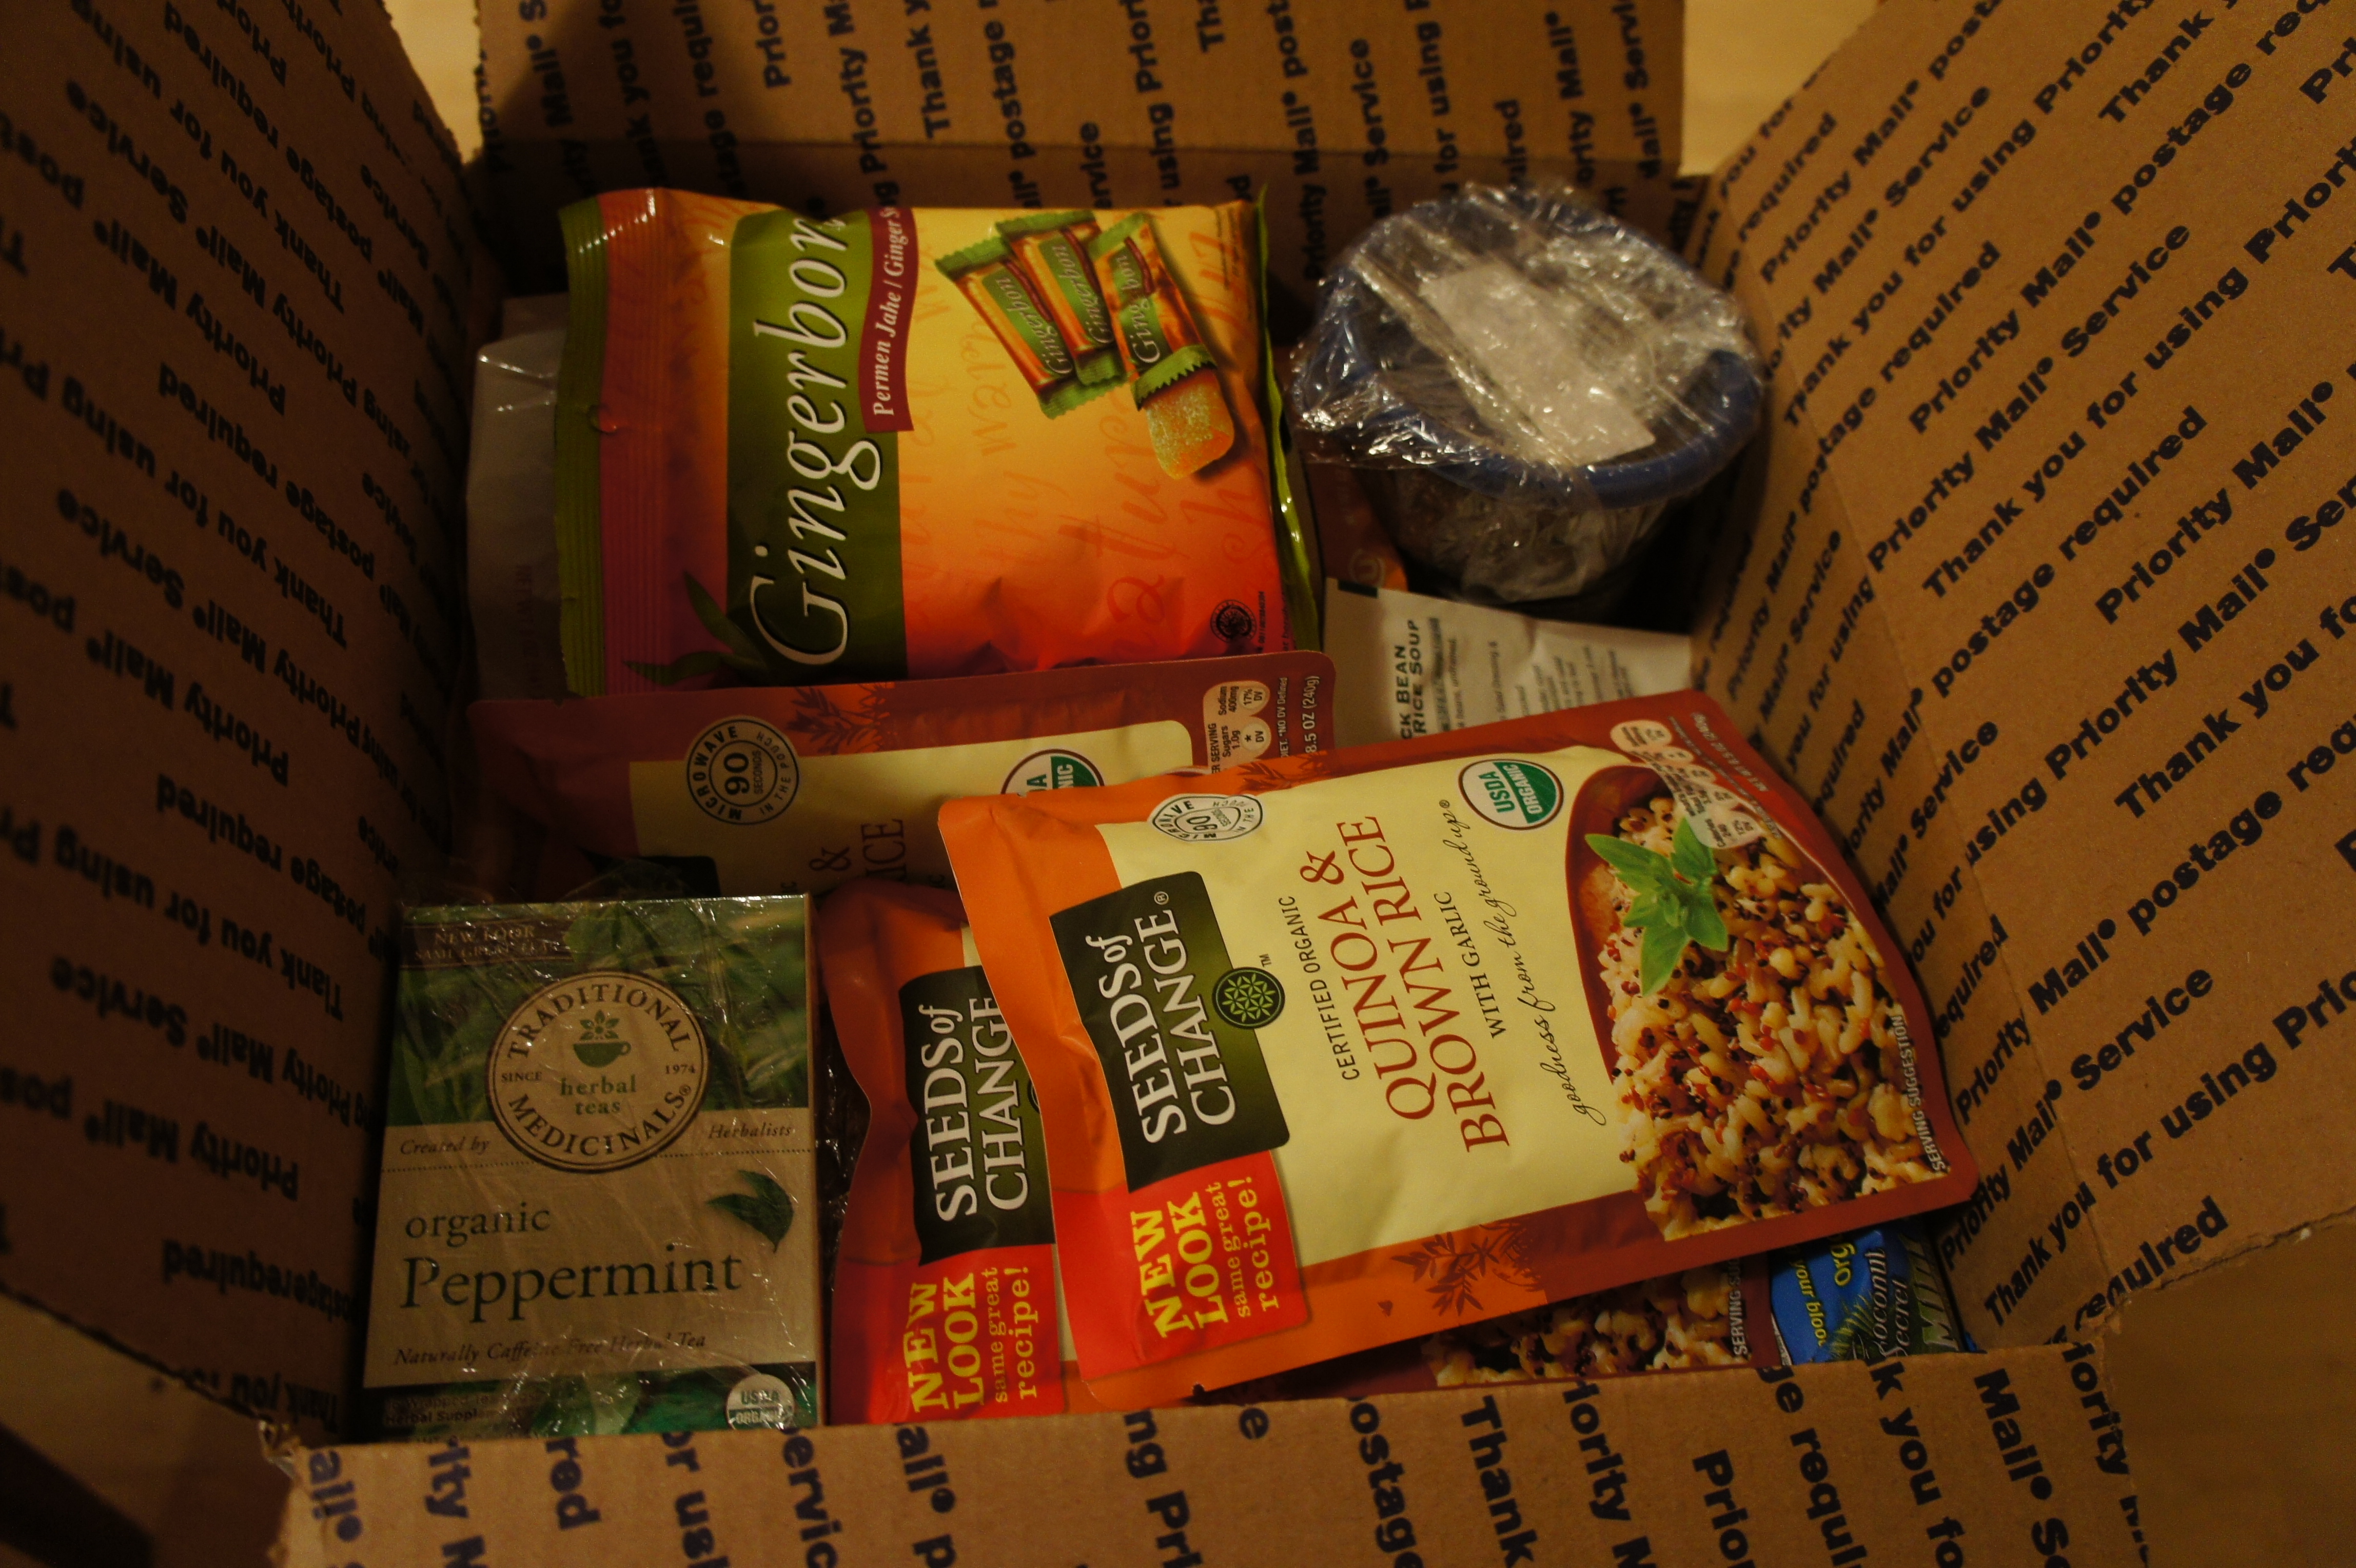
  9. Seeds of Change Brown Rice and Quinoa – For a little variety, some precooked rice and quinoa. These packets aren’t particularly delicious. They are just plain Jane, but they heat up in the packet in the microwave or on the stove top in less than 5 minutes. For people on the go, I think this is a good option. Definitely needs some protein or flavoring, but it’ll do the trick. I bought these at Costco also, but I think it works out to about $1 a packet.  SONY DSC
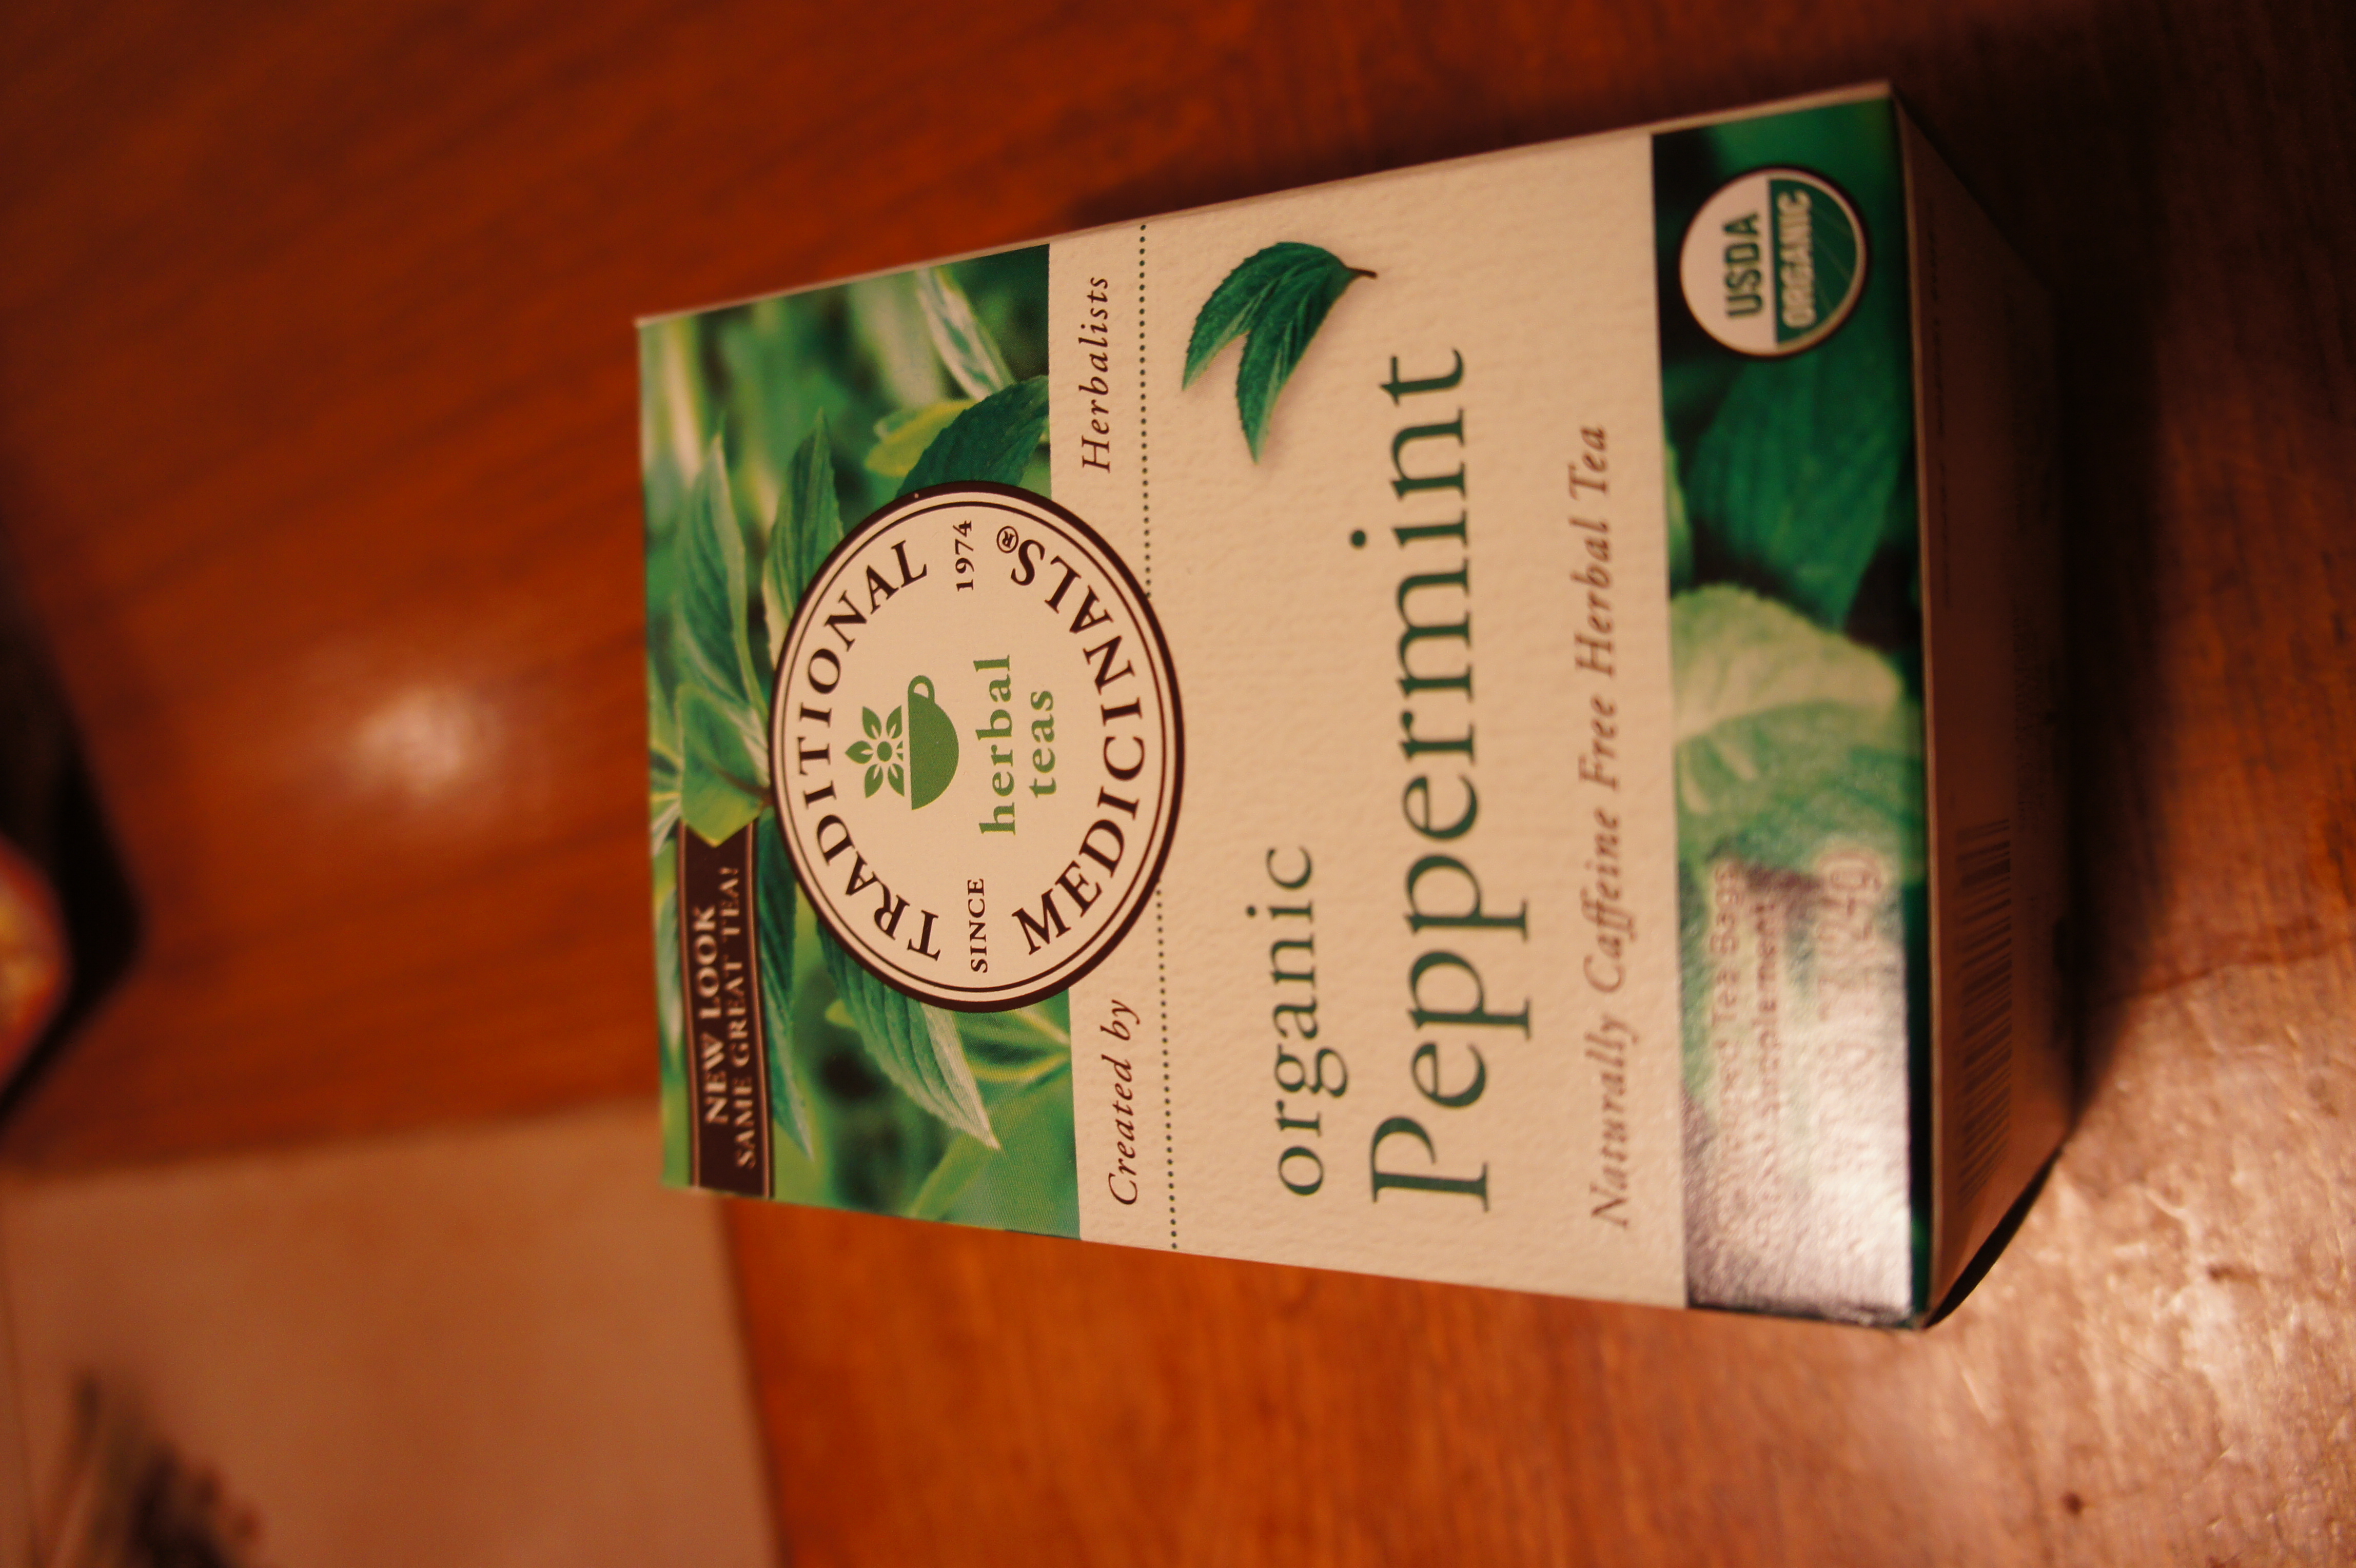
  10. Traditional Medicinals Organic Peppermint Tea – This brand of tea is consistently good, so I snapped this one. ($3.99/each) SONY DSC
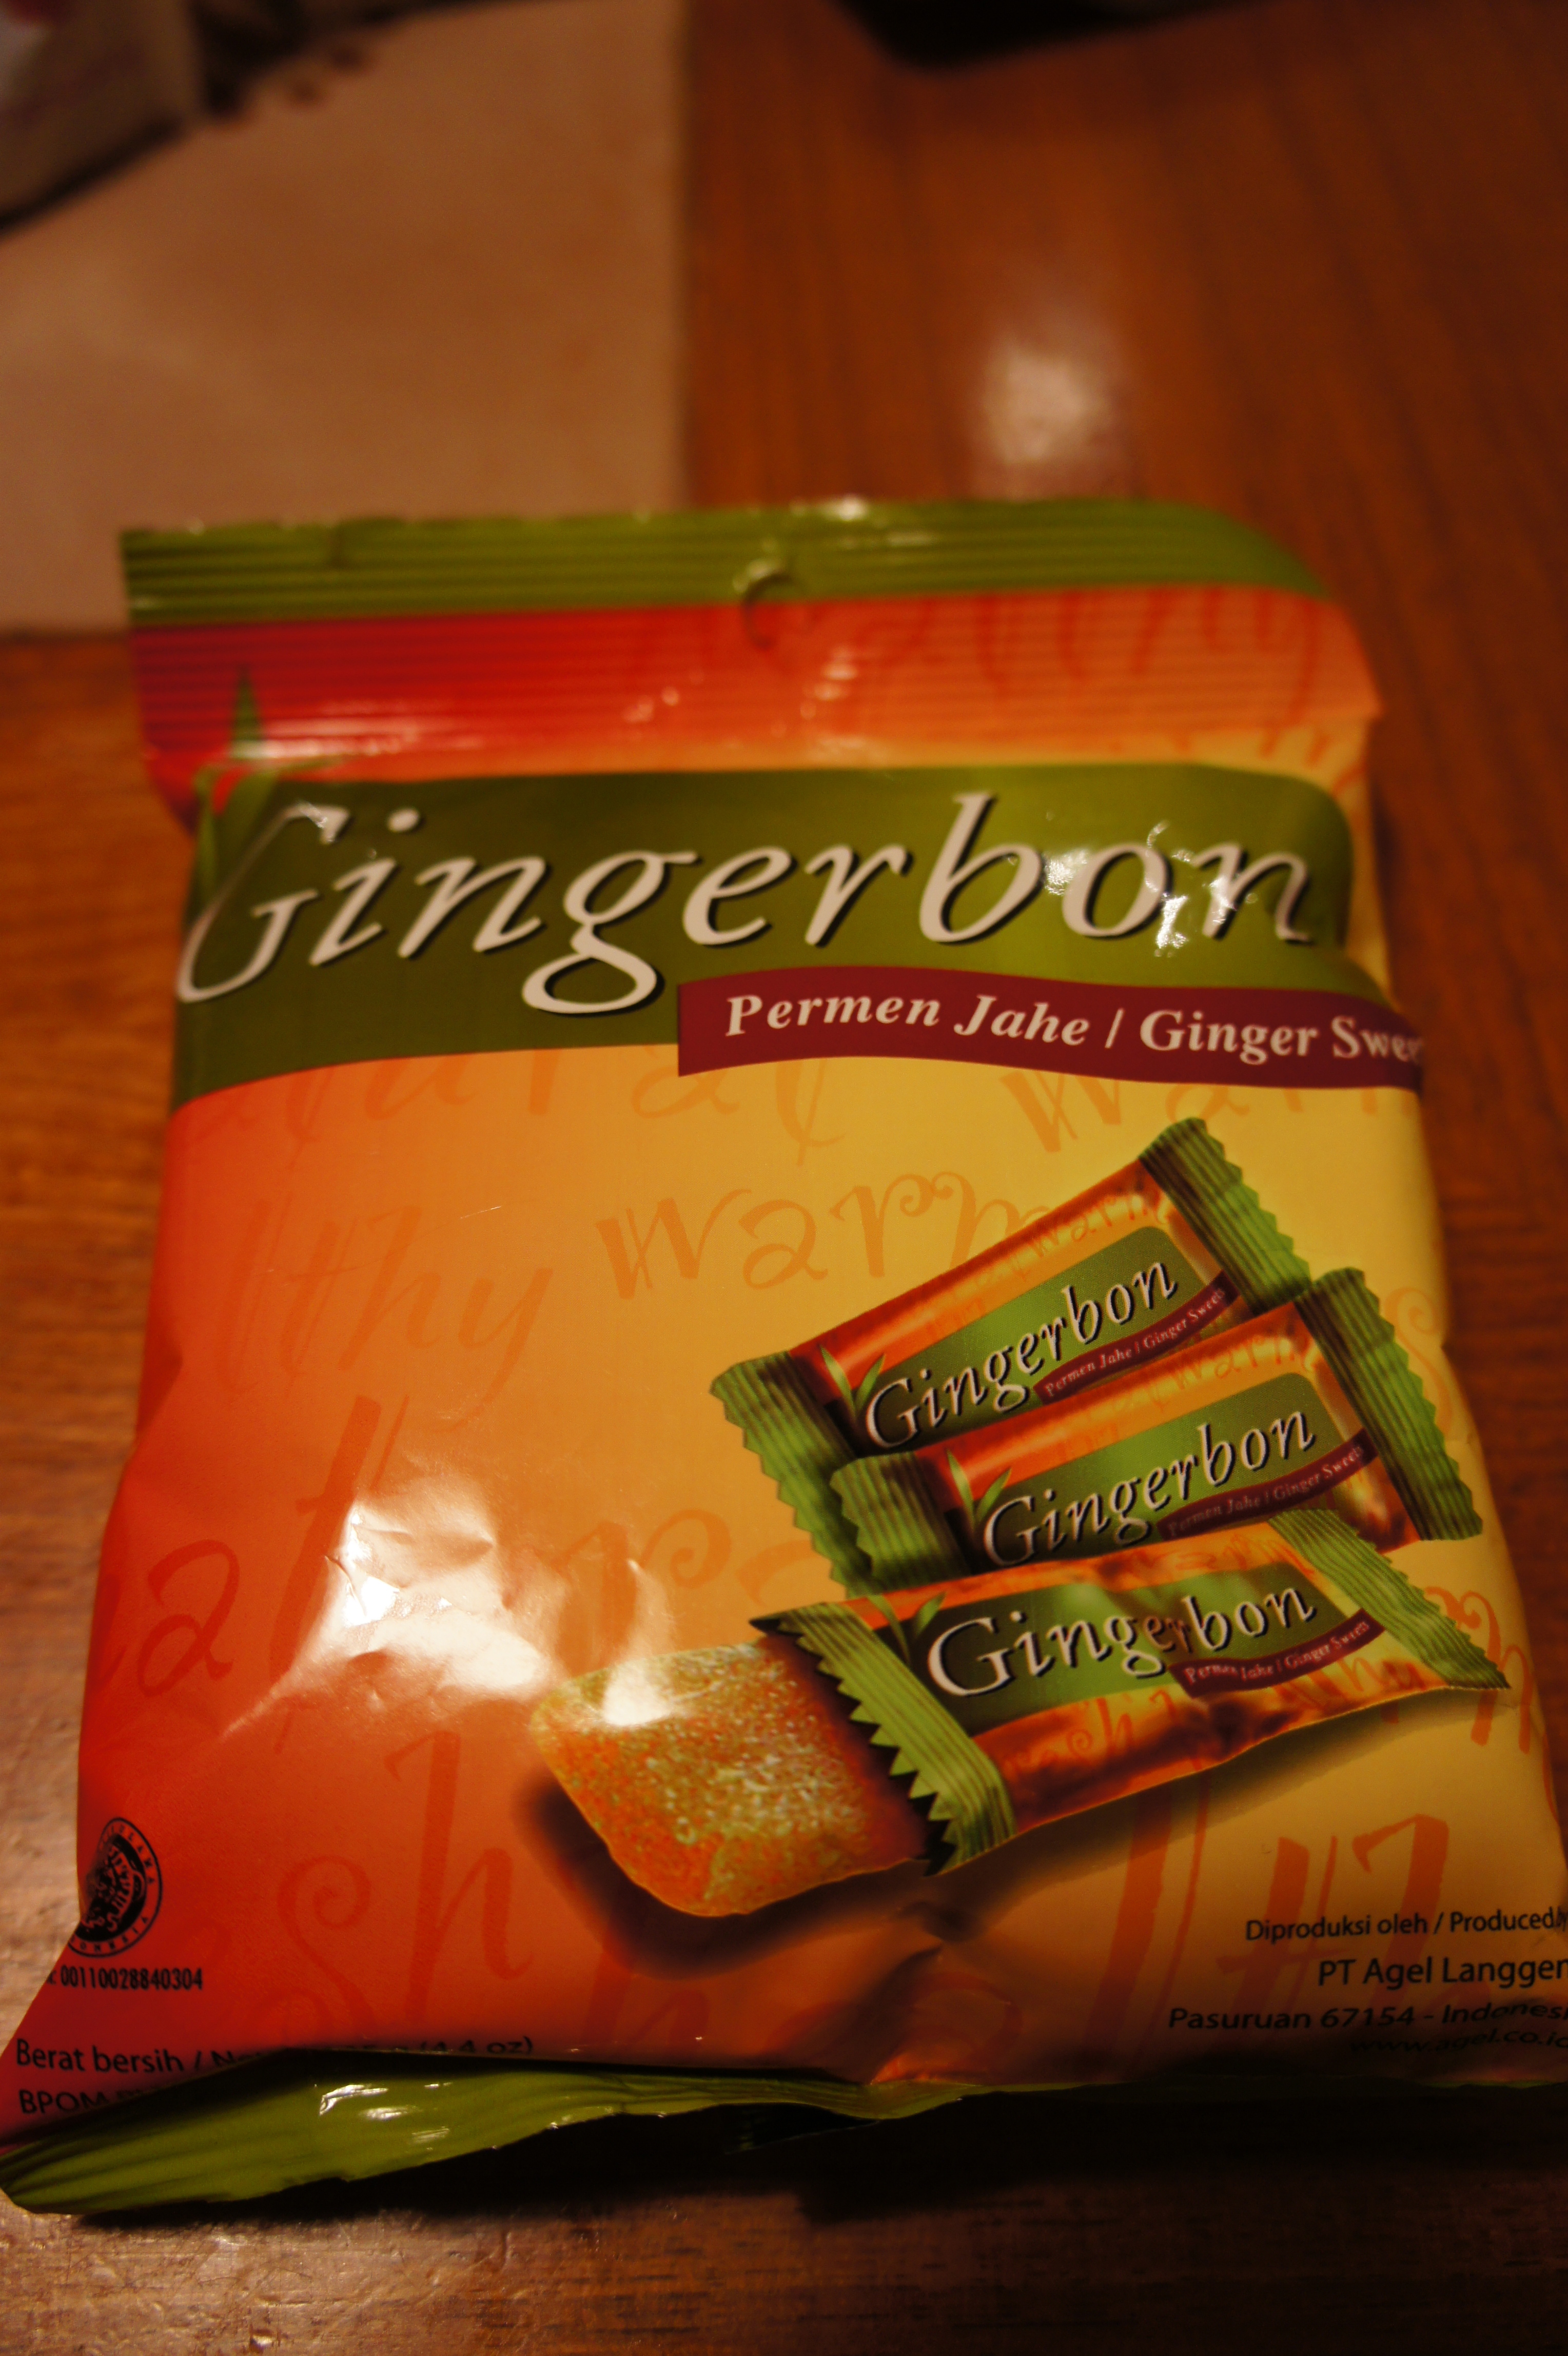
  11. Gingerbon  – Seriously. No words. Chewy. Gingery. Delicious. And made with only 3 ingredients – cane sugar, tapioca, ginger. ($1.00/each) SONY DSC
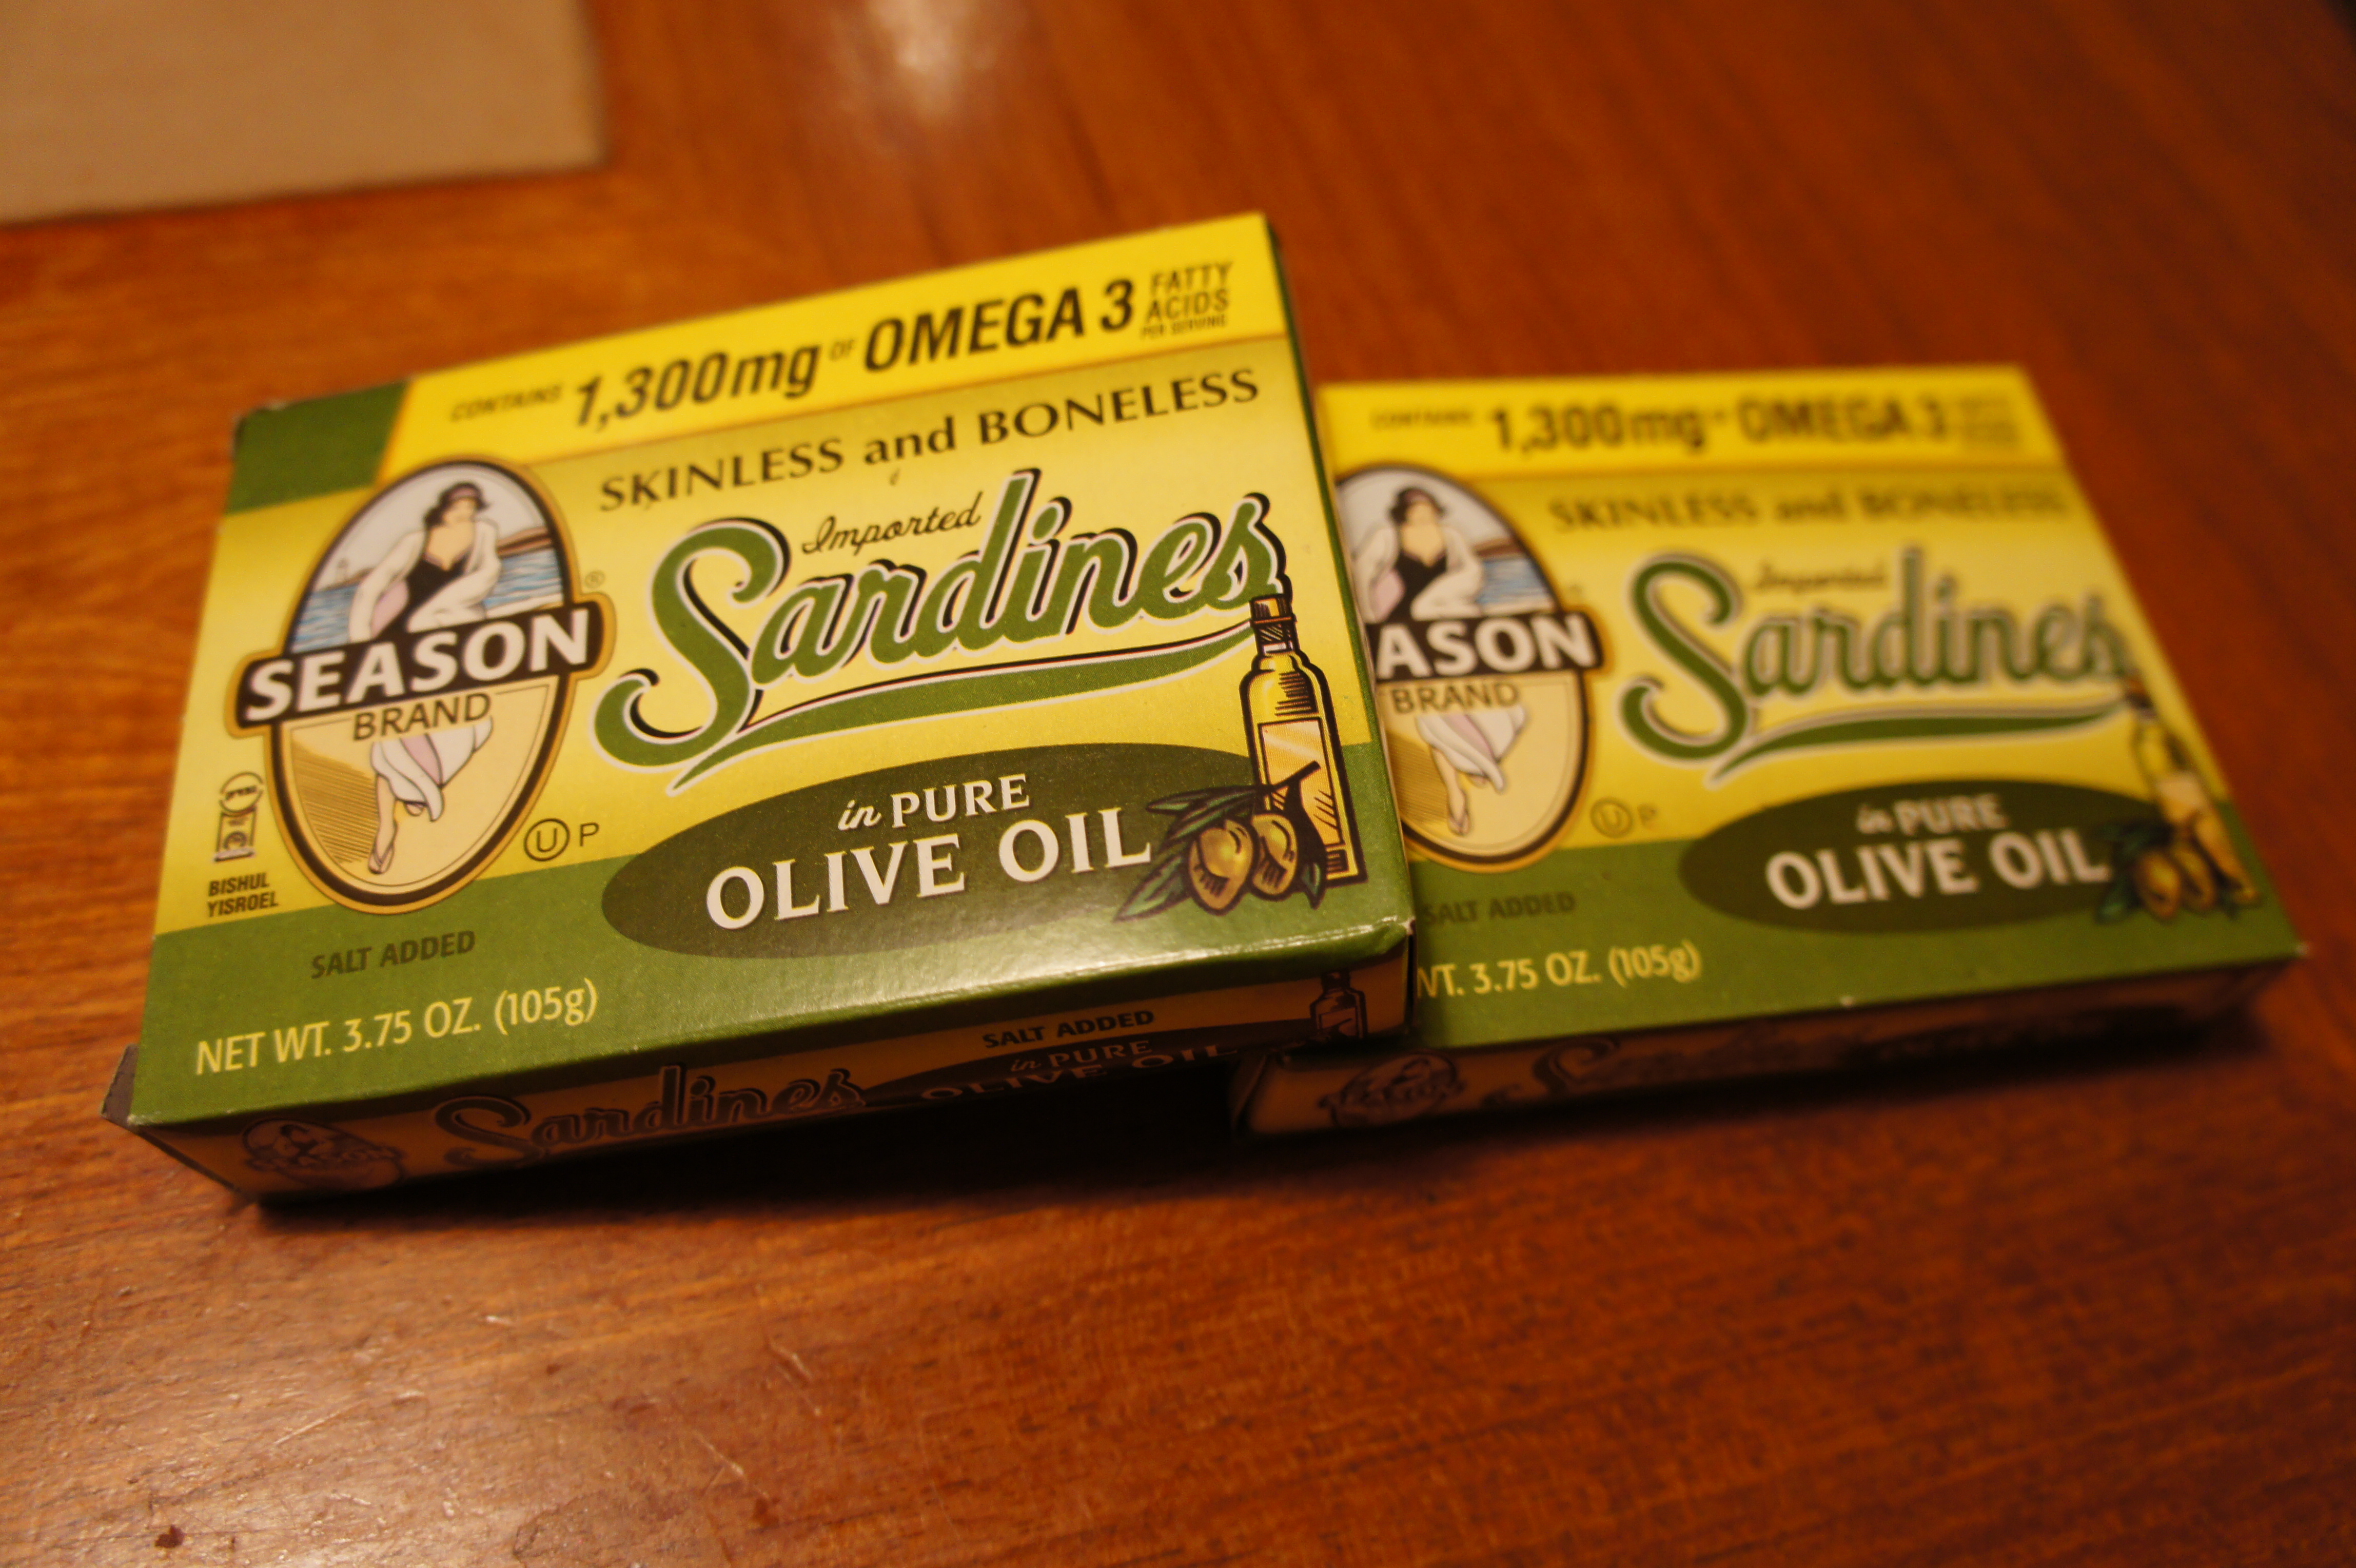
  12. Season Sardines in Olive Oil – Sardines! Good protein and calcium for people who don’t have access to vitamin rich food. Plenty of olive oil to keep you full with good fats. I also bought this at Costco, but I think it works out to about $1.50/box). SONY DSC
  13. Bagged Quinoa – I originally got this HUGE bag of quinoa from my older sister, but then she made the change to be 100% grain free, so I inherited this bag. I’ve been doling it out in 1 cup increments in my care packages, but after the bag is used up I will not be purchasing quinoa unless for very special occasions. More on that decision later (I’m still in the process of doing some research on the quinoa issue). With things that are bagged, I label them with instructions and specific measurements so that whomever receives them won’t have to make the extra step of measuring.SONY DSC
  14. Harry and David Mixed Nuts – I like to pack one serving size of nuts, but I’m an airhead and forgot to pick up extra packets today. I had this one so I’m adding it to the box, but normally I’d have a variety of toasted hazelnuts and lightly salted macadamia nuts.  SONY DSC
  15. Good Seasonings Italian Dressing – My older sister will be having a fit when she sees this, but I threw in a packet of salad dressing powder. It’s good to adding to quinoa before it’s cooked through, sprinkling on meat before grilling, and adding a little flavor to otherwise rather bland food. In the future, I’ll be sending Penzy’s Spices, but I didn’t have a chance to nip out there, so this commercial (probably GMO and chemical stuffed) packet has been included.  SONY DSC
  16. Finally, my personal favorite!! Chia seeds!! I love these always. I bought a giant bag from Costco for $10 and have been packing 1 cup at a time in my care packages. SONY DSC


So this is my final box: It’s still got some room. I’ll add some samples of cosmetics and other knick knacks before sending it out. 

SONY DSC

And don’t forget to fill out that awesome Customs Form for things leaving the USA!SONY DSC


I hope this little list helps you pack yummy things for your loved ones!

What do you pack for your loved ones? Any suggestions on things to add or subtract from my box?


Listen When I Sing This Song (+ the BEST Baked Ziti)

Today… Today I was ravenous… After my run, I demolished an entire tray of sliced carrots and hummus. Then I ate a cheeseburger. Then I spent three hours thinking about how I was SO hungry. Clearly, my body was telling me to eat something! But then I got super, uber fixated on cheesy pasta. So. I made it.

The first time I had baked ziti was at my friend Deirdre’s house. Her mom asked me to come over to play, and I was SO excited. I shouldn’t have been so excited, the minute I arrived Deirdre and I were planted firmly at the kitchen table and told to work on Algebra together while Deirdre’s mother whipped up dinner. Despite being forced to do homework on my “play” date, I was thrilled because Deirdre’s mother made us this thing called “baked ziti.” I distinctly remember wolfing down more than my fair share. It was hot, cheesey, and absolutely amazing. I loved it.

I made baked ziti for years, and it has always been one of my favorites. I made it for my 16th birthday celebration, but I can’t remember having made it since (… seriously?!).  Anyway, I read a couple recipes on my phone before running through the grocery and grabbing the ingredients. From start to finish it took me about an hour and 15 minutes, but it was an active 1 hour and 15 minutes. Either way, baked ziti is always worth the elbow grease!

Kaprise Kitchen’s So-Hungry-I-Can’t-Focus-On-Anything-But-Food Ziti (inspired by several different recipes online, and Deirdre’s mom)

  • 28 oz can of whole tomatoes (you may choose to use more tomatoes if you like to keep extra sauce for rainy days. I did!!!)
  • 1 bunch of basil
  • 1 bunch of parsley
  • 1 bay leaf
  • 2 tablespoons of chopped garlic
  • 1 yellow onion, minced
  • 2 tablespoons of olive oil
  • salt/pepper
  • 1 pound of uncooked pasta
  • 15 oz of full fat ricotta cheese
  • 12 to 16 oz of full fat mozzarella, shredded (also. seriously. NEVER buy that preshredded stuff. It’s bad. VERY bad)
  1. If your oven takes 10000000 years to preheat, now is the time to fire up that babd boy. 375 degrees F.
  2. In a large pot, bring a large quantity (enough for 1 pound of pasta) to boil. Salt lightly.
  3. In another large pot, heat olive oil over medium heat
  4. Mince the onion (really more of a petit dice) and add to the olive oil.
  5. While your onion is softening, peel and smash about 3-4 cloves of garlic. Chop finely and add to onions. Continue to cook gently, be sure not to let the garlic or onion brown. You just want them to be nice and translucent.
  6. Add tomatoes to the garlic/onion. Break apart the whole tomatoes with a fork. Continue on medium/high heat
  7. While your tomato mixture is heating up, your water should boil. Add your pasta and cook for 2 minutes less than al dente. Set a timer so you don’t forget!
  8. As your tomatoes heat, finely chop your fresh basil and parsley. I added a very generous 1/4 cup of chopped herbs, but feel free to adjust based on your preferences.
  9. Add the herbs to the tomatoes, cover and bring the tomato sauce to a boil. I don’t like to cook the heck out of the sauce, so just as it gets to a boil, I turn the heat off.
  10. Now… your pasta timer should have beeped, so drain your pasta in a colander. Shake the excess water from the pasta and return to the pot.
  11. In the pot, add the ricotta cheese and 1/2 of the shredded mozzarella (I added some more chopped herbs too) and 1/2 of the tomato sauce. Stir until the noodles are evenly coated.
  12. Spread your pasta into a large casserole dish (or two separate ones like I did). Dot the top of the pasta with the remaining tomato sauce. Sprinkle with the remaining mozzarella.
  13. Pop into the over for 20 minutes, or until the cheese has bubbled a bit.
  14. ENJOY!

Leftovers keep well for up to 4 days in a tightly sealed container. When reheating, add a little extra tomato sauce to the pan/plate/whatever to help the pasta perk up a bit.

I would have taken pictures, but I was so busy burning my tongue and wolfing this down that I didn’t. Also. Baked ziti photographs pretty terribly, so I doubt you’re missing much.

What did you eat for dinner?


Day 6 and Pumpkin Scones

Hello hello!

I ran 3 miles today. I kept a little bit of a faster pace and got a good work out in. I was actually pretty tired after this run, which is atypical. I sat on the dock in the lake where I ran and chatted with my new found friend while I stretched before heading home.

I didn’t feel like making anything so I picked up a salad and headed to the library. I don’t know what was up with that salad, but I felt terrible afterwards. I drank nearly a gallon of water trying to get rid of that dry, weird taste in my mouth before I gave up and came home. I ate some carrots and downed an electrolyte drink before taking nap… apparently that did the trick because I feel better. Anyway, lesson learned. No more store bought salads.

I also just noticed that I gave myself a good sunburn on my shoulders from sitting out on the dock… so sunblock for tomorrow for sure. Though, I’m told it will be raining so we’ll see how my run shakes out tomorrow.

In the mean time, I want to share a new scone recipe that I tried out. I know… I know… I have so many of these types of recipes on my blog, but since I do spend a rather large portion of my day sitting in the library, I like to have good food that is portable. I’ll do a separate blog post on what I take to the library, but that’ll have to be another day.

So… these are almond flour scones (again) but sweetened with a bit of maple syrup and fluffy from the delicious pumpkin puree. I used this recipe from The Spinach Spot. I just found her blog today, and it’s totally awesome!

I tweaked (as always) and swapped the baking soda for baking powder, added a palm full of hazelnut flour, and skipped on the frosting. They turned out fluffy, moist, and absolutely delicious. I do have quite a sweet tooth, so next time I’ll add a little more maple syrup… maybe chocolate chips or some dried fruit…..

So… what did you all do today? Any weird food experiences like mine? What do you like to avoid??


SONY DSC

SONY DSC

(Sorry for the crap photos, I have terrible lighting in my kitchen and I didn’t try…. O.o)


Summer Ribs and Avocados

This morning, I woke up, ran through my chores at the speed of light before bolting out the door. I have been getting a little stir crazy, so I went to the mall and tried on a number of fun little outfits. I love shopping, and today I had a blast trying on some really fun little summer outfits. I decided after trying on a candy-colored striped dress that it was time for guacamole and some summer barbecue. Nothing says “summer” like a pile of perfectly caramelized ribs and a whole  bunch of zesty guacamole and chips.

So I went to the store… they were having a sale on avocados. 10 for $10!!! So I gathered 10… that is I think I gathered 10! Because when I got home I realized I miscounted and had 11… I think I “stole” and avocado!

Anyway… Today I tried a different method of cooking my ribs. I alternate between the dry rub I wrote about HERE and wet barbecue sauce where I cut up the racks into segments. Anyway… the point is today, the ribs came out absolutely tender and succulent with just the right amount of crisped fat and bubbly barbecue sauce so I thought I would share! The method is easy peasy, but remember to crack a window or run a fan because the heat from the oven definitely makes the kitchen quite warm!

Easy Peasy Oven Baked Pork Ribs 

  • Baby Back Pork Ribs
  • 2 tablespoons of salt
  • 1 tablespoon of cracked black pepper
  • 1 teaspoon of paprika
  • 1 teaspoon of chili powder
  • Barbecue sauce (any variety!)
  1. Preheat the oven to 400F
  2. Rinse and pat the ribs dry
  3. Mix together the salt, pepper, paprika, and chili together.
  4. Sprinkle on both sides of the ribs
  5. Lay ribs on rimmed baking sheets, meat side down.
  6. Cover the entire sheet tightly with foil
  7. Bake ribs in foil wrapped baking sheets for 1 hour and 30 minutes, or until ribs are tender
  8. Drain fat
  9. Return ribs, meat side up, to pans
  10. Brush with barbecue sauce and bake at 375F for 30 minutes, until bubbly and delicious
  11. Serve!

I didn’t take pictures, because I’m a bum these days… but there is a picture of the finished ribs on my instagram… so check that out HERE

Gingery Grilled Avocado and Steak Salad

I’m sure you guys have gathered that I LOVE steak, avocado, and ginger… so naturally I put them all together in this salad for lunch. With ice cold tea, this was the perfect springy lunch. I splurged and bought an organic, grass fed Australian steak.

  • 8 ounces of good steak
  • 1 avocado
  • 3 slices of ginger
  • 1 bunch of arugula (or other lettuce)
  •  1 bunch of sugar snap peas
  • Salad dressing of your choice
  1. Sprinkle steak with good salt and grill. I like mine rare, so I grilled accordingly.
  2. Once your steak has been grilled, let it rest
  3. While the steak is resting, brush the avocado and ginger with a little olive oil. Grill for just a few minutes
  4. Arrange the salad in your favorite bowl and sprinkle with your favorite salad dressing.

*The grilled ginger is rather bitter, but tossed with the salad it imparts a light gingery flavor.

🙂 Enjoy!


SONY DSC SONY DSC SONY DSC SONY DSC SONY DSC SONY DSC

How to Peel Pomegranate Redux

A while back I posted “How to Peel Pomegranate” complete with pictures and detailed information on how I peel my fruits. You can see that post HERE.

Though pomegranate season is nearing the end, I thought I would share this new video that I saw. This gentleman explains and demonstrates how to extra pomegranate seeds efficiently with a knife and wooden spoon. I have yet to try this technique, but from what I see, it looks like an efficient alternative to sitting and gently peeling the fruit. He gives great explanation, so you can watch the demo below.

In case you can’t watch the video… the basics:

  1. Score the pomegranate around the entire circumference of the fruit… the equator. Equidistant from the flowering end and other end
  2. With your fingers, gently “stretch” the edges of the fruit to dislodge some of the seeds.
  3. Over a bowl, flip the pomegranate into your palm (cut side on your hand) and spank the skin of the pomegranate with a wooden spoon until all of the seeds have been dislodged
  4. Remove the larger chunks of pith from the bowl
  5. DONE!

Oh look…

I’m back… as promised!

So… I spent a few days with my older sister and whipped up some things for her to eat through the week. She’s an intern, so she spends a lot of time at the hospital and very little time at home. Since she spends so little time at home, it’s obviously difficult to find delicious and healthy meals to whip up in short periods of time.

This time I made roasted root vegetables and meatballs. Meatballs get popped in the freezer to be cooked freshly each day and the root vegetables are roasted all at once and refrigerated to be eaten for a couple days. S commented that how I made roasted vegetables are better than the way most people make them…

I laughed, because the key to having really delicious roasted vegetables is patience. There is a distinct difference between the temperatures at which vegetables are cooked that makes them more or less palatable… and how long you cook them.

The general rules I follow when roasting vegetables: (At some point, I’ll get more specific and even bring pictures!!)

  1. Use good quality olive oil, salt and pepper. I normally coat the baking sheet with a light coat of oil, toss the vegetables on the sheet with another generous drizzle of oil with the salt and pepper
  2. Space the vegetables out – the closer the vegetables are, the more likely they are to steam instead of roast… and you end up with uneven slices and soggy vegetables
  3. Roast at higher temperatures. I normally roast my vegetables at 425 F or 450 F. The higher temperature helps the vegetables get that desirable golden crust and cooks the insides of the root vegetables into a fluffy texture.
  4. Roast longer. There is a distinct difference between well cooked vegetables and undercooked. I think this is what sets my roasted vegetables apart from most others… I cook mine for a LONG time. I normally put a tray of cauliflower and carrots into the oven at 425 F for 65 minutes. Most recipes I’ve seen for comparable roasted vegetables say about 30 minutes. Vegetables take on an entirely different texture once they have been roasted for longer. Sweet potatoes start to caramelize and take on a chewy texture that rivals the best caramels. Carrots become plush but toothsome bites that are like distilled sunshine.
  5. Rotate generously – I rotate my pans about 3 or 4 times. I often switch from the bottom to top racks to ensure that the vegetables roast evenly and flip the pans around so everything is browned nicely.

Next time? There will be pictures. So many pictures.

xoxo

-H

Comfort Food: Galbi Jjim (Braised Short-ribs)

This is a recipe for Korean braised beef short-ribs… my way. My mother used to make this for me with the proper accoutrements (ginko, chestnuts, dried mushrooms, and Korean radish), but I was delirious, compliments of my cold, at the supermarket so I made do when I got home with a random assortment of food items. The recipe itself is pretty straightforward, but it is important to properly prep the short-ribs before braising them with the sauce and vegetables, otherwise your dish will been extremely greasy because of the heavy marbling in the beef.

Galbi Jjim

  • 2 pounds of bone-in beef short-ribs
  • 1 1/2 cups of filtered water
  • 1/4 cup of soy sauce
  • 2 tablespoons of sesame oil
  • 3 tablespoons of fresh chopped garlic
  • 1 small sliced onion
  • 1 teaspoon of brown sugar
  • 1 small bunch of sliced green onion
  • 2 King Oyster mushrooms, sliced
  • 2 red potatoes, cubed
  • 2 carrots, 1 inch slices
  1. Cut the short-ribs, one bone per piece.
  2. Place the short-ribs into a large pot, with the bone vertical. Fill the pot with cold water and allow the beef to soak for 1 hour. Change the water three to four times.
  3. Change the water in the pot one final time, and bring the pot of ribs and water to a rolling boil
  4. Simmer the ribs for 15 minutes
  5. During this time, whisk the water, soy sauce, sesame oil, garlic, and white onion into a bowl.
  6. Remove the ribs with tongs and place on a clean dish. (I also rinsed the ribs under cool water once more to remove a little extra fat)
  7. Pour the remaining liquid into a heat-proof bowl*(because of the high fat content, flushing the liquid down the sink will clog your drain. Instead, let the liquid cool and the fat to float to the service. Discard the fat in the trash. The remaining poaching liquid is beef stock that you can either keep for another dish, or discard. I kept it and put it in my beef stew I made the following morning)
  8. Clean out your pot, and then place the ribs back inside of the pot.
  9. Add the soy sauce mixture, and simmer over low heat for 15 minutes
  10. In the mean time, slice the potato, carrot, green onion, mushroom (and really any other vegetable that you want to add, just make sure it’s a sturdy vegetable that will hold up after simmer for an hour).
  11. Add the vegetables to the pot, and using a spoon drizzle some of the liquid over the vegetables
  12. Cover tightly and simmer over low heat for 1 hour. (DO NOT OPEN THE LID OF THE POT FOR ONE HOUR)
  13. Check the beef after 1 hour by sliding a knife into the meat. If your knife slides in the meat easily, the dish is ready. If the meat resists, then cover and simmer for another 15 to 30 minutes.
  14. Serve with steamed rice 🙂

Notes on this recipe:

  • This is not a traditional Galbi Jjim recipe… at all
  • Use a heavy pot, like a Le Creuset, with an equally heavy lid
  • Do NOT open the lid of the pot while the meat is simmering, the steam that forms inside of the pot is essential in allowing the meat to cook evenly.
  • Be sure to use LOW heat to ensure your braise doesn’t burn and that you have even cooking
  • Two pounds of short-ribs is enough for two to three people
  • Left-overs keep well for up to 3 days (That’s how long mine stayed in my fridge before I devoured it, I’m sure it’s good for up to a week, but I can’t guarantee past 3 days).

Links to Click

How to Peel Pomegranate

I love pomegranate. Last week, I finally got to a good grocery store with beautiful, shiny pomegranates – so I bought 6. I wish I had bought more because I’ve run out. :::pitiful sigh:::

As an avid pomegranate lover, I have perfected the technique to peeling this fruit that frequently leave people covered in splotches and sticky juice. I have read some suggestions like “submerse the entire fruit in water and peel it under water….” Not to be rude, but do you know how much water you need to submerse the pomegranate? And do you know that instead of having little red dots of juice everywhere, you just have soggy pomegranate peel and water splashed everywhere and some red dots of juice anyway! I know. I’ve tried it…. more than once with very poor results. Or I’ve read that you should roll the fruit around until it’s mushy and then poke a hole in the fruit to drink out the juice…. I don’t know about you but that sounds like a lot of work for juice you can buy in an adorable bubbly bottle from POM. Plus, I want to eat the seeds!

So, here is how I do it.

  1. Buy pomegranate that are smooth, shiny, and dense. The denser the fruit, the more likely you are going to get sweet seeds
  2. If this is your first time peeling pomegranate, change into black clothing so you don’t ruin anything. Pomegranate has bright red juice that turns purple and blue when you try to wash it out… and with Shout! it turns into a vibrant neon blue. So, black it is.
  3. Wash the pomegranates
  4. Cut the flowering end of the pomegranate off (I called this the top of the fruit, until I saw a pomegranate tree and apparently it’s the bottom!!). Try to avoid cutting into the seeds
  5. Cut the pomegranate in half, about 1 inch into the entire fruit
  6. Cut at a 90 degree angle another 1 inch cut into the fruit (see pictures below for an accurate image)
  7. Flip the cut side down facing a large bowl and pry the fruit apart. Try to put your hands and the fruit as far into the bowl as you can so that the juice and seeds don’t spray as you separate the quarters of the fruit
  8. Repeat this process with as many pomegranates as you plan on peeling (in the photos, I’m peeling 3 very large pomegranates at once).
  9. Line the quartered pomegranate up on a plastic mat or surface that doesn’t stain
  10. Starting with one quarter, face the seeds into the bowl and break the piece in half. This should expose more of the seeds.
  11. Gently remove the membrane of the fruit and dislodge the seeds into the bowl.
  12. I keep a produce bag open next to me so I can collect the peel and membrane as I peel.
  13. Continue splitting the quarters apart and dislodging the fruit

Personally, I like put the seeds in a huge bowl, and grab a spoon and eat the entire bowl while I watch TV or read a book. I love the tartness and the little bursts of juice. But, in attempt to keep my stash a little longer, I put the seeds in an airtight container and refrigerate the seeds. I sprinkle them (at least 1 cup!) over some Greek yogurt and homemade granola (I’ll post that recipe soon).

Cut the flowering end off

Cut in half about 1 inch into the fruit

Now, the second cut, perpendicular to the first

Pry the quarters apart

Set the quarters on a flat and non-staining surface, set up your bag and bowl and beginning dislodging the seeds

And with a little patience – VOILA!!

Did you know?

I love surprises. I like facts that you wouldn’t expect and recipes that are so easy it’s amazing. So it was no surprise that when I discovered I could make cranberry juice, I was thrilled. I have been making my own tart and lime spiced cranberry sauce for Thanksgiving for years, but it never occurred to me that I could in fact make my own jewel toned tart juice. I adapted this recipe from here (http://www.mytartelette.com/2006/11/mighty-cranberry.html). Instead of sugar, I use clover honey and instead of discarding the cranberries after extracting the ruby juice, I whizz them in a blender with ice cubes and blueberries.

Cranberries, juiced and smoothied

  • 3 to 4 cups of cranberries, picked through (discard any mushy berries and pick out stems)
  • 1 to 2 quarts of water (I used my biggest pot and filled it with cold, filtered water)
  • 1/4 cup of your favorite honey (if you prefer sweeter juices, you dial this up to 1/2 a cup)
  • Handful of blueberries (or any other fruit. Peaches, oranges, banana, apples, are all good options)
  1. Add water to pot and bring to a rolling boil
  2. Add the cranberries and continue to boil until all of the berries have burst and the water has turned a beautiful red.
  3. Remove from heat
  4. Strain the juice and berries through a fine mesh sieve or cheese cloth, do not press on the berries
  5. Stir in honey until dissolved
  6. Allow juice to cool.
  7. JUICE: Put 1/2 cup of leftover berries* and a handful of blueberries and whizz in a blender with a few cubes of ice. Drink!

* You can feel free to discard these if you want, but as a poor as a church mouse law student, I try to maximize the yield for all of my purchases. (You know… so I have some money left over for pretty things). You will have about 2-3 cups of berries (they will be a little mushed) leftover. You can freeze these in 1/2 cup increments to add to any of your smoothies.